How to take off iron on patches? Sorted. This ain’t your nan’s craft session, fam. Iron-on patches are a vibe, but sometimes you gotta ditch ’em. We’ll break down the whole process, from prepping the fabric to dealing with those pesky adhesion issues.
Get ready to slay those stubborn patches!
Iron-on patches are a total game-changer for DIY projects, but removing them can be a right pain. This guide’ll give you the lowdown on safely and effectively removing those iron-on patches, no matter the material or how stubborn they are.
Introduction to Iron-on Patches
Iron-on patches are a popular and versatile way to add style, personalization, or functionality to clothing and other fabrics. They’re essentially pre-cut pieces of material, often with designs or logos, that are adhered to a garment using heat and pressure. This method is simple and widely accessible, allowing for quick and easy customization.These patches are more than just decorative elements; they can be used to repair tears, add flair to uniforms, or even create unique pieces of art on clothing.
The ease of application, coupled with the diverse range of materials and designs, makes them a favorite among crafters, DIY enthusiasts, and fashion-conscious individuals.
Common Materials Used
Iron-on patches are crafted from a wide variety of materials, each contributing to the patch’s appearance and longevity. Common materials include woven and non-woven fabrics, vinyl, and even embroidered designs. The choice of material directly influences the patch’s texture, durability, and suitability for different projects.
Types of Iron-on Patches
Iron-on patches come in various types, catering to different needs and aesthetics. Understanding the distinctions between these types is key to selecting the right patch for a specific application.
| Patch Type | Material | Typical Use Cases |
|---|---|---|
| Fabric Patches | Woven or non-woven fabrics, often with printed or embroidered designs. | Adding decorative elements to clothing, repairing small tears, creating unique patterns, embellishing accessories. |
| Vinyl Patches | Durable vinyl material with printed or heat-transferred designs. | Creating logos, emblems, or graphic designs, adding personality to backpacks, jackets, and bags. They’re often used for branding. |
| Embroidered Patches | Fabric with intricate embroidery designs. | Adding a sophisticated and detailed look to clothing, personalizing items with unique embroidery. |
| Leather Patches | Leather material, often with embossed or printed designs. | Adding a touch of ruggedness and sophistication to jackets, bags, or accessories. These patches often complement leather goods. |
This table provides a basic overview of the different types of iron-on patches, highlighting the key distinctions in material and typical use cases. Each type offers unique characteristics that make it suitable for specific applications.
Preparing the Fabric
Getting the fabric ready is crucial for a successful iron-on patch application. A well-prepared surface ensures the patch adheres properly and looks its best. Proper preparation involves pre-treating the fabric, cleaning the application area, and ensuring the fabric is ready to receive the patch.
Pre-treating the Fabric
Pre-treating the fabric, particularly for delicate or heavily textured materials, prevents shrinking or distortion during the ironing process. This step is essential for maintaining the fabric’s integrity and the patch’s shape. It also helps to remove any loose threads or dirt that might interfere with the patch’s adhesion. The specific pre-treatment depends heavily on the fabric type.
Cleaning the Application Area
Thorough cleaning of the fabric area where the patch will be placed is essential. Dirt, dust, or loose fibers can prevent the patch from adhering completely. Use a soft brush or a damp cloth to remove any visible debris. Ensure the area is completely dry before ironing.
Importance of Ironing the Fabric Before Application
Ironing the fabric before applying the patch creates a smooth surface for the adhesive to bond to. This step helps the patch adhere firmly and evenly. The fabric needs to be completely wrinkle-free for optimal results. Ironing ensures that the patch will lay flat and not bunch up or shift after the application.
Fabric Preparation Guide
This table Artikels pre-treatment and ironing recommendations for various fabric types.
| Fabric Type | Pre-treatment Steps | Ironing Settings |
|---|---|---|
| Cotton | Spot clean any stains. | Medium heat, using a pressing cloth. |
| Polyester | Wash the garment to remove loose threads and debris. | Low to medium heat, using a pressing cloth. |
| Linen | Treat with a fabric protector to enhance adhesion. | Low heat, using a pressing cloth. |
| Synthetics | Pre-wash to avoid shrinking and distortion. | Low heat, using a pressing cloth. |
| Denim | Clean the application area thoroughly. | Medium heat, using a pressing cloth or a dedicated denim press. |
| Silk | Apply a small amount of fabric protector. | Very low heat, using a pressing cloth. Steam may damage the fabric. |
Positioning the Patch
Getting the iron-on patch perfectly placed is crucial for a professional-looking result. A slightly off-center patch can ruin the entire project, so precise positioning is key. A good understanding of the patch’s placement, along with the fabric’s surface, ensures a seamless finish.Careful positioning prevents wrinkles and misalignment, which are common issues that can be avoided with a few simple techniques.
This section details various methods for achieving accurate patch placement, including using stencils and templates for complex designs.
Importance of Precise Patch Positioning
Accurate patch placement ensures the patch adheres properly to the fabric and looks aesthetically pleasing. A poorly positioned patch can make the garment look amateurish, which is why attention to detail is paramount. This meticulousness ensures a smooth, wrinkle-free finish.
Methods for Accurate Patch Positioning
Several methods can help you achieve precise patch positioning. Understanding these methods allows you to select the best technique for the particular patch and fabric.
- Visual Alignment: This method involves aligning the patch’s edges to existing features on the fabric, such as seams or patterns. Visual alignment works best for simple patches and straightforward designs. You need a clear understanding of the fabric’s design and the patch’s Artikel to correctly position it.
- Tracing and Marking: Trace the patch’s Artikel onto the fabric using a pencil or fabric marker. This creates a visual guide for positioning the patch accurately. This technique ensures a perfect fit and avoids misalignments, especially for intricate designs.
- Using a Ruler and/or Measuring Tape: If the patch needs to be placed at a specific distance from a seam or edge, use a ruler or measuring tape. This method is useful for projects that require precise measurements. Measure the fabric’s dimensions to ensure the patch is placed in the right location, making it especially important for items with precise sizing.
Avoiding Wrinkles and Misalignment
Wrinkles and misalignment can mar the appearance of your finished project. Proper preparation is key to preventing these issues.
- Layering: Place a thin, smooth layer of fabric or paper under the patch to ensure even pressure during ironing. Avoid using too thick a layer, which could cause uneven heat distribution. This is essential for preventing wrinkles and ensuring a uniform adhesive.
- Even Pressure: Apply even pressure during ironing to prevent uneven adhesion. Use a heat-resistant surface or ironing board cover for added safety and stability. Using even pressure avoids uneven heating and ensures uniform adhesion of the patch to the fabric.
- Careful Ironing: Iron the patch for the recommended time and temperature, avoiding any unnecessary movements that might shift the patch. Be sure to follow the manufacturer’s instructions for specific iron settings for the patch and fabric.
Using Stencils or Templates for Complex Patch Placement
For intricate designs or large patches, a stencil or template is essential. Templates provide a precise guide for complex patch placements.
- Creating a Stencil: Draw the desired design onto a sturdy material like cardboard or plastic. Cut out the design to create a stencil. Using a stencil is particularly helpful for complex designs, ensuring that the patch is placed in the exact position.
- Using a Template: For pre-made templates, follow the instructions on the template. Templates often include guidelines and measurements for correct placement, allowing for accuracy and a neat finish. This is especially helpful when dealing with unusual shapes or intricate patterns.
Patch Positioning Methods Comparison
| Method | Advantages | Disadvantages ||—|—|—|| Visual Alignment | Simple, quick | Less precise for complex designs || Tracing and Marking | Easy to visualize, good for intricate designs | Can be time-consuming || Ruler/Measuring Tape | Precise, accurate positioning | Requires precise measurements || Stencil/Template | Precise for complex designs, avoids misalignment | Requires extra preparation time |
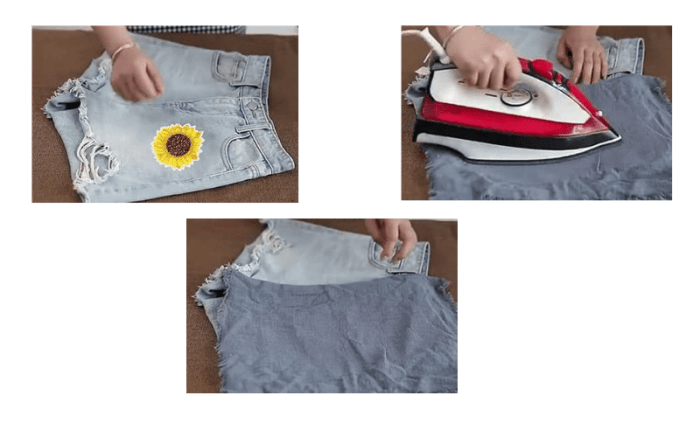
Ironing the Patch
Now that your patch is perfectly positioned, it’s time for the crucial step: ironing. Proper ironing ensures a secure and long-lasting bond between the patch and your fabric. Different patch materials require different ironing conditions, so careful attention to detail is essential.Ironing is a straightforward process, but understanding the nuances of temperature, time, and technique can significantly impact the outcome.
Incorrect ironing can lead to a poorly adhered patch, or even damage to the fabric. This section will guide you through the proper procedures for various patch types and sizes.
Temperature Settings for Different Patch Materials
Different iron-on patches are made from various materials, each with its optimal ironing temperature. Overheating can melt certain adhesives, resulting in a ruined patch, while under-heating might not provide a strong enough bond. Understanding the recommended temperature for your patch material is crucial. Always refer to the manufacturer’s instructions on the patch packaging or website.
Duration of Ironing for Different Patch Types
The duration of ironing is as important as the temperature. A short ironing time may not adequately activate the adhesive, resulting in a weak bond. Conversely, excessive ironing time can lead to over-heating and damage to the patch or fabric. Always adhere to the manufacturer’s guidelines for optimal bonding time.
Ironing Technique for Various Patch Sizes
The ironing technique should be adapted to the size of the patch. Small patches require a gentler touch and more controlled movement, whereas larger patches need a more comprehensive approach to ensure even heating across the entire surface area. A slow, methodical ironing is key for a uniform and successful result.
Ironing Techniques for Different Patch Shapes and Sizes
For round patches, use a circular motion, applying even pressure across the entire surface. For rectangular patches, use a back-and-forth motion, ensuring consistent contact with the iron. Patches with intricate designs or shapes require careful attention to detail. Use a light touch, and focus on each section to ensure proper adhesion. For larger patches, use a larger ironing surface area or use multiple ironing passes to avoid overheating in one area.
Table of Ironing Temperatures, Durations, and Techniques for Different Patch Types
| Patch Type | Recommended Iron Temperature (degrees Fahrenheit) | Ironing Duration (seconds) | Ironing Technique |
|---|---|---|---|
| Polyester | 300-350 | 10-15 | Circular motion for round patches, back-and-forth for rectangular |
| Cotton | 325-375 | 15-20 | Gentle circular motion, ensuring even heating |
| Leather | 275-300 | 5-10 | Very gentle, short passes, focusing on the edges and corners |
| Vinyl | 350-375 | 10-15 | Consistent, even pressure, especially for complex shapes |
| Embroidered | 250-275 | 5-10 | Light touch, short passes to avoid distortion or damage |
Post-Ironing Procedures
So, you’ve successfully ironed on that patch! Now comes the crucial part: making sure it stays put and looks great. This involves checking for proper adhesion and dealing with any potential issues, plus understanding the importance of letting the patch cool completely. A well-done post-ironing process is key to a long-lasting, attractive patch.
Checking for Proper Adhesion
After ironing, immediate checking is essential to ensure the patch adhered properly. A quick visual inspection can often reveal if the patch has stuck firmly. A gentle but firm touch can be a great way to assess the hold. This process should be performed with care to avoid disturbing the patch’s position. Avoid harsh or sudden movements.
Addressing Adhesion Issues
Sometimes, despite your best efforts, the patch might not adhere perfectly. Various factors can cause this, from the fabric type to the ironing technique. If the patch isn’t sticking, there are ways to rectify the problem.
- Slight Lifting or Shifting: If the patch has just slightly lifted or shifted, gently reposition it. Use a clean, lint-free cloth or a soft brush to press the patch firmly into place. Use a lower heat setting on the iron, and re-iron the patch using short, controlled strokes. Repeat this until the patch is securely in place.
- Partial Adhesion: For a patch that has only adhered partially, focus on the areas that haven’t bonded. Use a clean cloth and a low-heat setting of your iron. Apply consistent, firm pressure to those areas, and ensure the patch is pressed against the fabric surface thoroughly. If it persists, you may need to repeat the ironing process, making sure to avoid excessive pressure.
If this still doesn’t work, re-check your ironing technique to ensure correct pressure and temperature for the type of fabric and patch.
- Complete Non-Adhesion: If the patch completely failed to adhere, you may need to repeat the entire process. Double-check the ironing technique, making sure the temperature and pressure were suitable for the fabric type and patch. Ensure the fabric is clean and free from wrinkles or folds. If the problem persists, the patch might not be designed for that specific fabric type or iron-on patches might not be the best solution for your particular fabric.
Importance of Cooling
Letting the patch cool completely is crucial for ensuring lasting adhesion. The heat from the iron sets the adhesive, and allowing it to cool gradually and completely solidifies the bond between the patch and the fabric. Rushing this step can cause the patch to loosen or shift. Allowing the patch to cool fully before handling it prevents potential issues.
Step-by-Step Procedure for Checking and Addressing Adhesion Issues
- Visual Inspection: Carefully examine the patch’s placement on the fabric. Look for any signs of lifting, shifting, or uneven adhesion.
- Gentle Touch: Gently but firmly press on the patch to assess its hold. If the patch feels loose or wobbly, move to the next step.
- Repositioning (if necessary): Gently reposition the patch with a clean cloth or soft brush. Re-iron with a low heat setting and short, controlled strokes, applying consistent pressure.
- Cooling Time: Allow the patch to cool completely before handling it to avoid potential issues.
- Repeat if Necessary: If the patch remains loose or unevenly adhered, repeat steps 2-4 as needed. If it persists, consider alternatives or recheck the suitability of the fabric and patch for the application.
Troubleshooting Common Issues
Iron-on patches are generally easy to apply, but sometimes things don’t go as planned. This section covers common problems and provides solutions to help you achieve a perfect patch every time. Understanding these potential pitfalls will save you time and frustration.
Identifying Patch Adhesion Problems
Patch adhesion issues are often the result of a slight miscalculation in the application process. Careful attention to the preparation of both the fabric and the patch itself is crucial. A loose or improperly adhered patch can be unsightly and, in some cases, may even compromise the integrity of the garment.
Removing a Poorly Adhered Patch
Sometimes, despite careful preparation, a patch might not adhere properly. If this happens, don’t panic. The first step is to carefully examine the area of the patch and see what caused the problem. A poorly adhered patch can often be re-applied with a fresh application of iron-on adhesive. However, if the patch is completely detached, you may have to carefully remove it.
Use a sharp, pointed object to carefully lift the edges of the patch, peeling it away from the fabric slowly and methodically. If necessary, you may need to use a very sharp knife or scalpel, following all safety precautions. Do not pull the patch forcefully as this could damage the fabric. Clean the area where the patch was and reapply the patch as needed.
Solutions for Common Problems
Proper preparation and attention to detail are key to successful patch application. Here’s a breakdown of common issues and their solutions:
- Patch Doesn’t Stick: This is usually due to insufficient ironing or incorrect fabric preparation. Ensure the fabric is clean, dry, and free of any residue or wrinkles. Ensure that the patch is correctly positioned and iron the patch for the recommended time, and at the correct temperature. If it’s still not sticking, check for moisture or wrinkles in the fabric.
If the problem persists, try a different type of iron-on adhesive, or consider the fabric type.
- Patch Bubbles or Wrinkles: These often result from uneven pressure during ironing. If you encounter this, ensure that you’re ironing the patch evenly and with appropriate pressure. Avoid moving the iron back and forth while ironing. If bubbles persist, carefully use a sharp object to gently press out the bubbles and iron again.
- Patch Peels Off: This may be due to insufficient ironing, an unsuitable fabric type, or improper fabric preparation. Double-check the ironing instructions for the specific type of iron-on adhesive. Check the fabric for moisture, and ensure you have used the correct temperature and pressure. If the patch still peels, consider using a stronger adhesive or a different fabric type.
- Iron Damage to Fabric: This usually happens if you’re using an inappropriate temperature setting for the fabric or the iron-on patch. Follow the specific care instructions for the fabric type and iron-on patch. Test the iron setting on a hidden area of the garment before applying the patch. If the fabric type is delicate, consider using a pressing cloth.
Preventing Common Mistakes
Avoiding mistakes during patch application is key to a successful outcome.
- Proper Fabric Preparation: Ensure the fabric is clean, dry, and wrinkle-free before applying the patch. Pre-treating the fabric (e.g., using a fabric softener) might be necessary depending on the type of fabric.
- Correct Ironing Technique: Apply even pressure and consistent heat. Don’t move the iron back and forth during the ironing process.
- Correct Positioning: Carefully position the patch before ironing to ensure it’s in the correct place and orientation. Check the ironing instructions for specific placement guidelines.
- Appropriate Iron Temperature: Always follow the manufacturer’s instructions for the appropriate iron temperature and time for both the fabric and the patch. Experimenting with different temperatures or times may cause damage to the fabric.
Troubleshooting Table
This table summarizes common problems and their solutions:
| Problem | Solution |
|---|---|
| Patch doesn’t stick | Ensure proper fabric preparation, correct ironing time and temperature, and proper patch positioning. |
| Patch bubbles or wrinkles | Apply even pressure and consistent heat without moving the iron back and forth. |
| Patch peels off | Ensure sufficient ironing time and temperature, check the compatibility of fabric type and patch adhesive. |
| Iron damage to fabric | Follow the specific care instructions for the fabric type and iron-on patch. Test the iron setting on a hidden area before applying the patch. |
Advanced Techniques: How To Take Off Iron On Patches
Iron-on patches offer more than just simple embellishments; they can be used to create complex designs and add visual interest to garments. Mastering advanced techniques allows you to personalize clothing with intricate details and professional-looking results. This section dives into methods for working with curved surfaces, layering patches, and using interfacing for a polished finish.Applying patches to curved surfaces or intricate designs requires careful planning and execution.
Improper technique can lead to uneven results, wrinkles, or the patch detaching. The key is to understand the surface’s contours and adjust your ironing approach accordingly.
Applying Patches to Curved Surfaces
Understanding the shape of the curve is crucial for successful application. For example, a curved neckline requires a patch that conforms to the curve. Pre-creasing the patch to match the curve before ironing will help ensure a snug fit. Use a slightly dampened cloth and gentle, even pressure to mold the patch to the fabric.
Applying Patches to Intricate Designs
Intricate designs, like logos or intricate patterns, often demand precise positioning. Using a template or tracing paper can assist in accurately placing the patch. If the design is complex, ironing in sections, starting with the larger areas and working towards the details, can help to prevent wrinkles and maintain a smooth surface. This method is particularly helpful for complex, multi-layered patches.
Layering Multiple Patches
Layering patches allows for greater visual complexity. When layering, ensure that the underlying patches are securely ironed in place before adding subsequent layers. This method requires careful planning to ensure that each patch aligns correctly with the others. A common example is creating a quilted effect using multiple small patches.
Using Interfacing Materials, How to take off iron on patches
Interfacing materials, such as fusible fleece or interfacing, are critical for enhancing the patch’s stability and durability. These materials provide support, preventing the patch from stretching or tearing during wear and wash. Fusible fleece is a good option for adding support and structure to the patch and the surrounding fabric. Using the correct interfacing material will improve the patch’s ability to withstand daily wear.
Achieving Professional-Looking Results
Achieving a professional-looking finish involves precision and attention to detail. Using appropriate interfacing, ensuring the patch is completely adhered, and meticulously ironing the patch to prevent wrinkles are essential steps. Practicing with simple designs before tackling more intricate ones is a good way to gain experience and refine your technique. High-quality iron-on patches, proper fabric preparation, and consistent application contribute to a superior result.
Safety Precautions

Ironing, while seemingly simple, carries potential risks if not approached with care. Proper safety measures are crucial to prevent accidents and ensure a smooth and successful patching process. Understanding the potential hazards and adopting the right safety protocols can significantly reduce the chances of injury.
Ironing Safety Guidelines
Safe ironing practices are vital to avoid burns, electrical shocks, and other mishaps. Adhering to these guidelines will enhance your safety and the longevity of your ironing equipment.
- Always unplug the iron when not in use, and before cleaning or storing it. This simple step prevents electrical accidents and safeguards against unexpected power surges. Improper handling can lead to electric shock, and should always be avoided.
- Use a heat-resistant ironing board cover. This is crucial to protect the board itself and prevent burns if the iron accidentally touches the board directly, as well as preventing the ironing surface from becoming too hot, thereby preventing any burns on the ironing board.
- Never leave the iron unattended while it’s plugged in. A unattended iron can lead to overheating and possible damage to the ironing board. Leaving it unsupervised also increases the risk of fire or electrical issues.
- Keep children and pets away from the ironing area. Their accidental contact with the hot iron can cause serious burns. Young children and pets are often curious and unpredictable, and should never be left unattended near hot surfaces.
- Use the correct ironing board. A stable, level ironing board is essential for both safety and effective ironing. An unstable ironing board can lead to accidents, and prevent a smooth ironing experience. An uneven ironing board surface will cause uneven ironing, making the entire task more difficult and possibly even dangerous.
Iron Safety Procedures
Handling the iron correctly is paramount to prevent burns and other injuries. These steps will help you manage the iron safely.
- Check the iron’s temperature setting before starting. Ensure it’s appropriate for the fabric type to prevent damage and burns. Using the wrong temperature setting can result in fabric damage, and even burns if the fabric isn’t properly protected.
- Use a heat-resistant glove or mitt when handling the iron, especially when removing it from the iron board. This will help protect your hands from burns. Direct contact with a hot iron can cause severe burns, and it is crucial to use proper safety measures to avoid such issues.
- Handle the iron with care, avoiding sudden movements or dropping it. A dropped iron can cause damage to the iron itself and potentially cause burns to those around you. Carelessness can result in injuries and damage to the iron.
- Keep the iron’s cord clear of the ironing area to prevent tripping hazards. Tripping hazards can lead to falls and injuries, so ensuring the cord is clear and well-managed is critical to preventing these accidents.
Iron-on Patch Risks
While generally safe, iron-on patches do have some potential risks. Understanding these risks is vital for safe use.
- Using inappropriate iron settings can damage the fabric or cause the patch to warp or become distorted. Always check the patch’s instructions before ironing. Inadequate ironing temperatures can result in a poor patch application, causing it to deform or peel over time. This may lead to the patch losing its integrity or becoming damaged.
- Overheating the fabric while ironing can lead to burns or damage the fabric’s structure. Overheating can cause the fabric to become brittle, and this can lead to issues with the longevity of the patch itself. This can also create fire hazards.
Final Conclusion
So, there you have it – the ultimate guide to taking off iron-on patches. Whether you’re dealing with a failed design or just want to swap out a patch, you’re now fully equipped to handle any situation. No more stressing over stubborn residue, just smooth sailing to a fresh start. Peace out!
Key Questions Answered
What if the patch won’t budge after trying to peel it off?
Try a gentle heat application. Hold a hairdryer on low heat for a few seconds to loosen the adhesive. Then, try peeling again. If it still won’t come off, you might need a bit of gentle scrubbing with a damp cloth or a specialized adhesive remover (but be careful not to damage the fabric).
What’s the best way to avoid damaging the fabric when removing the patch?
Be super gentle! Avoid using harsh chemicals or abrasive tools. If you’re dealing with stubborn residue, try a fabric-safe adhesive remover, but test it in an inconspicuous area first. Use a soft cloth to apply the remover, avoiding excessive pressure.
Can I re-use the patch?
It depends on the material and how you removed it. If the removal was gentle, there’s a chance you might be able to re-use the patch. If it was subjected to harsh chemicals, the adhesive might be damaged.
What if the patch has come off in pieces?
Patience is key here. Carefully peel off any remaining pieces. If any adhesive residue remains, use a fabric-safe adhesive remover to remove it.
