How to take motor out of moken 10 canoue? This comprehensive guide provides a step-by-step approach to safely and efficiently removing your outboard motor from your Mokén 10 canoe. Learn the essential procedures, from initial disconnections to post-removal storage, ensuring a smooth and worry-free experience.
Mastering this process is crucial for maintaining your canoe and motor. Follow these detailed instructions to avoid damage and ensure longevity for both.
Introduction to Canoe Motor Removal
Unveiling the intricate dance of disassembling a canoe motor from its aquatic abode requires meticulous planning and a keen understanding of safety protocols. This process, while seemingly straightforward, demands respect for the mechanical components and the environment. A methodical approach, guided by safety precautions and appropriate tools, ensures a smooth and successful operation. This comprehensive guide will equip you with the knowledge necessary to execute this task efficiently and safely.The removal of a canoe motor, while seemingly a simple task, demands meticulous attention to detail and adherence to safety procedures.
Ignoring these elements could lead to potential hazards. This process, though potentially straightforward for experienced individuals, demands respect for the machinery and the canoe itself. It is crucial to understand the specific steps involved in dismantling the motor and securing the canoe, which will be detailed in the following sections.
Safety Precautions
Ensuring safety is paramount when handling mechanical equipment. Adhere to the following precautions to prevent injuries and maintain a secure working environment. Wear appropriate personal protective equipment (PPE), including safety glasses, gloves, and sturdy footwear. Disengage the motor’s ignition and ensure the power source is disconnected before beginning any work. Work in a well-lit area and, if possible, with another person present to assist.
Tools and Materials Required
A well-equipped toolkit is essential for a successful motor removal. The following list provides a comprehensive inventory of the necessary tools, categorized for clarity. This section Artikels the essential tools, classified by type, to facilitate a smooth and efficient motor removal process.
| Tool Type | Tool Name | Function |
|---|---|---|
| Hand Tools | Adjustable Wrench | Used for loosening and tightening various fasteners, such as nuts and bolts. |
| Hand Tools | Socket Set | Used for loosening and tightening bolts with specific head shapes. |
| Hand Tools | Screwdrivers (Phillips and Flathead) | Used for removing and installing screws and other fasteners with various head shapes. |
| Hand Tools | Pliers | Used for gripping and holding parts during removal and installation. |
| Hand Tools | Channel-lock pliers | Used for gripping and holding parts during removal and installation. |
| Hand Tools | Wire Cutters | Used for cutting wires or cables. |
| Power Tools | Drill | Used for drilling pilot holes or removing screws in some cases. |
| Miscellaneous | Cleaning Supplies | Used for cleaning the motor and other components. |
| Miscellaneous | Work Gloves | Protection for hands during handling of parts. |
| Miscellaneous | Safety Glasses | Protection for eyes during operation. |
Disassembly Steps
Embarking on the meticulous process of removing your canoe motor is like embarking on a journey of discovery, revealing the intricate mechanics beneath the surface. Each step, carefully executed, will unlock the secrets of your outboard’s design, empowering you with newfound appreciation for its engineering. This journey, while demanding precision, promises a satisfying sense of accomplishment as you gain mastery over the task.Understanding the fundamental principles of motor removal will not only make the process easier but also foster a deeper understanding of your vessel’s components.
A methodical approach, coupled with meticulous attention to detail, is crucial for a successful and safe disconnection.
Initial Disconnections
Prioritizing safety is paramount in any mechanical undertaking. Before initiating any disassembly, ensure the motor is securely grounded and that the power source is switched off. This proactive measure safeguards against electrical hazards and potential accidents. Next, carefully disconnect the electrical components, starting with the battery cables. Disconnect each cable from its terminal, ensuring the connections are secure and free of any loose wires.
Detaching Mounting Hardware
The meticulous detachment of mounting hardware is essential for a smooth removal. Identify all bolts, nuts, and clamps securing the motor to the canoe. Note the specific placement of each fastener, and carefully document the order of removal to facilitate reassembly. Using the appropriate tools, loosen and remove each fastener, being mindful of potential damage to the canoe or the motor itself.
Take care to avoid over-tightening or cross-threading the fasteners.
Comparing Mounting Methods
| Mounting Method | Description | Advantages | Disadvantages ||—|—|—|—|| Bolts and Nuts | Traditional method, employing threaded fasteners for secure attachment. | High strength, widely available, and versatile. | Requires careful alignment and torque management. || Clamps | Often used for quick and temporary attachment. | Simple installation, often adaptable to various canoe shapes.
| Lower strength compared to bolts and nuts, potential for slippage over time. || Fasteners with Integrated Clips | A combination of bolts/nuts and clips, for a secure and adaptable mount. | Balanced strength and adaptability. | Requires familiarity with the specific system design. |
Motor Removal Procedure
This numbered list details the steps involved in removing the motor, emphasizing a methodical approach.
- Disconnect the electrical connections, ensuring the power source is off.
- Loosen and remove all mounting hardware, documenting the order of removal.
- Carefully lift the motor from its mounting position, applying even pressure to avoid stressing components.
- Inspect all components for damage or wear, and note any discrepancies.
- Store the removed motor in a safe and secure location, protecting it from potential damage.
Canoe Considerations
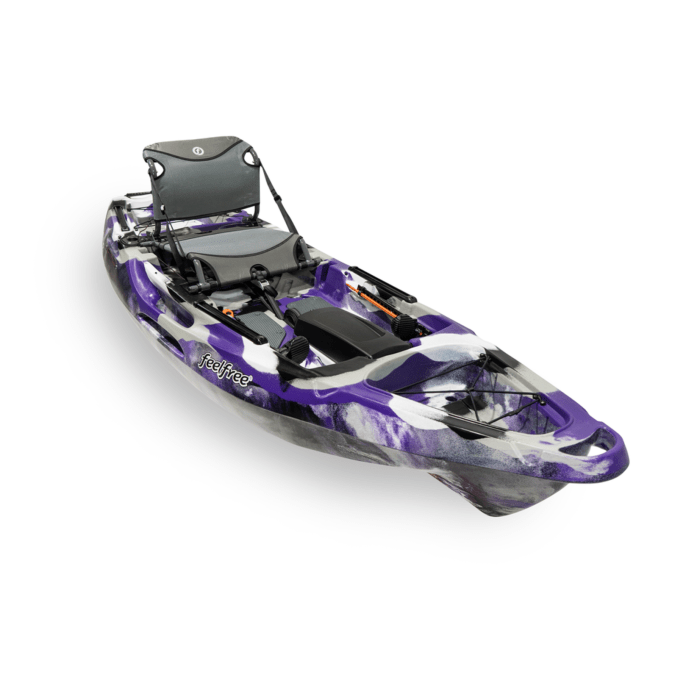
Embarking on the meticulous task of removing a motor from a Mokén 10 canoe demands a profound understanding of this unique vessel. Its design, a testament to centuries of craftsmanship, significantly impacts the motor removal process. Respecting the canoe’s integrity is paramount; every maneuver must be deliberate and mindful of potential risks.The Mokén 10 canoe, a masterpiece of traditional craftsmanship, often features a slender hull, optimized for speed and maneuverability in challenging waters.
This elegant design, however, presents specific considerations for motor removal. The delicate balance between the canoe’s structural integrity and the motor’s weight must be carefully maintained throughout the entire process.
Specific Design Considerations of a Mokén 10 Canoe
The Mokén 10 canoe, renowned for its lightweight construction and graceful lines, presents unique challenges during motor removal. Its slender hull, often crafted from meticulously selected wood, possesses inherent flexibility. This characteristic, while contributing to its agility, necessitates extreme caution during lifting and maneuvering. Understanding the canoe’s construction is crucial for successful removal. A deep understanding of the canoe’s inherent strength is necessary to prevent any damage to its structural integrity.
Impact of Canoe Structure on Motor Removal Process
The canoe’s structure profoundly impacts the motor removal process. The delicate balance between the motor’s weight and the canoe’s structural integrity necessitates a careful and methodical approach. The canoe’s framework, likely featuring a complex system of ribs and supports, must be treated with respect. Improper handling can cause warping, cracking, or other structural damage. Improper lifting methods, such as applying uneven pressure, can strain the canoe’s frame, potentially leading to catastrophic failure.
The positioning of the motor mounts and the canoe’s inherent strength are crucial factors to consider.
Potential Risks Associated with Motor Removal from a Mokén 10 Canoe
Several potential risks accompany the removal of a motor from a Mokén 10 canoe. The canoe’s delicate structure, coupled with the weight of the motor, presents significant challenges. Improper lifting techniques can cause the canoe’s frame to warp or crack. Unforeseen stress points can lead to unexpected damage, requiring extensive repairs or even rendering the canoe unusable.
Careless handling during the process may also result in damage to the canoe’s hull, requiring professional restoration. Consideration of these potential risks is crucial to mitigate potential harm to the canoe’s integrity.
Protecting the Canoe’s Hull and Deck During the Process
Protecting the canoe’s hull and deck is critical to preserving its aesthetic appeal and structural integrity. Use soft padding, such as blankets or old towels, beneath the motor’s mounting points and the areas where support will be placed. This prevents scratching and abrasions on the delicate hull. Cover the hull with protective sheeting or tarps during the entire process to safeguard against any accidental damage.
Careful planning and execution are essential in mitigating the risks of damage.
Common Issues When Working with a Mokén 10 Canoe
A common issue when working with a Mokén 10 canoe is the canoe’s inherent flexibility. This characteristic, while contributing to its maneuverability, necessitates a cautious approach during lifting and maneuvering. Uneven weight distribution can cause the canoe to warp or bend. Another frequent problem arises from the canoe’s complex framework. Improper support can lead to structural damage, necessitating costly repairs.
Improperly secured equipment can cause the motor to shift during the process, leading to further damage. Addressing these common issues requires meticulous attention to detail and a thorough understanding of the canoe’s structural limitations.
Motor Specifics
Unveiling the heart of your aquatic expedition, understanding the motor’s nuances is paramount. The intricacies of its design and mounting system will dictate the precision and safety of your removal process. A thorough comprehension of these details empowers you to handle the task with confidence and minimize potential pitfalls. This section will illuminate the specific characteristics of your motor, ensuring a smooth and efficient operation.A critical aspect of any motor removal is recognizing its specific features.
This involves identifying the motor’s make and model, understanding its mounting system, and scrutinizing the various hardware components. Equipped with this knowledge, you’ll be able to carefully detach the motor without damaging the canoe or the engine itself.
Motor Make and Model Identification
Precisely identifying your motor’s make and model is crucial for acquiring the correct replacement parts or troubleshooting procedures if needed. Refer to the canoe’s owner’s manual or any accompanying documentation for accurate identification. Failing to correctly identify the motor may lead to using incompatible parts, negatively impacting the overall functionality.
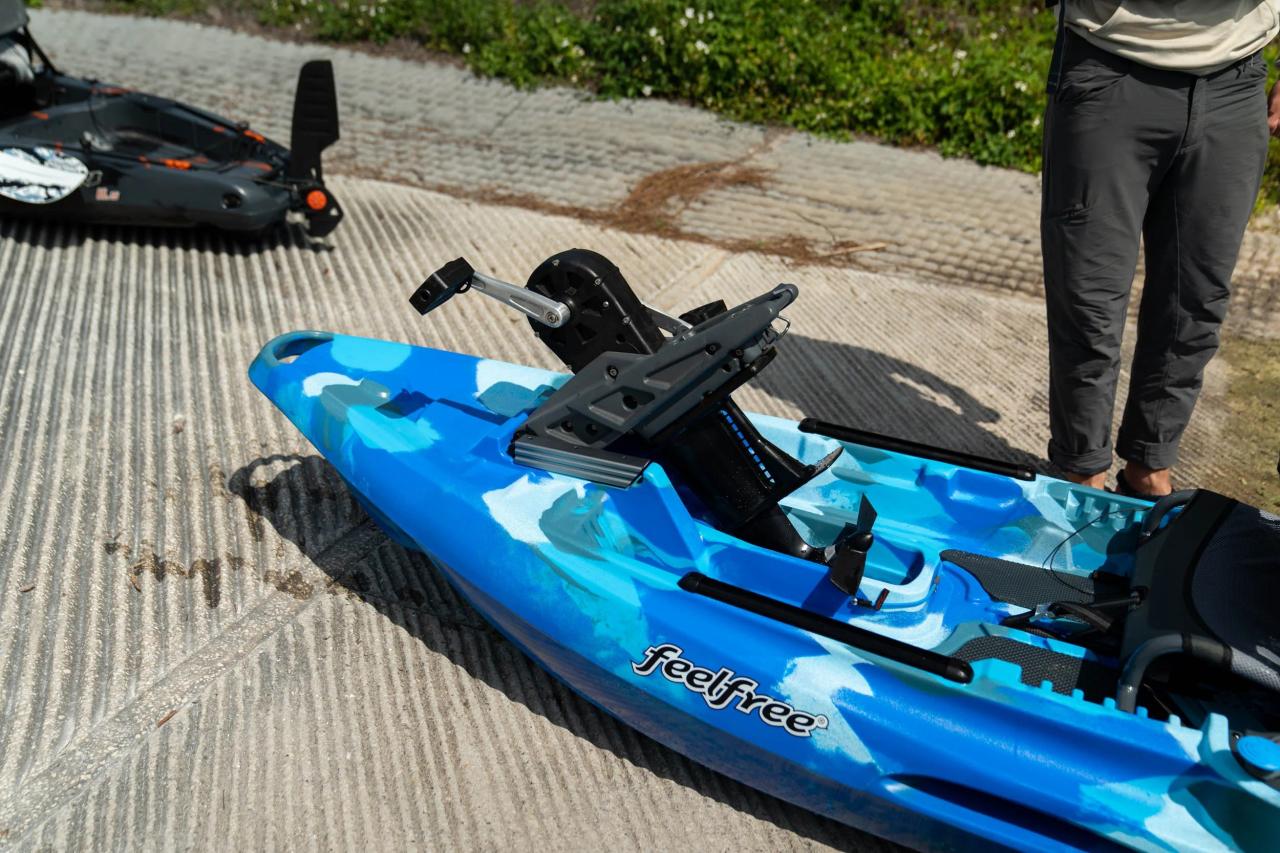
Motor Mounting System
Comprehending the motor’s mounting system is essential for a safe and efficient removal. Examine the mounting brackets, screws, and other hardware meticulously. This detailed analysis will aid in understanding the exact placement and configuration of the motor.
Motor Mounting Hardware
Various types of motor mounting hardware are used, each with its own characteristics. Understanding these differences will enable a smoother removal process. Common types include bolts, nuts, clamps, and specialized brackets. These components are designed for a secure and reliable connection between the motor and the canoe.
Motor Mounting Configurations
| Mounting Configuration | Advantages | Disadvantages |
|---|---|---|
| Standard Bracket Mounting | Simplicity, readily available parts, and cost-effectiveness. | Potential for misalignment or stress points, may not provide the optimal stability. |
| Custom-Designed Mounting System | Enhanced stability and precise alignment, accommodates unique canoe designs. | Requires specialized tools or knowledge, parts may not be readily available. |
| In-hull Mounting | Streamlined aesthetic, increased stability, and better protection against the elements. | Difficult to remove without specialized tools or knowledge, potentially requires modifications to the canoe. |
This table illustrates different motor mounting configurations, highlighting their relative advantages and disadvantages. Careful consideration of these aspects will help in selecting the most suitable method for your canoe.
Fuel System Disconnection
Safely disconnecting the fuel system is paramount to prevent any spillage or potential hazards. Follow these steps diligently to avoid any accidents. Firstly, locate the fuel lines and shut off valves. Then, carefully disconnect the fuel lines, ensuring that the fuel is properly drained and collected in a safe container. Finally, replace the caps or plugs on the fuel lines and tank openings to prevent leaks.
Always refer to the manufacturer’s instructions for specific disconnection procedures.
Proper fuel system disconnection is crucial for a safe and successful motor removal.
Safety Procedures
Embarking on a canoe motor removal project demands meticulous attention to safety. A proactive approach to potential hazards, coupled with the right safety gear and environment, ensures a smooth and incident-free operation. Prioritizing safety not only protects you from harm but also safeguards the canoe and motor, minimizing potential damage.
Essential Safety Gear
A well-equipped toolkit for motor removal includes more than just tools; it encompasses crucial safety gear. Proper attire and protective equipment are paramount to mitigating risks and ensuring a comfortable and secure working environment. Investing in quality safety gear is an investment in your well-being and the success of your project.
- Gloves provide a critical barrier against sharp edges and potential abrasions. Choose heavy-duty work gloves that offer adequate grip and protection. Leather or reinforced synthetic gloves are excellent choices.
- Eye protection, such as safety glasses or goggles, is essential to safeguard your eyes from flying debris or splashes. Ensure the eyewear is snug and offers comprehensive protection.
- Appropriate clothing is also important. Wear long sleeves and pants to prevent cuts and scrapes. Consider a sturdy apron to protect your clothing from oil, grease, or other potential contaminants.
Creating a Secure Workspace
A well-organized and stable workspace is crucial for a safe and efficient motor removal process. Thoroughly assessing the environment and establishing a secure foundation are essential steps to minimize the risk of accidents. A stable workspace reduces the chances of slips, trips, or falls, protecting you from potential injury.
- Select a level, stable surface to work on. Avoid working on uneven ground or surfaces that could cause you to lose your balance. A sturdy workbench or a flat, cleared area of the ground will suffice.
- Secure the canoe using appropriate straps or clamps to prevent accidental movement during the removal process. This is particularly important for larger or heavier canoes.
- Ensure adequate lighting to illuminate the work area. Proper lighting prevents accidents and enhances visibility, ensuring precise work execution.
Handling Potential Hazards
Identifying and addressing potential hazards is a vital aspect of a safe motor removal procedure. Thorough preparation, including understanding potential risks, allows for proactive mitigation and minimizes the possibility of unforeseen incidents.
- Inspect the canoe and motor for any loose or damaged parts before starting. This proactive approach minimizes the risk of unexpected issues during the process. Identify any potential hazards, such as exposed wires, sharp edges, or loose fasteners.
- Be mindful of potential electrical hazards if the motor has a battery. Disconnect the battery terminals before working on any electrical components to prevent electrical shocks. Proper grounding is also crucial for electrical safety.
- Use caution when handling any tools or equipment. Maintain a firm grip on tools to prevent them from slipping or falling, causing injury or damage. Always follow the manufacturer’s instructions for using any power tools.
Ventilation and Environment
Adequate ventilation and a suitable environment are crucial for maintaining a safe and healthy working environment during motor removal. Proper ventilation reduces the risk of inhaling harmful fumes or particles.
- Ensure proper ventilation in the work area, especially if working with fuels or lubricants. Open windows or use fans to improve airflow and remove any potentially harmful vapors.
- If working in an enclosed area, consider using a respirator to protect yourself from inhaling any harmful substances. This is especially important if working with paints or other potentially harmful materials.
- If you notice any unusual odors or fumes, immediately evacuate the area and contact the relevant authorities. Do not hesitate to prioritize your health and safety.
Post-Removal Considerations: How To Take Motor Out Of Moken 10 Canoue
The journey of removing a motor from a Moken 10 canoe isn’t complete with the final bolt. Careful storage and meticulous maintenance are the final acts in ensuring the longevity of both your vessel and its powerful heart. These considerations are not just good practice; they are the key to unlocking years of uninterrupted paddling pleasure.Proper post-removal care sets the stage for future adventures.
This meticulous approach ensures your canoe and motor remain in prime condition, ready to conquer the water’s embrace.
Storing the Removed Motor
Protecting your motor from the elements is paramount to its long-term health. A clean, dry environment is essential to prevent corrosion and deterioration. The motor’s internal components are delicate and need protection from moisture and dust.
- Secure Storage Location: Find a dry, well-ventilated area, ideally a shed or garage, shielded from direct sunlight and extreme temperatures. Avoid areas prone to flooding or significant temperature fluctuations. Consider using a cover to further protect the motor from the elements.
- Thorough Cleaning: Remove any remaining dirt, grime, or debris from all surfaces of the motor. A gentle cleaning solution, like a diluted mixture of mild dish soap and water, is effective. Ensure thorough rinsing and complete drying. This prevents rust and ensures a clean slate for future use.
- Component Organization: Disassemble the motor if possible and store each part individually in labeled containers. This prevents components from becoming tangled or misplaced, making reassembly much easier. Protect any delicate parts from damage. Consider using plastic bags or protective covers for these components.
Storing the Canoe Components
Proper storage for the canoe is just as critical as for the motor. Ensuring the hull remains free from damage is vital to its structural integrity.
- Cleaning the Canoe: Thoroughly clean the canoe’s interior and exterior. Remove any lingering water, debris, or dirt. Focus on areas where moisture can accumulate. A thorough drying process is crucial, using towels or a drying rack if necessary.
- Protecting the Hull: Inspect the hull for any damage or imperfections. Apply a protective sealant or wax to prevent water absorption and deterioration. A waterproof cover should be considered for long-term storage to protect the hull from dust and environmental hazards.
- Storing the Hull: Choose a storage area that is level, stable, and dry. Elevating the canoe slightly above the ground is a good practice to avoid moisture issues. Avoid placing heavy objects on the canoe, especially if the storage space is not designed to handle such weights.
Maintenance and Future Considerations
Regular maintenance is key to extending the life of both your canoe and motor. This proactive approach helps identify potential issues before they escalate.
- Regular Inspection: Inspect both the canoe and motor periodically for any signs of wear, damage, or corrosion. Pay attention to areas that are prone to these issues.
- Record Keeping: Maintain detailed records of cleaning, maintenance, and any repairs to both the canoe and the motor. These records serve as a valuable resource for future maintenance and troubleshooting.
- Potential Future Issues: Be aware of potential issues that may arise in the future, such as corrosion on the motor’s metallic components, or warping of the canoe’s hull due to moisture exposure. Proper storage and maintenance are preventative measures against these issues.
Post-Removal Checklist
- Clean the motor thoroughly.
- Disassemble the motor (if possible) and store components in labeled containers.
- Clean the canoe meticulously, ensuring complete drying.
- Protect the canoe hull with a sealant or wax.
- Store the canoe in a dry, stable location.
- Store the motor in a dry, well-ventilated area.
- Inspect both canoe and motor regularly for damage or wear.
- Maintain records of cleaning, maintenance, and repairs.
Troubleshooting
Unforeseen challenges are inevitable in any endeavor, and the removal of a canoe motor is no exception. This section will equip you with the knowledge to identify and resolve common issues that might arise during the process, ensuring a smooth and successful outcome. Navigating these hurdles with a clear understanding of potential problems and their solutions will lead to a more confident and satisfying experience.
Common Motor Removal Issues
Troubleshooting often involves recognizing patterns and symptoms. Careful observation and methodical analysis are crucial to pinpointing the source of the problem. A systematic approach to identifying and resolving issues is essential for efficient and successful troubleshooting.
- Motor Won’t Disconnect: If the motor refuses to detach from the canoe, the first step is to carefully re-examine the mounting hardware. Corrosion, worn-out fasteners, or improper tightening can all impede the disconnection process. Ensure all connections are secure and that no hidden obstacles are preventing the motor from releasing. If corrosion is evident, use penetrating oil or a specialized rust remover to aid in the disconnection process.
A slightly worn or damaged mounting bracket might require replacement to prevent future issues.
- Damaged or Broken Components: The process of removing the motor may sometimes expose hidden damage to the canoe’s hull or the motor’s components. Inspect all parts carefully for any signs of damage, including cracks, bends, or missing pieces. A damaged propeller, for example, may not only hinder the removal process but could also cause problems during operation. A damaged propeller or shaft may require replacement.
- Difficult Propeller Removal: The propeller might be stubbornly attached, potentially due to corrosion or improper alignment. Try using appropriate tools, such as a wrench or pliers, but avoid applying excessive force. If the problem persists, lubricating the shaft with penetrating oil can help loosen the connection. If these efforts prove ineffective, consult a professional mechanic to prevent further damage to the propeller or shaft.
- Wiring Issues: Incorrect wiring connections or damaged wires can create difficulties in the disconnection process. Verify all connections and inspect the wires for any signs of damage. Replace any damaged wires or connectors to ensure a reliable electrical connection. A simple loose connection can sometimes be the source of significant troubleshooting.
Troubleshooting Table
This table summarizes potential issues and their corresponding solutions:
| Issue | Possible Cause | Solution |
|---|---|---|
| Motor won’t disconnect | Corrosion, worn fasteners, improper tightening | Apply penetrating oil, inspect fasteners, ensure proper tightening |
| Damaged components | Impact, wear and tear, corrosion | Inspect for damage, replace damaged parts |
| Difficult propeller removal | Corrosion, improper alignment | Lubricate shaft, use appropriate tools, consult professional if needed |
| Wiring issues | Incorrect connections, damaged wires | Verify connections, inspect wires, replace damaged components |
Identifying and Resolving Specific Problems
Effective troubleshooting relies on careful observation and a methodical approach. For instance, if the motor won’t disconnect, examine the mounting hardware closely. Look for signs of corrosion or wear. Apply penetrating oil to loosen any stubborn connections. If the problem persists, consider replacing damaged fasteners.
This systematic approach ensures that every potential cause is addressed. This allows you to isolate the specific cause of the problem and implement a targeted solution.
Visual Aids
Embarking on the meticulous process of removing a motor from your Moken 10 canoe requires a clear understanding of the intricate interplay of components and a precise sequence of actions. Visual aids serve as invaluable tools, providing a roadmap to guide your hands and eyes, transforming a potentially daunting task into a manageable and rewarding experience. Clear visuals illuminate each step, ensuring you approach the procedure with confidence and precision.Visual aids are pivotal for successful motor removal.
They act as a detailed blueprint, showcasing the canoe’s anatomy, motor configuration, and the strategic placement of tools and equipment. By visualizing each step, you enhance your understanding and reduce the risk of errors, thereby maximizing the efficiency and safety of the entire process.
Motor Removal Process Illustrations
This section presents a visual guide to the motor removal process, highlighting each critical step with descriptive annotations. Comprehending the process through imagery is crucial for a successful outcome. Imagine the intricate dance of mechanics unfolding before your eyes.
- Step 1: Preparing the Canoe: A crucial initial step involves securing the canoe in a stable and level position. This might involve placing the canoe on a sturdy, level surface or using supports to prevent any shifting during the procedure. A stable environment minimizes the risk of accidental movement and enhances safety. A well-positioned canoe is a foundation for a successful removal.
- Step 2: Disconnecting Electrical Connections: This step emphasizes the importance of careful attention to detail. Before disengaging any mechanical connections, disconnect the electrical cables and terminals meticulously. This preventative measure avoids short circuits and electrical hazards, ensuring a safe and controlled process. The illustrations will clearly show the location of the electrical connections and how to safely disconnect them.
- Step 3: Detaching Mounting Hardware: Carefully remove the mounting hardware, paying attention to the specific type and size of fasteners. The image will illustrate the proper way to use appropriate tools, such as screwdrivers, wrenches, and sockets. This detailed approach ensures you don’t damage the mounting points or lose any critical components.
- Step 4: Removing the Motor: This step involves carefully lifting and extracting the motor from its mounting location. Illustrations will guide you through the process, highlighting any critical support points or leverages. The canoe’s specific layout and the motor’s dimensions are essential to understand this step. Grasping the motor with proper care will minimize damage to both the motor and the canoe.
Tools and Equipment, How to take motor out of moken 10 canoue
A comprehensive list of tools and equipment is essential for a smooth and efficient motor removal process.
- Screwdrivers: Various sizes and types are needed to accommodate the different fasteners on the motor and canoe. Illustrations will showcase the correct screwdriver types for various screws.
- Wrenches: Spanner wrenches, adjustable wrenches, and socket wrenches are required for loosening and tightening nuts and bolts. Images will clearly show the appropriate wrench for each fastener.
- Pliers: Needle-nose pliers and slip-joint pliers are helpful for gripping and manipulating small parts. Visual aids will demonstrate the correct use of pliers.
- Electrical Disconnect Tools: Specific tools might be needed to disconnect electrical connections. Illustrations will detail the correct use of these tools.
Canoe and Interior Layout
Understanding the canoe’s design is crucial for safe and efficient motor removal. The canoe’s structure and internal components will be highlighted in detailed illustrations.
- Canoe Design: The Moken 10 canoe’s specific design, including its hull shape, internal supports, and weight distribution, will be depicted in the visual guide. This knowledge helps understand the removal process.
- Interior Layout: The visual guide will highlight the canoe’s internal layout, illustrating the location of the motor mounting points, electrical connections, and other relevant features. This visualization is critical for the successful removal of the motor.
Visual Guide of Components
A comprehensive visual guide of the various components involved in the motor removal process will be provided.
| Component | Description | Image |
|---|---|---|
| Motor Mounting Brackets | These brackets secure the motor to the canoe. | [Image depicting motor mounting brackets] |
| Electrical Wiring Harness | Connects the motor to the electrical system. | [Image illustrating the wiring harness] |
| Fasteners (Bolts, Nuts, Screws) | Various fasteners securing the motor and related components. | [Image displaying different types of fasteners] |
Final Conclusion
Successfully removing your motor from your Mokén 10 canoe is achievable with careful planning and execution. This guide has equipped you with the knowledge and tools to perform the task with confidence. Remember safety first, and always prioritize a stable working environment. Now, you’re ready to embark on your next aquatic adventure!
Frequently Asked Questions
What tools are necessary for removing the motor?
The specific tools required depend on the motor and canoe model. However, common tools include wrenches, sockets, screwdrivers, and possibly a ratchet set. Refer to the detailed tool list within the guide for a comprehensive list.
What are the potential risks when removing a motor from a Mokén 10 canoe?
Potential risks include damage to the canoe’s hull or motor if not handled carefully. Improper securing of the canoe or motor can also lead to accidents. Following the safety guidelines in the guide minimizes these risks.
How do I store the removed motor and canoe components?
Store the motor and canoe components in a dry, secure location. Properly clean all components before storage to prevent corrosion. Consult the guide for specific storage recommendations.
What should I do if I encounter a problem during the removal process?
The guide includes a troubleshooting section with solutions for common problems. If you encounter an issue, refer to this section to identify and resolve the problem efficiently. If the issue persists, consult a professional.
