How to remove nail polish from wood? This guide provides a comprehensive approach to tackling this common problem, whether you’ve accidentally spilled polish on a cherished wooden surface or simply want to restore its pristine beauty. We’ll explore the best methods for different wood types and nail polish varieties, from quick fixes to stubborn stains. Understanding the potential risks and choosing the right technique is crucial to preserving your wood’s integrity.
From identifying the type of nail polish to preventing future spills, this guide covers all aspects of safe and effective nail polish removal from wood. We’ll delve into the specifics of various wood finishes, ensuring you’re equipped with the knowledge to handle any situation. Protecting your valuable wooden pieces is paramount, and we’ll provide a detailed step-by-step approach for each scenario.
Introduction to Removing Nail Polish from Wood
Nail polish spills on wood surfaces are a common household mishap. From intricate wooden furniture to delicate wooden toys, the damage can be frustrating. The challenge lies not only in the diverse types of wood, but also in the varying degrees of porosity and the potential for the nail polish to penetrate the wood’s grain. Understanding these factors and acting quickly is crucial to minimizing damage and restoring the beauty of your wooden possessions.
Ignoring the issue can lead to permanent staining and significant repair costs.The need to act fast cannot be overstated. Nail polish, especially when it’s in its liquid form, is highly susceptible to drying and hardening. The longer it sits, the more difficult it becomes to remove, and the greater the chance of permanent damage. This is especially true for porous woods, which can absorb the polish deeply.
Knowing the type of wood involved is also key to determining the appropriate removal method. Choosing the wrong approach can lead to wood discoloration, scratches, or even the need for costly professional restoration.
Common Wood Surfaces Affected by Nail Polish
A wide range of wooden surfaces can be affected by nail polish spills. These include, but are not limited to, wooden furniture, decorative items, wooden toys, flooring, and even wooden musical instruments. The risk varies depending on the specific wood type and the amount of polish spilled. Porous woods, like pine, absorb polish more readily than dense woods, like oak.
Factors Influencing Nail Polish Removal
Several factors influence the effectiveness and safety of nail polish removal from wood. The type of wood, the age and condition of the polish, and the amount of polish spilled all play a role. The quicker you act, the higher the likelihood of a successful and damage-free removal. Incorrect methods can cause irreversible damage to the wood’s finish.
Understanding the wood’s characteristics is vital.
Wood Type Susceptibility to Nail Polish Damage
| Wood Type | Porosity | Susceptibility to Damage | Recommended Removal Method |
|---|---|---|---|
| Oak | Low | Moderate | Gentle solvents, careful blotting |
| Pine | High | High | Gentle solvents, careful blotting, followed by sealing if necessary |
| Mahogany | Medium | Moderate | Gentle solvents, careful blotting, possibly sanding if needed |
The table above illustrates the varying susceptibility of different wood types to nail polish damage. Oak, with its lower porosity, tends to be less affected than pine, which is more porous. Mahogany falls somewhere in the middle. Always prioritize a gentle approach, and remember to test any method on an inconspicuous area first to avoid unintended damage.
Choosing the right approach is essential to preserve the beauty and integrity of your wood surfaces.
Identifying the Type of Nail Polish
Knowing the type of nail polish is crucial for choosing the right removal method. Different polishes, from everyday lacquers to specialized acrylics and gels, react differently to various solvents and require specific techniques. This understanding significantly impacts the effectiveness and safety of the removal process, preventing damage to the wood’s surface.
Different Types of Nail Polish
Nail polish comes in various formulations, each with unique characteristics. Regular nail polish, often referred to as lacquer, is the most common type. Acrylic nail enhancements are a more durable, sculpted option. Gel polishes are known for their high shine and long-lasting wear. Each type reacts differently to solvents and requires a tailored approach for successful removal.
Comparison of Removal Difficulty
The difficulty of removing nail polish from wood varies considerably based on the type. Regular nail polish, being the thinnest and least durable, is generally the easiest to remove. Acrylic nail polish, due to its thicker, more rigid nature, often requires more aggressive solvents and techniques. Gel polish, due to its hard, cured resin structure, presents the greatest challenge and typically necessitates specific gel polish removers or more intense methods.
Drying Time and Removal
The drying time of the nail polish significantly influences the removal process. A freshly applied regular nail polish is easier to remove than one that has been allowed to dry completely. The longer the drying time, the more likely the polish is to become embedded in the wood’s surface, making removal more difficult. This highlights the importance of acting promptly to remove any unwanted nail polish.
Removal Techniques Based on Nail Polish Type
| Nail Polish Type | Removal Technique | Important Considerations |
|---|---|---|
| Regular Nail Polish | Use a cotton swab or soft cloth with a mild solvent like acetone or nail polish remover. | Avoid harsh scrubbing, which could damage the wood’s surface. |
| Acrylic Nail Polish | Use a cotton swab or soft cloth with a stronger solvent, like a specialized acrylic remover. | Be extra cautious with the strength of the solvent. Test a small, inconspicuous area first to prevent damage. |
| Gel Nail Polish | Use a gel polish remover containing acetone or a specific gel polish removal solution. Consider using a sanding block or buffer for stubborn residue. | Gel polish removers often require longer soaking times and potentially more aggressive methods. Always use caution and follow the instructions on the remover’s label. |
Safe Removal Methods
Removing nail polish from wood without damaging the finish requires a delicate touch. Choosing the right method is crucial for preserving the wood’s beauty and preventing irreversible damage. Using harsh chemicals or abrasive materials can lead to scratches, discoloration, or even the complete deterioration of the wood’s surface. Understanding the nuances of each method and the potential risks is key to a successful, damage-free removal process.Effective nail polish removal from wood hinges on a thoughtful approach.
Different types of nail polish react differently to various cleaning agents. This section Artikels safe and effective methods, emphasizing the importance of avoiding harsh chemicals and abrasives. We’ll delve into the specific steps involved in using each method, along with potential risks and a comparison of pros and cons.
Safe and Effective Removal Methods
Careful selection of removal methods is critical to preserving the wood’s integrity. The best approach is to select a method that is gentle and targeted, minimizing the risk of harming the wood’s finish. Avoid harsh chemicals or abrasive materials, as they can cause significant damage.
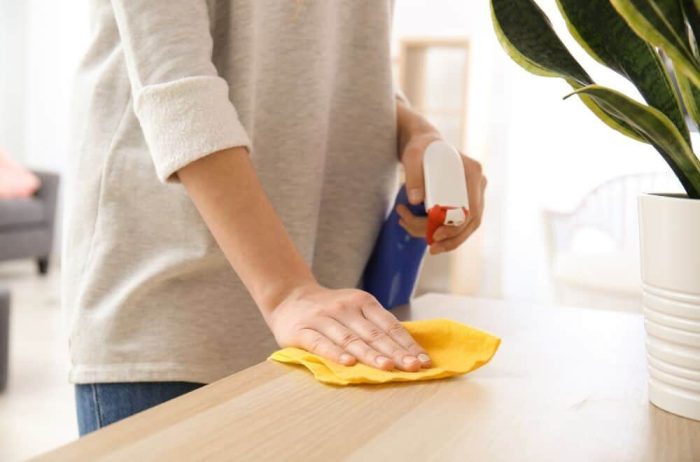
- Using a Cotton Swab Soaked in Acetone: Acetone is a common nail polish remover, but it can be aggressive. Use a cotton swab to carefully apply a small amount of acetone directly to the affected area. Work in small, controlled strokes, avoiding excessive pressure or prolonged contact. Allow the acetone to dissolve the polish, then gently wipe away the residue with a clean, damp cloth.
Always test in an inconspicuous area first to ensure no discoloration occurs. The cotton swab helps target the nail polish, limiting the area exposed to acetone. Be cautious about applying acetone directly to the wood, as prolonged exposure can damage the finish.
- Using a Cotton Swab with Nail Polish Remover: For a gentler approach, opt for a non-acetone nail polish remover. These removers are less likely to harm the wood’s finish. Use a cotton swab to apply the remover to the nail polish stain, then gently wipe away the residue with a clean, damp cloth. This approach is gentler on the wood, minimizing the risk of damage.
- Using a Soft Cloth and Mild Soap and Water: For stubborn nail polish stains, try a solution of mild soap and warm water. Soak a soft cloth in the solution and gently wipe the affected area. This approach is suitable for water-based nail polishes and can be used to remove light-colored nail polish stains without damaging the wood. Avoid using hot water, as this can potentially warp or damage the wood.
Potential Risks of Using Inappropriate Cleaning Solutions
Improper cleaning solutions can lead to irreversible damage to the wood’s surface. Understanding the potential risks is critical for preserving the wood’s integrity.
- Harsh Chemicals: Harsh chemicals, like acetone, can strip away the wood’s protective finish, leading to discoloration, dulling, and even pitting. Prolonged exposure can also damage the wood fibers.
- Abrasive Materials: Using abrasive materials, such as steel wool or scouring pads, can scratch or mar the wood’s surface. These scratches are difficult to repair and can permanently compromise the wood’s appearance.
- Inappropriate Cleaning Solutions: Certain cleaning solutions, like bleach or ammonia, are highly corrosive and can cause severe damage to the wood’s finish, leading to discoloration, swelling, or even complete destruction of the wood surface.
Method Comparison
A comparison of the methods can help you choose the best approach for your situation.
| Method | Pros | Cons |
|---|---|---|
| Cotton Swab with Acetone | Effective at removing nail polish. | Can damage wood finish if not used carefully. |
| Cotton Swab with Nail Polish Remover (Non-Acetone) | Gentle on wood, less likely to damage finish. | Less effective for stubborn stains; may require multiple applications. |
| Soft Cloth and Mild Soap/Water | Gentle on wood, suitable for water-based polishes. | May not be effective for all types of nail polish. |
Prevention Techniques
Protecting your beautiful wood surfaces from nail polish disasters is crucial. A little proactive planning goes a long way in preventing costly clean-up and frustration. By understanding the risks and implementing preventative measures, you can enjoy your polished pieces without worrying about unwanted stains.
Preventing Nail Polish Spills
Nail polish spills are a common occurrence, especially when applying or removing the polish. Implementing preventative measures can significantly reduce the risk of these spills, protecting your wood surfaces from potential damage. Proactive steps minimize the chance of costly clean-up.
- Use a Protective Surface: Employing a protective surface like newspaper or plastic sheeting under your work area is essential. This barrier acts as a shield, trapping any accidental spills and preventing them from reaching the wood beneath. This is a straightforward and highly effective way to safeguard your furniture and other valuable wood surfaces.
- Designated Work Area: Establish a specific, dedicated area for nail polish application and removal. This area should be easily cleaned and protected. Choose a spot away from your valuable wood surfaces, minimizing the chance of spills affecting your treasured items.
- Careful Application and Removal: Exercise caution when applying and removing nail polish. Slow, deliberate movements and attention to detail can prevent spills and drips. Use a steady hand and avoid overly aggressive motions, especially near delicate wood surfaces.
- Proper Ventilation: Ensure adequate ventilation during nail polish application and removal. Poor ventilation can lead to spills and drips, increasing the risk of accidental contact with wood surfaces. Open a window or use a fan to circulate the air and reduce the risk of accidental damage.
Avoiding Nail Polish Application on Wood
Careful planning and mindful application can minimize the risk of nail polish contact with wood surfaces. This proactive approach protects your valuable wooden items and avoids potential damage.
- Placement and Separation: Position your work area (e.g., table, countertop) away from any wood surfaces. Maintain a clear separation between your work area and your wood items to prevent unintentional contact.
- Alternative Surfaces: Utilize surfaces like cardboard, aluminum foil, or a disposable plastic tray for your nail polish application. These offer a safe, easily disposable barrier, eliminating the risk of spills or contact with wooden surfaces.
Protecting Wood Surfaces During Nail Polish Application and Removal
Creating a buffer zone is crucial when working with nail polish. This involves utilizing a protective layer to prevent any spills or drips from reaching the wood.
- Lay down newspaper or plastic sheeting: Place newspaper or plastic sheeting on the work surface to serve as a barrier between your work area and the wood surfaces. This creates a protective layer that will catch any drips or spills.
- Use a tray or container: If applying nail polish, use a tray or container to collect any drips or spills. This method helps prevent the nail polish from reaching the wooden surface.
- Keep wood surfaces covered: When working with nail polish, cover any wood surfaces that may be exposed to potential spills or drips with a protective sheet. This minimizes the risk of unwanted nail polish stains.
- Proper ventilation: Ensure proper ventilation during nail polish application and removal to prevent spills and drips. Open a window or use a fan to circulate the air and reduce the risk of unwanted stains.
Specific Removal Techniques
Removing nail polish from wood requires a delicate touch and the right approach. Choosing the wrong method can lead to irreversible damage, ruining your beautiful piece of furniture or artwork. Understanding the different wood finishes and the appropriate removal techniques is crucial to preserving the integrity of the wood while effectively removing the offending polish. Let’s dive into the specifics.
Removing Nail Polish from Varnished Wood
Varnished wood often presents a protective layer over the wood grain. This layer can make removal more challenging but also provides a degree of protection against damage during the process. Gentle methods are paramount. Using a soft cloth dampened with a specialized wood polish remover, or a mixture of mineral spirits and denatured alcohol (in a 1:1 ratio), apply the solution gently to the affected area.
Work in small, controlled circles. Avoid excessive pressure, which can mar the finish. Monitor the area constantly, as some varnishes might be sensitive to solvents. If the polish isn’t lifting, use a soft-bristled brush to gently loosen the polish without scratching the surface.
Removing Nail Polish from Lacquered Wood
Lacquer is a thin, quick-drying finish, making it susceptible to solvents. Using a specialized lacquer thinner or a mixture of denatured alcohol and mineral spirits (in a 1:1 ratio) is often the most effective method. Apply the solvent to a clean, soft cloth or cotton swab and gently dab at the affected area. Avoid saturating the wood, as this can cause the finish to lift or become uneven.
Watch closely for any signs of the lacquer softening or bubbling. If the polish doesn’t lift, try using a cotton swab or soft brush.
Removing Nail Polish from Oil-Based Finished Wood
Oil-based finishes, like those found on antique furniture, require a more cautious approach. These finishes are often more resilient, but solvents can still cause damage if not used correctly. A specialized wood polish remover specifically designed for oil-based finishes is ideal. Apply the remover to a soft cloth and gently wipe the affected area. Use light, circular motions, ensuring not to saturate the wood.
Monitor the area closely and stop if you see the finish lifting or becoming uneven. Alternatively, mineral spirits can be used, but always test in an inconspicuous area first. Never use harsh chemicals or abrasives.
Comparison Table of Removal Techniques
| Wood Finish | Recommended Solvent/Remover | Application Technique | Potential Risks |
|---|---|---|---|
| Varnished | Specialized wood polish remover, or a mixture of mineral spirits and denatured alcohol (1:1) | Gently dab with a soft cloth in small, controlled circles. Avoid excessive pressure. | Over-saturation can cause finish lifting or marring. |
| Lacquered | Specialized lacquer thinner, or a mixture of denatured alcohol and mineral spirits (1:1) | Gently dab with a soft cloth or cotton swab. Avoid saturating the wood. | Solvent can cause the lacquer to lift or become uneven if used improperly. |
| Oil-Based | Specialized wood polish remover for oil-based finishes, or mineral spirits (test in an inconspicuous area first) | Gently wipe with a soft cloth using light, circular motions. Avoid excessive pressure or saturation. | Improper use of solvents can cause finish lifting, damage, or discoloration. |
Dealing with Stubborn Nail Polish: How To Remove Nail Polish From Wood

Nail polish, while beautiful, can sometimes become a stubborn foe when it comes to removal, especially from delicate surfaces like wood. Knowing how to handle dried or heavily pigmented nail polish is crucial to preserving the integrity of your wooden furniture or crafts. This section provides proven techniques to effectively remove stubborn nail polish without damaging the wood.
Softening Dried Nail Polish
Dried nail polish is often harder to remove than fresh polish. A crucial first step is softening the hardened polish. This allows the polish to become more pliable and easier to lift off the wood surface. Different approaches work for various types of nail polish.
- Acetone-Based Nail Polish Removers: Acetone is a powerful solvent that effectively dissolves nail polish. Apply a small amount of acetone-based remover to a soft cloth or cotton ball. Allow the acetone to work on the dried nail polish for a few minutes to soften it.
- Alcohol-Based Solutions: Isopropyl alcohol is another option. Its strength varies, so use it judiciously. A small amount applied to a soft cloth will help loosen the dried polish. However, be mindful that it might not be as effective as acetone.
- Warm Water and Dish Soap: For water-based nail polish, a mixture of warm water and mild dish soap can be effective. Apply the mixture to a soft cloth and gently scrub the area. This approach is ideal for delicate woods or those prone to scratching.
Removing Nail Polish from Hard-to-Reach Areas
Dealing with nail polish in tight spaces or hard-to-reach areas requires specialized tools and techniques. Avoid using abrasive materials or tools that could scratch the wood.
- Small, Soft Brushes: Small, soft-bristled brushes, such as those used for model painting, are perfect for getting into tight corners. Apply the chosen solvent to the brush and gently work around the dried polish.
- Cotton Swabs or Q-Tips: Cotton swabs or Q-tips can be invaluable for reaching small crevices or areas. Dip the swab in the chosen solvent and gently lift the nail polish.
- Wooden Spatulas or Tweezers (Carefully): In some cases, a small wooden spatula or tweezers can be used to carefully lift the nail polish from hard-to-reach areas. Use extreme caution, and avoid using metal tools, which can scratch the wood.
Importance of Using a Soft Cloth or Brush
Protecting the wood’s surface is paramount. Using a rough or abrasive tool can leave scratches or damage the finish. A soft cloth or brush prevents this.
- Scratch Prevention: Rough materials will damage the wood’s surface, potentially leading to significant imperfections. Soft cloths or brushes are crucial for a gentle and safe removal process.
- Maintaining the Wood’s Integrity: By avoiding harsh materials, you ensure the wood’s beauty and structural integrity remain intact. The preservation of the wood’s original condition is paramount.
Step-by-Step Guide for Stubborn Nail Polish Removal
This guide provides a systematic approach for dealing with stubborn nail polish on wood.
- Assess the Situation: Identify the type of nail polish and the severity of the stain. This will dictate the appropriate removal method.
- Soften the Polish: Apply the appropriate solvent (e.g., acetone, alcohol) to a soft cloth or brush. Allow it to soften the polish for a few minutes.
- Gently Lift: Using a soft cloth or brush, gently lift the softened polish from the wood surface. Work in small, controlled strokes.
- Clean the Area: Wipe the area with a clean, damp cloth to remove any remaining solvent or polish residue.
- Inspect and Repeat (if needed): Check for any remaining polish. If necessary, repeat steps 2-4 until the stain is completely removed.
Aftercare Procedures
So, you’ve successfully removed the nail polish from your prized wooden furniture or decorative piece. Now, it’s crucial to ensure the wood’s health and beauty are restored to their former glory. This involves careful cleaning, proper drying, and neutralizing any lingering solvents. Skipping these steps can lead to damage, discoloration, or even permanent damage.After successfully removing the nail polish, the wood needs thorough attention to maintain its integrity and appearance.
This involves meticulous cleaning to remove any residues and solvents, and drying to prevent water damage and warping. Proper neutralization of remaining solvents is essential to avoid any chemical reactions that could harm the wood or create unpleasant odors. A detailed understanding of these procedures will guarantee the best possible outcome.
Cleaning the Wood Surface
Thorough cleaning is essential to remove any traces of nail polish remover and residue. This will also help prevent future discoloration or damage. Use a soft, lint-free cloth or a microfiber cloth to gently wipe the surface. Avoid harsh scrubbing, as this can scratch the wood. For stubborn marks or areas that need a deeper clean, a wood cleaner can be effective.
Neutralizing Remaining Solvents
It’s vital to neutralize any remaining solvents to prevent potential damage or reactions with the wood’s natural oils and finish. A mild, neutral cleaner is the best approach. Avoid using harsh chemicals, as they can damage the wood’s protective layer. Applying a diluted solution of rubbing alcohol can help to break down any remaining solvent residue.
Using a Wood Cleaner for a Deeper Clean
For stubborn marks or areas that require a deeper clean, a wood cleaner can be highly effective. These cleaners are specifically formulated to remove dirt, grime, and other impurities without damaging the wood’s surface. Follow the manufacturer’s instructions carefully, and test the cleaner in an inconspicuous area first to ensure it doesn’t alter the wood’s color or finish.
Drying the Wood
Proper drying is critical to prevent water damage and warping. Use a soft, clean cloth to gently blot the surface, removing excess moisture. Allow the wood to air dry completely in a well-ventilated area, away from direct sunlight or heat sources. Avoid using a hairdryer or other heat sources, as this can damage the wood’s finish.
Recommended Cleaning Products, How to remove nail polish from wood
The appropriate cleaning product depends on the type of wood. Different types of wood have different needs and sensitivities to certain chemicals. A table outlining recommended cleaning products for various wood types is provided below. Always test a cleaning product in an inconspicuous area before applying it to the entire surface.
| Wood Type | Recommended Cleaning Product | Important Considerations |
|---|---|---|
| Oak | Mild dish soap and water | Avoid harsh chemicals or abrasive cleaners. |
| Mahogany | Wood cleaner specifically designed for polished wood | Follow manufacturer’s instructions carefully. |
| Pine | Mild soap and water or a wood cleaner formulated for softwoods | Avoid harsh abrasives that can scratch the wood. |
| Cherry | Wood cleaner specifically designed for polished wood | Follow manufacturer’s instructions carefully. |
| Walnut | Mild dish soap and water or a wood cleaner specifically for hardwoods | Avoid harsh chemicals. |
Final Wrap-Up
In conclusion, successfully removing nail polish from wood involves careful consideration of the wood type, the nail polish’s composition, and the chosen removal method. By following the safe and effective techniques Artikeld in this guide, you can confidently restore your wooden surfaces to their original beauty. Remember, prevention is key, and taking proactive steps to avoid spills can save you a lot of trouble down the line.
Clarifying Questions
What if the nail polish has already dried completely?
Using a soft cloth or brush dipped in a small amount of acetone or a specialized wood cleaner can help soften the dried polish. Be extremely cautious, as prolonged exposure can damage the wood. Work in small, controlled areas.
Can I use any type of solvent to remove nail polish from wood?
No, not all solvents are suitable. Avoid harsh chemicals or abrasive materials as they can damage the wood’s finish. Always test a small, inconspicuous area first to ensure the solvent doesn’t cause discoloration or damage.
How do I prevent nail polish from getting on my wooden furniture?
Cover the furniture with newspaper or plastic sheeting before applying nail polish. Ensure proper ventilation during application and removal to avoid trapping solvents. Keep a clean workspace and be meticulous in your technique.
What should I do if I accidentally spill nail polish on a delicate wooden surface?
Act quickly! Blot the excess polish with a clean, soft cloth or paper towel. Avoid rubbing, as this can spread the stain. Then, follow the appropriate removal method for your specific wood type and polish type as Artikeld in the guide.
