How to reseal stamped concrete, a crucial aspect of maintaining the beauty and longevity of this exquisite surface, is unveiled in this detailed guide. The process, while seemingly complex, becomes straightforward with the right knowledge and approach. Proper resealing not only extends the lifespan of your stamped concrete but also preserves its original charm, ensuring it continues to grace your space with its timeless elegance.
This guide dives deep into the intricacies of resealing stamped concrete, covering everything from surface preparation to selecting the ideal sealer, application techniques, and post-application care. We’ll explore the various types of sealers available, highlighting their strengths and weaknesses, and guide you through choosing the perfect one for your specific needs. Furthermore, we will present troubleshooting tips for common issues, providing practical solutions to ensure a flawless resealing process.
Introduction to Resealing Stamped Concrete
Stamped concrete, with its intricate patterns and durable nature, offers a visually appealing and long-lasting surface for driveways, patios, and walkways. However, like any exterior surface, it requires proper maintenance to preserve its aesthetic beauty and structural integrity. Resealing is a crucial step in extending the lifespan of stamped concrete, protecting it from the harsh elements and preventing deterioration.
Neglecting this process can lead to unsightly cracking, fading, and a loss of the original design’s vibrancy.Resealing stamped concrete is essential for several reasons. It creates a protective barrier against water penetration, which can cause staining, discoloration, and ultimately, damage to the concrete’s underlying structure. This protection also shields the surface from UV rays, preventing fading and maintaining the rich colors and patterns of the original design.
Furthermore, resealing enhances the concrete’s resistance to stains and chemicals, keeping the surface clean and aesthetically pleasing.
Common Causes of Stamped Concrete Deterioration Requiring Resealing
Stamped concrete, like any other outdoor surface, is vulnerable to various environmental factors. Exposure to harsh weather conditions, including intense sunlight, rain, and freeze-thaw cycles, can lead to significant damage. These cycles can cause cracks and deterioration in the concrete surface, making it more susceptible to stains and water damage. Furthermore, improper application of the initial sealer, or the absence of a sealer entirely, will accelerate the concrete’s deterioration and shorten its lifespan.
Finally, vehicular traffic and pedestrian activity, especially in high-traffic areas, can contribute to the wear and tear of the stamped concrete, demanding more frequent resealing to maintain its integrity.
Types of Stamped Concrete Sealers
Various types of sealers are available for stamped concrete, each with unique characteristics. Understanding these characteristics is essential for selecting the appropriate sealer for your specific needs and environment. The choice will depend on the level of traffic, the climate, and the desired longevity of the seal. Different sealers offer varying degrees of protection, durability, and cost, so a careful evaluation is important.
Pros and Cons of Different Sealing Methods
| Sealing Method | Pros | Cons | Suitable for |
|---|---|---|---|
| Acrylic | Affordable, easy application, relatively quick drying time. | Less durable than polyurethane, may require more frequent applications, potentially less resistant to harsh chemicals and stains. | Low-traffic areas, such as residential walkways or patios with minimal vehicular traffic. |
| Polyurethane | High durability, long-lasting protection, highly resistant to stains, chemicals, and UV rays. | Higher cost, potentially more difficult to apply, can have a longer drying time. | High-traffic areas, such as driveways, parking areas, or areas exposed to harsh weather conditions. |
Preparing the Surface for Resealing
A pristine surface is the cornerstone of a successful resealing project. Just as a painter meticulously prepares a wall before applying fresh coats, so too must the stamped concrete be meticulously readied for a new layer of protective sealer. This preparation ensures the longevity and beauty of your stamped concrete investment. A well-prepared surface allows the new sealer to adhere properly, resisting cracking and peeling, and enhancing its aesthetic appeal for years to come.Thorough surface preparation isn’t just about aesthetics; it’s a crucial step for the sealer’s long-term performance.
Proper cleaning, removal of loose debris, and the careful patching of cracks all contribute to a robust and enduring seal. A well-prepared surface will allow the sealer to penetrate the concrete properly, creating a strong barrier against the elements and extending the lifespan of your investment.
Cleaning the Stamped Concrete Surface
A thorough cleaning is paramount before any resealing. A neglected surface, harboring embedded dirt and debris, will prevent the new sealer from bonding effectively. The objective is to remove all traces of old sealer, dirt, and loose particles.
- Begin by sweeping or vacuuming the surface to remove loose dirt, leaves, and other debris. This initial step is critical to preventing further damage to the concrete and creating a clean canvas for the sealer.
- Next, use a pressure washer to thoroughly clean the concrete. Ensure the pressure is appropriate to avoid damaging the stamped pattern or the concrete itself. Adjust the nozzle for a consistent, controlled spray to eliminate dirt and grime from all areas.
- Pay particular attention to crevices and joints, ensuring the pressure washer reaches all areas. This will guarantee a deep clean and a thorough removal of all contaminants, leading to a superior seal.
- Finally, use a stiff-bristled brush or a scrub brush to remove any stubborn dirt or residue. This step ensures a clean surface free from any remnants of dirt or old sealer that could impede proper adhesion.
Removing Old Sealer
Old sealer can hinder the adhesion of the new sealer. Removing it ensures the new sealer adheres properly to the concrete’s surface, significantly impacting its longevity.
- Employ a specialized concrete cleaner to effectively remove any remaining traces of old sealer. These cleaners are formulated to dissolve sealer without harming the concrete’s integrity.
- Apply the cleaner according to the manufacturer’s instructions, ensuring thorough coverage and contact time to dissolve the old sealer.
- Rinse the surface thoroughly with clean water to remove all traces of the cleaner and any remaining sealer fragments.
Patching Cracks and Holes
Addressing cracks and holes is essential for a uniform and long-lasting seal. These imperfections can compromise the integrity of the new sealer, leading to premature failure. Prompt attention to these issues is crucial for preserving the concrete’s aesthetic appeal and durability.
- Inspect the surface for cracks and holes, noting their size and depth. This careful inspection allows for an accurate assessment of the necessary repair.
- Use a concrete patching compound to fill the cracks and holes. Choose a compound that matches the color of the concrete for a seamless blend. Ensure the compound is appropriate for the depth and size of the imperfections.
- Allow the patching compound to cure completely according to the manufacturer’s instructions. This step ensures that the patch bonds effectively with the surrounding concrete, creating a durable repair.
- Smooth the patched areas to match the surrounding concrete’s surface. This ensures a consistent and visually appealing finish.
Surface Preparation Procedure
A step-by-step approach to surface preparation ensures optimal results. This systematic approach helps achieve a clean and consistent surface, enabling the new sealer to adhere properly and last for many years.
- Begin by sweeping or vacuuming the surface to remove any loose debris.
- Use a pressure washer to thoroughly clean the surface, paying close attention to crevices and joints.
- Apply a concrete cleaner to remove old sealer, following the manufacturer’s instructions.
- Thoroughly rinse the surface with clean water.
- Inspect the surface for cracks and holes, and repair them using a concrete patching compound.
- Allow the patching compound to cure completely.
- Smooth the patched areas to match the surrounding concrete.
Choosing the Right Sealer

Transforming your stamped concrete from a beautiful vision to a long-lasting masterpiece hinges on selecting the right sealer. The right sealer acts as a protective shield, repelling stains, weathering, and general wear and tear. Understanding the nuances of various sealer types is key to preserving the aesthetic appeal and structural integrity of your investment.
Sealer Type Comparisons
Different sealers offer varying degrees of protection and performance. Understanding their characteristics allows informed decisions based on your specific needs. Acrylic sealers are a popular choice for their affordability and ease of application, while polyurethane sealers, despite their higher cost, offer superior durability and resistance to harsh weather conditions. The choice should align with your budget, expected lifespan, and the anticipated environmental stresses your concrete will face.
Factors Influencing Sealer Selection
Several factors significantly impact the choice of sealer. Traffic volume is a crucial consideration; high-traffic areas require sealers with enhanced durability and stain resistance. The prevailing climate plays a significant role; sealers formulated for extreme temperatures or heavy rainfall will offer better long-term protection. Aesthetic considerations are equally important; certain sealers may alter the appearance of the stamped concrete, so choosing a sealer that complements the design is vital.
Compatibility with the existing concrete is paramount; using an incompatible sealer can lead to premature degradation and damage. This compatibility ensures a seamless and long-lasting bond between the concrete and the protective layer.
Sealer Compatibility
Ensuring sealer compatibility with the existing concrete is crucial for the longevity of your stamped concrete. Incompatibility can manifest as peeling, cracking, or discoloration, significantly compromising the aesthetic appeal and structural integrity of the surface. Always consult the manufacturer’s instructions and recommendations to confirm compatibility.
Selecting the Appropriate Sealer Based on Needs
A systematic approach to selecting the right sealer is crucial for optimal results. First, assess the traffic level, noting whether it is low, medium, or high. Next, evaluate the local climate, paying close attention to factors like temperature extremes and precipitation. Finally, consider the desired aesthetic outcome, ensuring the sealer complements the concrete’s design and color.
Sealer Type Suitability Guide
The table below offers a concise comparison of different sealer types, highlighting their suitability for various conditions.
| Sealer Type | Durability | Cost | Application Method | Suitability for… |
|---|---|---|---|---|
| Acrylic | Medium | Low | Brush, roller | Low-traffic areas with moderate climate conditions. Good for occasional foot traffic. |
| Polyurethane | High | High | Brush, spray | High-traffic areas with extreme climates. Excellent choice for areas exposed to heavy foot traffic, vehicular traffic, or harsh weather. |
| Silicone | Medium-High | Medium | Brush, spray | Moderate-traffic areas with a variety of weather conditions. A good compromise between cost and performance. |
Applying the Sealer
Transforming your stamped concrete from a raw canvas to a breathtaking masterpiece hinges on meticulous sealer application. This step isn’t just about aesthetics; it’s about safeguarding your investment, ensuring longevity, and preventing the elements from wreaking havoc on your beautiful design. A proper application method will enhance the concrete’s durability, preserving its color, and resisting stains and damage.Applying the sealer correctly is crucial for the long-term health and beauty of your stamped concrete.
A poorly applied sealer can lead to uneven coverage, premature wear, and unsightly imperfections. Following a precise method and paying attention to detail will ensure a professional-looking finish that protects your investment.
Applying Different Sealer Types
Choosing the right application method for your chosen sealer type is essential for achieving optimal results. Different sealers have unique characteristics and require specific techniques to ensure even distribution and prevent issues like pooling or streaking.
Acrylic Sealer Application
Acrylic sealers are known for their ease of use and relatively quick drying time. They are commonly used for their affordability and ability to penetrate the concrete surface effectively. A brush or roller is ideal for applying acrylic sealers. Apply the sealer in smooth, even strokes, overlapping slightly to prevent gaps. Ensure thorough coverage of the entire surface.
Polyurethane Sealer Application
Polyurethane sealers, on the other hand, provide superior protection and durability, making them suitable for high-traffic areas or harsh environments. They typically require a spray application for even coverage. Using a spray gun ensures precise application, minimizing the chance of uneven coats. A second coat of polyurethane sealer is often recommended for enhanced protection and a more resilient finish.
Even and Thorough Application
Applying the sealer evenly and thoroughly is paramount. Uneven application can lead to areas that are more vulnerable to stains and wear. Apply the sealer in a consistent direction, moving from one area to the next. Ensure the sealer is evenly distributed across the surface. Check for any pooling or streaking, and reapply as needed to achieve an even coat.
Importance of Ventilation
Adequate ventilation is critical during the application process, particularly when using solvents or high-VOC sealers. Proper ventilation minimizes the risk of inhaling harmful fumes and allows for complete drying. Open windows, use fans, or consider a well-ventilated area for the application. This safety measure is paramount to protect your health and well-being.
Application Steps Summary
| Sealer Type | Application Steps |
|---|---|
| Acrylic | 1. Thoroughly clean the surface. 2. Apply the sealer using a brush or roller in even strokes, overlapping slightly. 3. Allow the sealer to dry completely according to the manufacturer’s instructions. |
| Polyurethane | 1. Thoroughly clean the surface. 2. Apply the sealer using a spray gun for even coverage. 3. Allow the sealer to dry completely according to the manufacturer’s instructions. 4. Apply a second coat, following the same procedure as the first coat, for enhanced protection. |
Post-Application Care
Transforming your stamped concrete from a vision to a reality requires more than just the application of sealer. A crucial phase, often overlooked, is the post-application care. This diligent period ensures the sealer’s longevity and the preservation of your stunning concrete design, turning it into a lasting investment.Understanding the intricacies of post-application care is key to the success of your project.
Proper curing, precautions, and maintenance are essential for a beautiful and durable surface that withstands the test of time. These practices not only enhance the aesthetic appeal but also protect the investment you’ve made.
Curing the Sealer
The sealer’s curing process is a critical step. Allowing the sealer ample time to cure fully is vital for achieving maximum protection and preventing premature damage. The sealer’s molecular structure needs time to bond properly with the concrete, forming a robust barrier against moisture, stains, and other environmental factors. This process is influenced by factors like temperature and humidity, and following the manufacturer’s instructions is paramount for optimal results.
Typically, curing times range from 24 to 72 hours, depending on the type of sealer and environmental conditions. Failing to allow sufficient curing time can lead to a less effective seal, making the surface more susceptible to staining and deterioration.
Avoiding Damage to the Newly Sealed Surface
Preventing damage to the freshly sealed surface is crucial in the immediate post-application phase. Certain activities can compromise the integrity of the sealant and the underlying concrete. For instance, avoid heavy traffic on the surface for the specified curing time, as this can disrupt the bonding process. Likewise, refrain from washing or cleaning the surface until the manufacturer’s recommended curing period has elapsed.
Excessive moisture can interfere with the curing process and compromise the sealant’s effectiveness. Understanding these precautions is critical to achieving the desired result and extending the life of the sealed surface.
Maintaining the Sealed Stamped Concrete
Regular maintenance is essential to ensure the longevity of your sealed stamped concrete. Cleaning is vital, but avoid harsh chemicals or abrasive cleaners, as they can damage the sealant. Gentle scrubbing with a soft-bristled brush and mild soap and water is often sufficient. For stubborn stains, a specialized concrete cleaner can be used, but always test in an inconspicuous area first to avoid any unintended damage.
By adhering to these preventative measures, you can preserve the beauty and integrity of your stamped concrete for years to come.
Frequency of Resealing
The frequency of resealing depends on several factors. Heavy foot traffic areas or high-moisture environments, such as patios frequently exposed to rain, may require resealing more frequently than areas with minimal traffic. Furthermore, the quality and type of sealer used will impact the longevity of the seal. A high-quality, durable sealer will extend the time between resealing compared to a less durable option.
Generally, resealing is recommended every 1-3 years, but regular inspections and assessment of the surface’s condition are crucial in determining the precise timing for your specific needs. Consider the specific use and environmental conditions when determining the frequency of resealing.
Cleaning the Sealed Surface After Resealing
Thorough cleaning after resealing is crucial to ensure optimal results. Allow the sealer to cure completely according to the manufacturer’s instructions. Then, gently sweep or vacuum the surface to remove any loose debris. Use a soft-bristled brush and mild soap and water to clean the surface. Avoid harsh chemicals or abrasive cleaners, as they can damage the sealant.
A thorough rinsing with clean water is essential to remove all traces of soap residue. Following these guidelines will ensure a clean and protected sealed surface.
Troubleshooting Common Issues
Resealing stamped concrete can be a rewarding project, but like any intricate process, it can sometimes encounter unexpected challenges. Understanding the potential pitfalls and their solutions is crucial for achieving a flawless and long-lasting finish. This section will guide you through common issues and provide effective solutions to ensure your resealing efforts are successful.
Uneven Sealer Application, How to reseal stamped concrete
Achieving a uniform sealer application is paramount for a visually appealing and protective finish. Factors such as inconsistent pressure from the applicator or inadequate coverage can result in uneven distribution. This can lead to areas where the sealer is too thick, resulting in a dull appearance, or too thin, leaving the concrete vulnerable to staining.
- Proper application techniques are essential. Employ a consistent, overlapping motion when applying the sealer, ensuring that every square inch receives an even coating. Use the appropriate pressure setting for the sprayer or roller to avoid dripping or pooling. The sealer should be applied in thin, even coats rather than thick layers.
- Uneven application is often exacerbated by insufficient preparation. Ensure the concrete surface is thoroughly cleaned and free from debris, dust, or contaminants that can disrupt the sealer’s even spread. A properly cleaned surface is the cornerstone of a uniform application.
- Consider the type of sealer. Certain sealers are more prone to uneven application than others. Consult the manufacturer’s instructions for the best application techniques and surface preparation procedures. Understanding the characteristics of the sealer you are using will prevent potential problems.
Streaking
Streaking, characterized by visible lines or bands of different shades, can mar the aesthetic appeal of your resealed concrete. This often arises from uneven application or improper use of the equipment. In some cases, it can also indicate incompatibility between the sealer and the concrete surface.
- Ensure the sealer is well-mixed before application. Improper mixing can result in variations in the sealer’s concentration, leading to uneven absorption and streaking. Follow the manufacturer’s instructions for proper mixing and agitation.
- Apply the sealer in multiple thin coats rather than a single thick coat. This prevents the sealer from pooling or drying unevenly, which can cause streaking. A thin layer application ensures consistent coverage.
- Check for uneven surface preparation. Any irregularities or high spots in the concrete surface can lead to variations in sealer absorption and streaking. Use a concrete grinder or similar tools to smooth out any imperfections before applying the sealer. Thorough preparation is critical.
Bubbling
Bubbling, where air pockets form in the sealer, is an unsightly and potentially problematic issue. It is frequently caused by trapped air in the sealer itself, or when the concrete isn’t adequately prepared. Moisture trapped beneath the sealer can also lead to bubbling issues.
- Ensure the sealer is thoroughly mixed and agitated. Allow sufficient time for any entrapped air to escape before applying. This step prevents the air from forming bubbles in the sealer after application.
- Check for moisture in the concrete. If the concrete surface is damp or wet, the sealer will struggle to adhere properly, resulting in bubbling. Allow the concrete to dry completely before applying the sealer. This will prevent moisture from disrupting the sealing process.
- Apply the sealer in a cool, dry environment. Extreme temperatures can affect the sealer’s ability to cure and may contribute to bubbling. Applying the sealer in optimal temperature conditions will improve the sealer’s adherence and reduce the likelihood of bubbling.
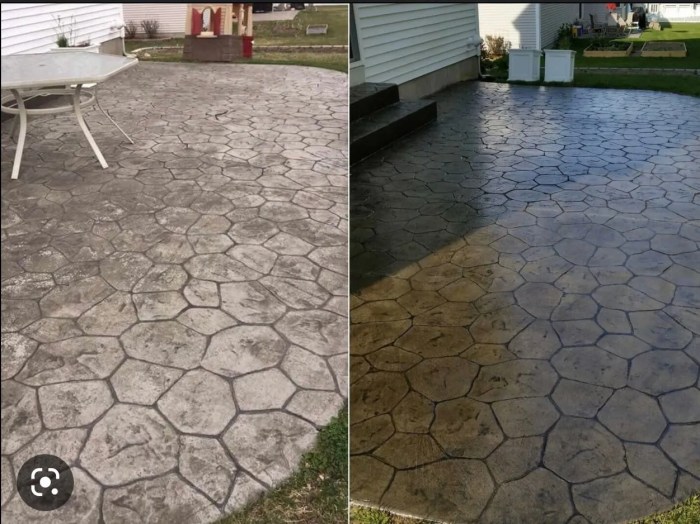
Visual Aids and Case Studies
Unveiling the transformative power of resealing stamped concrete is best understood through visual storytelling. The transformation from a weathered surface to a revitalized masterpiece is palpable, and the before-and-after comparisons truly highlight the remarkable results achievable with proper resealing techniques. These visual aids, combined with real-world case studies, will illustrate the long-term benefits and aesthetic enhancements that properly sealed stamped concrete can provide.Case studies and visual examples demonstrate the crucial impact of a well-executed resealing project on the longevity and visual appeal of stamped concrete.
The following sections offer a comprehensive view of this process, showcasing successful applications and highlighting potential pitfalls to avoid.
Visual Impact of Resealing
Resealing stamped concrete breathes new life into the surface, dramatically improving its visual appeal. The process restores the original beauty and vibrancy, enhancing the intricate patterns and textures meticulously crafted during the initial stamping. A faded, dull surface transforms into a gleaming, rich aesthetic, showcasing the design’s initial brilliance. Before-and-after images showcase the stark difference, highlighting the revitalization process.
Stages of the Resealing Process
A series of carefully documented steps throughout the resealing process provide a visual guide to the procedures. Each step is crucial to ensure a high-quality outcome, from thorough surface preparation to the meticulous application of the sealer. High-resolution images illustrate the proper techniques for applying the sealer, ensuring even coverage and minimizing potential issues. The images highlight the importance of avoiding runs, drips, or uneven application.
Proper vs. Improper Sealing
Visual comparisons between properly sealed and improperly sealed stamped concrete illustrate the significant impact of correct application. A properly sealed surface exhibits uniform color, deep penetration, and enhanced durability. The sealer effectively protects the concrete from staining and fading. Conversely, improperly sealed surfaces display uneven coloration, noticeable runs, or streaks, highlighting the importance of meticulous application. Improper sealing leads to premature deterioration and a compromised aesthetic appeal.
Examples of both situations will be visually presented to showcase the difference.
Successful Resealing Case Studies
Case studies of successful resealing projects illustrate the lasting benefits of the process. A specific example might highlight a homeowner whose stamped concrete patio, once marred by stains and fading, was revitalized through professional resealing. Images of the patio before and after resealing demonstrate the significant improvement in appearance and resilience. This, coupled with the long-term durability of the resealed surface, showcases the value of proper resealing.
Another case study might detail a commercial property where the resealing project significantly reduced maintenance costs and enhanced the property’s curb appeal. The long-term impact of resealing, including the reduced need for future repairs and the sustained aesthetic appeal, will be a key focus. These case studies provide compelling evidence for the long-term value of investing in professional resealing.
Closing Summary: How To Reseal Stamped Concrete
In conclusion, resealing stamped concrete is a significant investment in preserving its beauty and longevity. This comprehensive guide has armed you with the knowledge and strategies to undertake this task with confidence. By meticulously following the steps Artikeld, you can revitalize your stamped concrete, ensuring it remains a stunning focal point for years to come. Remember, the key to a successful resealing project lies in thorough preparation, proper selection of materials, and meticulous execution of the application process.
FAQ Resource
What are the typical signs that my stamped concrete needs resealing?
Signs of deterioration, such as fading color, visible dirt penetration, and the appearance of cracks and chips, often indicate that resealing is necessary. Regular inspection is key to preventing further damage.
How often should I reseal my stamped concrete?
The frequency of resealing depends on factors like traffic, climate, and the type of sealer used. High-traffic areas and harsh weather conditions necessitate more frequent resealing compared to low-traffic areas in milder climates.
Can I reseal stamped concrete myself, or should I hire a professional?
While resealing stamped concrete can be done independently, especially for smaller areas, it is recommended to seek professional assistance for larger projects or if you lack experience. Professional expertise ensures optimal results and minimizes potential issues.
What is the best way to clean stamped concrete before resealing?
Thorough cleaning is crucial. Begin by removing loose debris and dirt, then use a suitable cleaner to remove any lingering residue. Pay close attention to the surface, removing any old sealer and ensuring a clean, smooth surface for the new sealer to adhere to.
