How long can you turn off water to toilet? This guide provides a comprehensive overview of factors influencing shutoff durations, from minor repairs to complete toilet replacements. Understanding these parameters helps avoid water damage and ensures efficient plumbing solutions.
From identifying the appropriate shut-off valves to understanding the nuances of various toilet types, this resource equips you with the knowledge to safely and effectively manage your toilet’s water supply.
Understanding Water Shutoff Times for Your Toilet
Turning off your toilet water supply ain’t something you wanna do lightly, fam. It’s crucial to know the dos and don’ts to avoid any plumbing problems. Knowing how long you can safely turn off the water, and why you might need to do it in the first place, is key to keeping your toilet running smoothly.Understanding the factors affecting how long you can turn off your toilet’s water supply is vital.
Different situations demand different durations, and knowing the potential consequences of extended shutoffs is just as important.
Factors Influencing Water Shutoff Times
Various factors influence how long you can safely turn off your toilet’s water supply. The type of plumbing, the presence of sensitive fixtures or appliances connected to the same line, and the overall water pressure in your system all play a role. Additionally, the reason for the shutoff can affect the recommended time frame.
Reasons for Temporary Water Shutoff
Several reasons might necessitate temporarily turning off your toilet’s water supply. Routine maintenance tasks, such as fixing leaks or replacing parts, often require this step. Emergency situations, like a burst pipe, may also call for a water shutoff to prevent further damage or safety hazards. Furthermore, construction or plumbing repairs in the vicinity can also necessitate temporarily turning off the water supply to the toilet.
Typical Duration of Safe Shutoff Periods
The duration of a safe water shutoff for your toilet depends heavily on the specific situation. For routine maintenance, like replacing a toilet flapper, a short shutoff of a few hours is usually sufficient. However, if you’re dealing with a major plumbing repair, the shutoff period could be significantly longer. If you experience a water main break, you should contact your water utility for a permanent shutoff as quickly as possible.
Potential Consequences of Extended Water Shutoff
Turning off your toilet’s water supply for extended periods can lead to various issues. A prolonged shutoff can cause the water pipes to lose pressure and eventually lead to a loss of water pressure in the entire house. This could affect other fixtures and appliances relying on the same water line. Moreover, prolonged lack of water in the system can result in the growth of bacteria and other microorganisms in the plumbing system, which can cause health issues.
Furthermore, if you experience a major water leak and don’t shut off the water supply promptly, the damages can be extensive and lead to expensive repairs.
Procedures Before Shutting Off Water to a Toilet
Before shutting off the water supply to your toilet, it’s crucial to take precautionary measures. First, locate the shut-off valve, usually a small valve under the sink or near the water meter. Next, check the valve’s position to ensure it’s fully open. Afterward, carefully turn the valve clockwise to completely shut off the water supply. Finally, double-check that the water supply is completely off to the toilet by checking for any water flow from the toilet.
Methods for Temporary Water Shutoff: How Long Can You Turn Off Water To Toilet
Yo, peeps! So, you gotta know how to temporarily cut off the water to your toilet, especially if you’re dealing with a leak or somethin’. Knowing the right moves can save you a ton of hassle and potential water damage. Let’s dive into the different methods and get you up to speed!Knowing how to shut off your toilet’s water supply is crucial for repairs, maintenance, and preventing costly water damage.
Different shutoff valve types exist, and understanding their operation is key to a smooth and safe procedure. This will guide you through the steps to isolate the water supply line and locate the valve, equipping you with the tools needed for a quick and easy fix.
Different Shutoff Valve Types and Operation
Various shutoff valves are used in plumbing systems. Understanding the differences between them will help you identify the correct valve type in your home. The most common types include ball valves, gate valves, and angle valves.
- Ball Valves: These are typically used for quick on/off operations. They feature a ball with a hole that allows water flow when the ball is in the correct position. They’re often found in simpler plumbing setups. Imagine a ball in a pipe; turn it, and the water stops or flows.
- Gate Valves: These valves use a gate-like mechanism to control water flow. They’re more suitable for situations requiring precise control, and they can be used to shut off water completely. Gate valves are typically used for larger pipes.
- Angle Valves: These valves have a 90-degree angle design, which makes them easier to access in some plumbing setups. They are a good option for toilets and other fixtures, providing a convenient method for water shutoff.
Locating the Toilet Water Supply Shutoff Valve
Finding the shutoff valve is the first step. It’s usually located near the base of the toilet, behind the wall, or under the floor. Common places include beneath the toilet base, in a utility closet, or behind a wall.
Steps to Isolate the Water Supply Line
- Turn off the water supply valve completely. This is crucial to prevent water from flowing into the toilet.
- Close the shutoff valve. This will stop the water flow to the toilet.
- Check for leaks around the valve. Look for any signs of dripping water to ensure a complete shutoff.
Tools Needed for Water Shutoff
Safety first! Having the right tools will help you work efficiently and avoid any accidents. These are the essential tools:
- Adjustable wrench: Essential for turning valves.
- Pipe wrench: Used for tightening or loosening pipe connections.
- Screwdrivers (various types): Helpful for accessing valve covers or other parts.
- Gloves: Protect your hands from water and potential hazards.
- Flashlight or headlamp: Provides visibility in hard-to-reach places.
Troubleshooting Water Shutoff Issues
Bro, shutting off the toilet water ain’t always a walk in the park. Sometimes, things go sideways, and you’re left with a leaky situation, or worse, a plumbing nightmare. This part breaks down the potential hiccups and how to fix ’em, so you can get your water flowing smoothly again, without drama.Understanding the potential problems and how to fix them is crucial for preventing further damage and ensuring a smooth water restoration process.
Knowing the steps for diagnosing leaks and reconnecting the water supply will help you avoid costly repairs and unnecessary stress.
Potential Problems During Shutoff
Improper shutoff procedures can lead to leaks, water damage, and even more significant plumbing issues. Being mindful of these potential problems is key to preventing a bigger headache later on.
- Faulty Shut-off Valves: Sometimes, the shutoff valve itself might be the culprit. It could be worn out, corroded, or simply stuck, making it difficult or impossible to completely turn off the water. This can result in a steady drip or a gushing leak even after you think you’ve shut it off properly. A rusty or damaged valve might require professional attention.
- Hidden Leaks: Even after shutting off the water, a leak could still be present. This often involves hidden leaks in pipes or connections behind walls or floors. You might not see the leak immediately, but you’ll notice signs like dampness, or a slowly rising water level in a tank. These can be tricky to spot, requiring careful observation and maybe a bit of detective work.
- Incorrect Shutoff Procedure: Turning the valve too slowly or not turning it fully can result in a leak. Turning it too fast might also break something. Ensuring a complete shut-off is essential to avoid these issues. A proper shut-off procedure can prevent these problems.
Diagnosing Leaks After Shutoff
After turning off the water, it’s essential to check for any leaks to avoid potential damage. Checking thoroughly is key.
- Visual Inspection: Carefully inspect the area around the toilet for any signs of moisture, dampness, or drips. Check under sinks, around pipes, and the floor. A wet spot might be a giveaway.
- Listening for Drips: Listen carefully for any dripping sounds, even if it’s faint. Use your ears to pinpoint the source of the leak, and don’t overlook any quiet drips.
- Using a Moisture Meter: If visual and auditory checks don’t reveal anything, use a moisture meter to detect hidden moisture or dampness in walls or floors. This can help determine the exact location of a leak, which might not be obvious.
Reconnecting the Water Supply
Reconnecting the water supply after a temporary shutoff should be done cautiously. Careful reconnection is crucial to avoid restarting a leak.
- Verify the Shutoff Valve: Ensure the shutoff valve is fully closed and secure. This is important to avoid any leaks or damage to the valve.
- Turn the Water Back On Slowly: Slowly open the water valve. This will prevent a sudden rush of water, which could cause a leak or burst pipe. Monitor the water pressure and look for any leaks around the valve.
- Check for Leaks: After turning the water back on, thoroughly inspect the area around the toilet, including the pipes and connections, for any signs of leaks. Don’t be hasty; a quick check could miss a slow drip.
Risks of Improper Shutoff Procedures
Improper shutoff procedures can lead to various problems, ranging from minor leaks to significant water damage. Understanding these risks is crucial to prevent problems.
- Leaks: Leaking water can lead to wasted water, increased water bills, and potential water damage to your home.
- Mold and Mildew Growth: Standing water or moisture can lead to mold and mildew growth, affecting the health of you and your family.
- Structural Damage: Significant water damage can lead to structural problems in your home, such as weakened walls or floors.
Finding and Fixing Leaks
Addressing leaks promptly can prevent significant water damage. Quick action is key.
- Identify the Leak’s Location: Pinpointing the precise location of the leak is the first step in fixing it. Use a combination of visual and auditory inspection techniques to locate the source of the leak.
- Repairing the Leak: After locating the leak, you can repair it. The repair method depends on the type of leak. This could involve tightening connections, replacing washers, or, in more severe cases, calling a plumber.
- Prevention Measures: Taking preventive measures to prevent future leaks, such as checking pipes regularly and fixing any issues promptly, is vital to avoid recurring problems.
Safety Precautions and Considerations

Hey Makassar peeps! Turning off your toilet water supply can be a super handy skill, but safety is key. We gotta be extra careful when dealing with water shutoff valves to avoid any nasty surprises. Following proper safety procedures can prevent potential problems and keep you and your home safe and sound.
Importance of Safety Measures
Proper safety measures are crucial when working with water shutoff valves. Neglecting these precautions can lead to serious issues, like water damage, equipment malfunctions, or even personal injury. Taking the necessary safety steps ensures a smooth and risk-free water shutoff process, minimizing the chance of unwanted problems.
Safety Equipment for Water Shutoff Procedures
Using the right tools and gear is essential for a safe water shutoff job. Always wear safety glasses to protect your eyes from flying debris or splashes, and consider using work gloves to protect your hands. This is like when you’re playing a dangerous game—you gotta have the right equipment!
Potential Hazards of Water Shutoff Procedures
Several hazards can arise during water shutoff procedures. Water damage is a common concern, especially if the shutoff isn’t done correctly. Leaks can also occur if the valve isn’t properly turned off, potentially leading to water damage and increased bills. Improper handling of tools or equipment can result in damage to the tools themselves or to the plumbing system.
Accidents are always a risk.
Preventing Water Damage During Temporary Shutoff
To prevent water damage during a temporary shutoff, carefully turn off the main water supply valve. Thoroughly check for leaks after turning off the valve. Even a small leak can lead to a significant amount of water damage over time. Also, keep an eye out for any signs of water seeping from the pipes.
Potential Hazards and Safety Measures
| Hazard | Safety Measure |
|---|---|
| Water Damage | Turn off the main water supply valve before starting any work. This is the most critical safety step. |
| Leaks | Inspect the pipes and fittings for leaks immediately after turning off the water supply. If you find any leaks, promptly address them. |
| Equipment Damage | Use appropriate tools and techniques to avoid damaging the plumbing system or the equipment itself. Avoid using excessive force when working with water valves. |
| Injury | Wear safety glasses and gloves to protect yourself from potential injuries, such as cuts, scrapes, or splashes. Always follow manufacturer’s instructions for using tools and equipment. |
Examples of Situations and Durations
Turning off the toilet water supply isn’t just for major plumbing jobs, fam! Sometimes, you gotta shut it off for smaller repairs or maintenance. Knowing how long you need it off can help you plan ahead, avoid leaks, and save some serious time and stress.
Scenarios Requiring Temporary Water Shutoff
Temporary shutoffs are common in everyday situations. Whether it’s a leaky pipe or a stubborn clog, understanding the timeframes for different issues is key. Knowing the estimated duration will help you plan your day and get things back to normal quicker.
Estimated Shutoff Durations
This table provides a general idea of how long you might need to turn off the water for different situations. Remember, these are estimates, and the actual time may vary based on the specific circumstances.
| Situation | Estimated Duration |
|---|---|
| Minor repair (e.g., replacing a washer) | 1-2 hours |
| Flushing issues (e.g., fixing a clogged drain) | 1-4 hours |
| Toilet replacement | 2-4 hours |
Typical Repair Procedures and Timeframes
A typical minor repair, like replacing a toilet flapper or a leaky seal, usually takes 1-2 hours. This includes the time needed to shut off the water, perform the repair, and then turn the water back on. If the issue is more complex, like a clogged drain, it might take longer, up to 4 hours. A toilet replacement, of course, will need a longer shutoff period, between 2 and 4 hours, depending on the complexity of the installation and any additional work involved.
Varying Timeframes for Specific Situations
The duration for turning off the water depends heavily on the specific issue. A simple leak might just need a quick fix, while a complete clog or replacement will require more time. For example, if you’re replacing a toilet, you’ll need more time to disconnect the old one, prepare the new one, and connect all the pipes correctly.
So, if you’re tackling a bigger job, it’s always better to plan ahead and allocate enough time to complete the repair successfully.
Different Types of Toilets and Shutoffs
Yo, peeps! So, you wanna know the deets on how to turn off the water for your toilet, depending on what kind of throne you’ve got? Different toilets have different shutoff methods, just like different types of cars have different ways to start their engines. Understanding these differences is key to avoiding any plumbing drama.Knowing how to locate and operate the water shutoff for your specific toilet type can save you major headaches and potential water damage.
Whether you’re a seasoned homeowner or a total newbie, this breakdown will make it crystal clear.
Comparison of Shutoff Procedures for Different Toilet Types
Different toilet designs use various shutoff methods. This section clarifies the differences in shutoff procedures for various toilet types, including traditional, low-flow, and modern designs. Understanding these differences is crucial for quick and effective water shutoffs.
- Traditional toilets typically have a manual shut-off valve located beneath the toilet base. This is a common setup, often found in older homes, and the shutoff valve is usually straightforward to access.
- Low-flow toilets also often feature a manual shut-off valve situated beneath the toilet. The shutoff method is similar to traditional toilets, but the low-flow design may involve different plumbing configurations, which could impact the precise location of the valve. Water conservation is a key element in these designs.
- Modern toilets, particularly those with more integrated designs, may feature automatic shut-off valves located behind the toilet tank. This automated system often simplifies the shutoff process and can be especially useful in preventing water damage if a leak occurs. This is a relatively newer technology, so its usage is less common in older homes.
Variations in Shut-off Valve Locations
The location of the shut-off valve varies significantly based on the toilet model. This difference in placement is essential to consider when troubleshooting or performing maintenance on your toilet’s water supply.
- Traditional toilets usually have a shut-off valve positioned directly underneath the toilet base, making it easily accessible. This design is common in older homes, and the location is consistent.
- Low-flow toilets typically use the same under-the-toilet valve location as traditional toilets. This standard positioning simplifies the shutoff procedure, although specific locations might slightly vary depending on the manufacturer.
- Modern toilets, with their built-in automatic shutoff valves, frequently place the valve behind the toilet tank. This concealed location might require a little more effort to locate compared to traditional methods, but the automated shutoff often saves time and effort.
Differences in Shutoff Processes Based on Toilet Design
The shutoff process differs significantly based on the toilet’s design. This section Artikels the steps involved in turning off the water supply for various toilet types.
- Traditional toilets require manually turning off the shut-off valve located underneath the toilet base. This is a straightforward process, but ensuring the valve is completely closed is important.
- Low-flow toilets use a similar manual shutoff method, with the valve typically situated beneath the toilet base. The procedure is relatively simple, involving locating and turning the valve to cut off the water supply.
- Modern toilets, due to their automatic shut-off valves, usually don’t have a visible valve under the toilet. Instead, the shut-off is integrated into the system, often located behind the toilet tank, and requires specific procedures for activation.
Table of Differences in Shut-off Methods
This table summarizes the different shutoff methods for various toilet types.
Visual Representation of Shutoff Processes
Yo, peeps! Knowing where those water shutoff valves are for your toilet is crucial, especially when dealing with a leak or maintenance. It’s like having a secret weapon against plumbing problems – you’ll be chillin’ with a totally fixed toilet in no time.Understanding the layout of your toilet’s water supply lines and valves empowers you to handle these situations with confidence, preventing major headaches and potential water damage.
This visual guide will break it down, making it super easy to spot those critical shutoff points.
Diagram of Water Supply Lines and Valves for a Standard Toilet
A standard toilet’s water supply typically involves two main components: the water supply line and the shutoff valve. This diagram shows the basic setup.
+-----------------+     +-----------------+
|   Water Supply   |-----|  Shutoff Valve   |
|      Line       |     |                 |
+-----------------+     +-----------------+
        |
        |
        V
+-----------------+
|      Toilet     |
+-----------------+
This simplified representation illustrates the direct connection from the water supply line to the shutoff valve, which controls the water flow to the toilet.
Step-by-Step Visual Guide for Turning Off Water to a Toilet
This guide provides a visual sequence for turning off water to your toilet. Following these steps ensures a smooth process and prevents any accidental water damage.
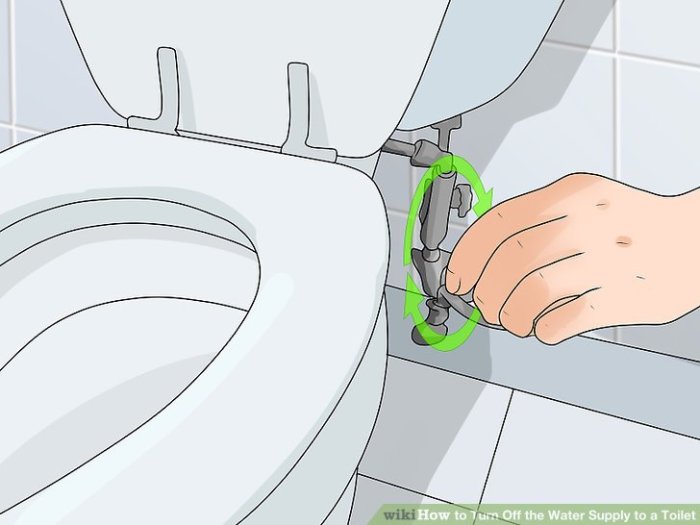
- Locate the shutoff valve. The valve is typically a small, round or rectangular knob, often found near the base of the wall or on the floor where the water supply line connects to the toilet. Different types of toilets might have slightly different valve locations. Some might be tucked behind the wall, making them less visible. So, be thorough in your search!
- Turn the shutoff valve clockwise. Rotating the valve clockwise will close the valve, cutting off the water supply to the toilet. It’s like turning a lock; make sure you do it in the right direction. This simple step can save you from a flooded bathroom!
- Check for water flow stoppage. After turning the valve, turn on the faucet or other fixtures connected to the same water line to verify the water flow is completely stopped. If water continues to flow, you might need to check the valve’s condition or try another valve. This is crucial for preventing further issues.
Procedure for Identifying Water Supply Lines
Locating the water supply lines for your toilet involves carefully inspecting the plumbing behind or near the toilet.
- Look for the water supply line. This line usually is a flexible or rigid pipe, carrying water to the toilet. It’s typically copper or plastic. The pipe’s appearance will depend on your plumbing system.
- Inspect the connection points. Carefully observe where the water supply line connects to the toilet’s water supply. Pay attention to the fittings, connections, and the general area.
Illustrating Various Locations of Water Shutoff Valves, How long can you turn off water to toilet
Water shutoff valves can be found in various locations, depending on your plumbing setup.
| Location | Description |
|---|---|
| Wall-mounted | Common in many homes. These valves are typically found near the base of the wall, easily accessible. |
| Floor-mounted | Occasionally found underneath the toilet or near the wall. These are sometimes concealed by flooring or baseboards. |
| Under sink | In some cases, the shutoff valves might be located under a sink or in a similar concealed area. Be mindful of the area’s setup. |
Last Word
In summary, turning off water to your toilet involves careful consideration of the task’s scope and potential risks. This guide offers practical insights into safe shutoff procedures, durations, and troubleshooting techniques, ultimately empowering you to handle plumbing issues with confidence and minimize potential water damage.
User Queries
How long can I turn off the water to my toilet for a minor leak repair?
Typically, a minor repair allows for a 1-2 hour shutoff, but always prioritize safety and carefully assess the situation.
What are the potential risks of improper water shutoff procedures?
Improper shutoff can lead to leaks, water damage, and potential equipment damage. Always follow the Artikeld safety procedures.
How do I locate the shut-off valve for my toilet?
The location of the shut-off valve varies depending on the toilet type. Refer to the diagram and procedures for your specific toilet model.
What safety equipment should I use when working with water shut-off valves?
Always wear safety glasses and gloves to protect yourself from potential hazards.
