How to fix c0267 pump motor circuit open chevy silverado presents a critical challenge for vehicle owners. This intricate electrical problem demands a methodical approach, recognizing the interconnected nature of the pump motor circuit. A poorly addressed issue can lead to significant performance degradation and potentially costly repairs down the road.
This comprehensive guide delves into the intricacies of the C0267 code, providing a systematic diagnosis, troubleshooting, and repair strategy. We explore potential causes ranging from simple wiring issues to more complex relay malfunctions, offering practical solutions to restore optimal functionality.
Troubleshooting the Circuit Open
The diagnostic trouble code (DTC) C0267, specifically related to a fuel pump motor circuit open in a Chevy Silverado, indicates a critical electrical issue within the fuel delivery system. This interruption in the circuit prevents the fuel pump from operating correctly, potentially leading to starting problems, no fuel delivery, or other related performance issues. Understanding the causes and symptoms of this code is crucial for efficient troubleshooting and repair.
Understanding the C0267 Code
The C0267 code signifies an interruption in the electrical path responsible for powering the fuel pump motor. This open circuit can manifest in various ways, depending on the specific component at fault. The vehicle’s onboard computer detects this failure and records the code to alert the technician to the problem.
Potential Causes of a Circuit Open
Several factors can contribute to a fuel pump motor circuit open in a Chevy Silverado. A breakdown of potential causes includes issues with wiring, relays, and fuses.
- Wiring Issues: Damaged or corroded wires within the wiring harness are common culprits. Physical damage, such as chafing against components or sharp edges, can cause breaks or shorts in the circuit. Moisture intrusion or environmental factors can also degrade wire insulation, leading to an open circuit.
- Relay Failure: The relay responsible for switching power to the fuel pump motor might have failed. Relays are electro-mechanical components that switch current based on electrical signals. If a relay malfunctions, it can prevent the pump from receiving power, leading to a circuit open condition. A common example is a relay that’s physically damaged or whose internal contacts are worn out.
- Fuse Failure: A blown or improperly seated fuse in the fuel pump circuit can also interrupt the power flow, causing a circuit open. Fuses act as safety devices, preventing excessive current from damaging components. If a fuse blows, it must be replaced with one of the same amperage rating to ensure proper functionality.
Common Symptoms Associated with C0267
Several symptoms may indicate a C0267 code. These symptoms may vary in severity depending on the extent of the electrical issue.
- No Starting: The vehicle may fail to start due to a lack of fuel being pumped. This is a clear indication that the fuel pump is not receiving the necessary power.
- Rough Idle or Stuttering: If there is an intermittent or partial circuit open, the engine may run roughly or stutter. This occurs when the fuel pump doesn’t deliver a consistent fuel flow.
- No Fuel Delivery: The vehicle may not deliver fuel at all, resulting in a “no fuel” situation. This can be a result of a total failure of the pump circuit.
- Warning Lights: The instrument panel may illuminate warning lights related to fuel or engine performance.
Visual Inspection of the Wiring Harness and Connections
A thorough visual inspection of the wiring harness and connections related to the fuel pump circuit is essential.
- Inspect the wiring harness for any signs of damage, such as cuts, abrasions, or exposed wires. Pay particular attention to areas where the wiring runs near sharp edges or components.
- Check all connectors and terminals for corrosion or loose connections. Use a cleaner to remove any buildup and ensure a firm connection.
- Examine the fuel pump relay for any signs of damage or overheating. Look for discoloration or physical damage that may indicate failure.
- Verify the integrity of the fuse associated with the fuel pump circuit. A blown fuse is a clear indication of an issue.
Comparing Scenarios of a Circuit Open
The following table provides a comparison of different scenarios for a fuel pump circuit open, highlighting the potential causes and symptoms.
| Scenario | Potential Cause | Symptoms | Diagnostic Steps |
|---|---|---|---|
| Relay Failure | Internal component failure within the relay, causing a complete interruption of the circuit. | No starting, no fuel delivery. | Inspect the relay for physical damage, verify the relay’s operation, and test the circuit continuity between the relay and the fuel pump. |
| Wire Damage | Physical damage to the wiring harness (e.g., cuts, corrosion), leading to an open circuit. | Intermittent starting problems, rough idle, or no fuel delivery. | Inspect the wiring harness visually, check for loose connections, and test circuit continuity along the entire wiring path. |
| Fuse Failure | A blown fuse in the fuel pump circuit. | No starting, no fuel delivery. | Check the fuse for physical damage, replace the fuse, and test the circuit continuity. |
Diagnostic Testing Procedures
Unveiling the hidden culprits behind a malfunctioning pump motor circuit demands a systematic approach. Precise diagnostic testing procedures are crucial to pinpoint the root cause of the C0267 code, ensuring efficient and effective troubleshooting. This meticulous process involves assessing power and ground connections, verifying circuit integrity, and examining critical components like relays and fuses.
Power and Ground Connection Verification
Thorough examination of the power and ground connections is paramount. Incorrect wiring or loose connections can lead to an open circuit, manifesting as a C0267 code. This section details the crucial steps involved in verifying these vital connections.
- Inspecting the Battery Connections: Ensure the battery terminals are clean and securely fastened. Corroded terminals can impede the flow of current, effectively creating an open circuit. Clean the terminals with a wire brush and apply dielectric grease for enhanced conductivity and corrosion prevention.
- Checking the Fuse Box: Verify the relevant fuse for the pump motor circuit is intact and not blown. A blown fuse indicates a potential short circuit or excessive current draw, thus interrupting the circuit flow. Replace the fuse only with the correct amperage rating specified in the vehicle’s electrical diagram.
- Inspecting the Wiring Harness: Visual inspection of the wiring harness for signs of damage like frayed wires, broken insulation, or exposed conductors is essential. Damaged wires can interrupt the circuit flow, leading to a faulty reading. Replace any damaged sections immediately.
Multimeter-Based Circuit Integrity Testing
Multimeter testing provides a quantitative assessment of the circuit’s integrity. This section details the procedure for utilizing a multimeter to detect circuit breaks.
- Resistance Measurement: Use the multimeter’s resistance setting to check for continuity between the power and ground connections. A reading of zero ohms (0Ω) indicates a closed circuit, while an infinite resistance reading (∞Ω) suggests an open circuit, a crucial indicator of the C0267 code. Measure resistance across all critical connections.
- Voltage Measurement: Measure the voltage at the pump motor’s power terminals. A voltage reading close to the battery’s voltage (e.g., 12 volts for a 12-volt system) confirms that power is reaching the pump motor. Variations could indicate a problem in the wiring or a faulty relay.
Relay and Fuse Testing
Relays and fuses are critical components in the electrical system, and malfunctions can lead to an open circuit. This section describes the testing procedures for these components.
- Visual Inspection of Relays: Examine the relays for visible signs of damage or corrosion. Malfunctioning relays can cause an open circuit. Inspect for any burnt spots or discolored components. Replace any damaged relays.
- Continuity Check on Relays: Use the multimeter’s continuity setting to verify the electrical connection within the relay’s coil. A closed circuit (zero ohms) confirms the coil’s integrity, while an open circuit indicates a faulty relay. This step ensures proper power transmission.
- Fuse Inspection: Inspect the relevant fuses for signs of physical damage, melting, or discoloration. A damaged fuse indicates a potential fault in the circuit. Replace the fuse only with the correct amperage rating.
Wiring Harness Continuity Testing
The wiring harness is the lifeline of the electrical system. Continuity testing ensures its integrity. This section details the procedure for testing the wiring harness.
- Testing Individual Wires: Utilize the multimeter’s continuity setting to test the continuity of each wire within the harness. A reading of zero ohms (0Ω) indicates a continuous path, while an infinite resistance (∞Ω) indicates a break in the circuit. This ensures that each section of the wiring harness is functioning properly.
- Comprehensive Wiring Harness Check: Perform a thorough continuity test on the entire wiring harness associated with the pump motor circuit. A comprehensive check across all relevant sections is critical to pinpoint any issues. This process is crucial to identify any intermittent faults that might not be apparent with simple checks.
Diagnostic Test Table
This table Artikels the expected readings for various diagnostic tests.
| Test | Expected Reading | Interpretation |
|---|---|---|
| Power at pump motor terminals | ~12V (12V system) | Power is reaching the pump motor |
| Resistance between power and ground | 0Ω | Closed circuit |
| Resistance between relay coil terminals | 0Ω | Relay coil is functioning |
| Fuse resistance | 0Ω | Fuse is intact |
| Continuity check on wiring harness | 0Ω | Wiring harness is intact |
Component Replacement and Repair
The quest to resolve the elusive “circuit open” fault in the Chevy Silverado’s fuel pump motor demands a meticulous investigation of the critical components. Understanding their interconnected roles and adeptly diagnosing their conditions is paramount to restoring functionality. This process involves more than just swapping parts; it’s about tracing the electrical pathways, identifying weak links, and restoring the system’s integrity.
This meticulous approach will not only rectify the current issue but also prevent future recurrence.The Chevy Silverado’s fuel pump circuit, like a complex network, is composed of numerous interconnected components. Each element plays a vital role in ensuring the smooth operation of the pump motor, from relay switches to insulated wiring. Faulty components can disrupt the flow of electrical current, ultimately leading to the circuit open fault.
This methodical approach to repair is essential to restoring the fuel system’s efficiency.
Relay Component Analysis
Relays are electromechanical switches that act as electrical intermediaries. They are crucial for controlling high-current loads, such as the fuel pump motor, by switching them on or off. A faulty relay may fail to energize the motor, causing the circuit to appear open. The relay’s coil may be damaged, or the contacts might have corroded, preventing a proper electrical connection.
Properly replacing a faulty relay requires matching the replacement to the original specifications for optimal performance and avoiding further complications.
Fuse Inspection and Replacement
Fuses are designed to safeguard the circuit from excessive current flow, which could cause damage to components. A blown fuse often indicates an overload or a short circuit in the fuel pump circuit. Replacement fuses should have the same amperage rating as the original to prevent further issues. Inspecting the fuse housing and ensuring it’s securely installed are critical to preventing future incidents.
Wiring Repair Procedures
Damaged wiring is another potential source of the circuit open fault. Exposed wires or breaks in the insulation can disrupt the electrical flow. Repairing damaged wiring requires careful splicing and ensuring proper insulation. A common method involves using wire connectors and heat-shrink tubing to create a secure and electrically sound joint. This process is crucial to preventing future short circuits and ensuring the integrity of the electrical pathway.
Fuel Pump Motor Replacement
The fuel pump motor itself may be the culprit in the circuit open fault. The motor’s internal components could be damaged, or the wiring connections to the motor could be loose. Replacing a faulty pump motor involves disconnecting the old motor, connecting the new motor, and verifying its proper functionality. Proper installation is paramount to ensure a reliable fuel supply and prevent further issues.
Component Summary Table
| Component | Function |
|---|---|
| Relay | Controls high-current loads (e.g., fuel pump motor) |
| Fuse | Protects the circuit from overcurrent |
| Wiring | Conducts electrical current between components |
| Pump Motor | Provides mechanical power to move fuel |
Preventive Maintenance
Proactive measures are crucial in extending the lifespan of any vehicle’s components, including the crucial fuel pump system. By implementing preventive maintenance strategies, the likelihood of encountering a circuit open in the pump motor can be significantly reduced, saving time, money, and potential frustration. This section details the importance of regular inspections and maintenance to ensure optimal pump performance.Regular inspection of electrical systems is paramount to preventing malfunctions.
Electrical components, including wiring, connections, and the pump motor itself, are susceptible to degradation over time. Preventive maintenance, acting as a safeguard, identifies potential issues before they escalate into costly repairs.
Wiring and Connection Inspection
Proper wiring and connections are fundamental to a reliable electrical system. Corrosion, loose connections, and damaged insulation can lead to intermittent or complete circuit failures. Regular visual inspections can detect these issues before they cause significant problems.
- Visually inspect all wiring for signs of damage, such as fraying, cuts, or exposed wires. Pay close attention to areas where wires are routed through tight spaces or around moving parts.
- Check all terminals and connectors for tightness and corrosion. Use appropriate tools to ensure a secure connection. Loose connections are a common source of electrical problems.
- Inspect the wiring harness for any signs of rubbing or chafing against metal components. Rubbing can cause insulation damage, leading to short circuits or open circuits.
- Verify the integrity of wire insulation. Damaged insulation can lead to short circuits or open circuits, potentially causing a pump motor circuit failure.
Electrical System Checks
Regular electrical system checks are essential to maintain the functionality and safety of the vehicle’s electrical system. These checks can often identify subtle issues before they become critical. A comprehensive check can encompass a wide range of components and connections.
- Inspect the fuse box for any blown fuses or loose connections. A blown fuse indicates a potential overload in the circuit, which could have been caused by an issue with the pump motor.
- Check for any unusual sounds or smells emanating from the electrical system. A burning smell, for instance, could indicate a short circuit. Pay close attention to the pump’s operation.
- Measure the voltage at various points in the circuit using a multimeter. Fluctuations or inconsistencies in voltage can signal a potential problem.
- Verify the proper functioning of the relay and other electrical components associated with the pump motor.
Component Checklist, How to fix c0267 pump motor circuit open chevy silverado
A well-structured checklist can significantly improve the efficiency of preventive maintenance procedures. This structured approach ensures thorough inspection of all crucial components, helping to identify potential problems proactively.
| Component | Inspection Criteria |
|---|---|
| Wiring | Visual inspection for damage, tightness of connections, and insulation integrity. |
| Connections | Verify tightness and absence of corrosion at all terminals and connectors. |
| Fuses | Check for blown fuses or loose connections. |
| Relays | Ensure proper functioning of all relays. |
| Pump Motor | Listen for unusual sounds or smells. |
Tools Needed
The appropriate tools are essential for accurate and efficient troubleshooting and preventive maintenance. Using the correct tools will save time and ensure a professional approach.
- Multimeter: Essential for measuring voltage, resistance, and current. Accurate readings are vital for assessing the condition of the circuit.
- Wire strippers: For safely removing insulation from wires. This is essential for inspecting connections and repairing wiring.
- Screwdrivers: Various types for accessing and securing connections. Precision screwdrivers are useful for delicate components.
- Pliers: For gripping and manipulating wires and components. Crimping pliers are helpful for ensuring secure connections.
- Fuse puller: For safely removing and replacing fuses.
Troubleshooting Variations: How To Fix C0267 Pump Motor Circuit Open Chevy Silverado
Delving into the intricacies of a faulty pump motor circuit, we encounter a spectrum of potential causes. Each scenario, from a simple wire break to a malfunctioning relay, necessitates a tailored diagnostic approach. Understanding these variations and employing the right troubleshooting strategies is paramount for effective repair and preventative measures.
Comparing Circuit Open Scenarios
Different types of wire damage, such as breaks, corrosion, or frayed insulation, manifest distinct circuit open scenarios. A complete break in a wire will result in a definitive open circuit, easily identified with a multimeter. Partial wire breaks or high-resistance connections due to corrosion present a more challenging scenario, often manifesting as intermittent faults. Understanding the specific type of wire damage informs the appropriate troubleshooting strategy.
Relay failures, crucial in switching the pump motor circuit, can also cause an open circuit. Different relay types exhibit varying degrees of complexity in their internal mechanisms, affecting the diagnostic procedure. Analyzing the relay’s function and design becomes crucial in pinpointing the root cause.
Troubleshooting Strategies for Different Causes
A systematic approach is vital when troubleshooting circuit opens. For a definitive open circuit, direct voltage measurements across the faulty section will reveal the break. A visual inspection of the wiring, searching for physical damage, is an essential first step. If corrosion is suspected, cleaning the affected area and retesting the circuit can resolve the issue. For intermittent faults, repeating the voltage test under varying conditions (e.g., while the engine is running) is crucial.
This strategy helps identify subtle changes in resistance or contact points.
Troubleshooting Electrical Components
Troubleshooting specific electrical components, such as fuses, relays, and contactors, involves targeted testing. A blown fuse, a common occurrence, can be easily identified by checking its physical condition. If the fuse is intact but the circuit remains open, the issue likely lies downstream. For relays, verifying the relay coil voltage and observing the operation of the contacts using a multimeter can pinpoint the malfunction.
This testing sequence is critical to isolate the problem to the specific relay component. Furthermore, a comprehensive examination of the contactor’s contacts and coil voltage is essential in determining if the contactor is the root cause of the issue.
Testing for Intermittent Faults
Intermittent faults, characterized by sporadic circuit opens, pose a unique diagnostic challenge. These faults are often difficult to reproduce, making consistent testing crucial. Strategies to isolate intermittent faults include running the vehicle and monitoring the circuit’s behavior. This helps identify the fluctuating resistance in the circuit, guiding the technician to the specific area causing the issue. Visual inspections, combined with voltage measurements under varying conditions, can reveal subtle changes that indicate the intermittent fault’s location.
Moreover, utilizing a specialized diagnostic tool to capture data over time can identify the subtle changes and provide insight into the intermittent fault’s behavior.
Troubleshooting Strategies Table
| Fault Type | Troubleshooting Strategy | Associated Components |
|---|---|---|
| Complete Wire Break | Direct voltage measurement across the suspect section. Visual inspection for physical damage. | Wiring, connectors |
| Corrosion-induced high resistance | Visual inspection for corrosion. Cleaning the affected area and retesting the circuit. | Wiring, connectors |
| Intermittent Fault | Repeating voltage tests under varying conditions (e.g., engine running). Monitoring the circuit’s behavior over time using diagnostic tools. | Wiring, relays, connectors, switches |
| Relay Failure | Checking the relay coil voltage. Observing the relay contacts’ operation. | Relays, contactors |
Electrical Diagrams and Schematics
Delving into the intricacies of the Chevy Silverado’s fuel pump circuit reveals a complex interplay of electrical components. Understanding the circuit’s layout, component placement, and wiring paths is paramount for accurate diagnostics and effective repairs. This section details the electrical diagrams and schematics, providing a comprehensive visualization of the pump motor circuit.
Pump Motor Circuit Diagram for a Chevy Silverado
The diagram below illustrates a simplified representation of the pump motor circuit. Real-world diagrams can be considerably more detailed, incorporating numerous safety features and varying depending on the specific Silverado model year and trim level. Crucially, always consult the vehicle’s official repair manual for the most accurate and complete information.
+-----------------+     +--------+     +-----------+
|   Battery (+)   |-----| Fuse Box|-----| Relay (R)|
+-----------------+     +--------+     +-----------+
        |                     |
        |                     |
        |                     |
        |                     |
        |                     |
        |                     |
        |                     |
        |                     |
        |                     |
+-----------------+     +--------+     +-----------+
|   Battery (-)   |-----| Ground   |-----| Pump Motor|
+-----------------+     +--------+     +-----------+
This simplified diagram highlights the essential components: the battery, fuse box, relay, and pump motor.
Wiring connections are represented by lines.
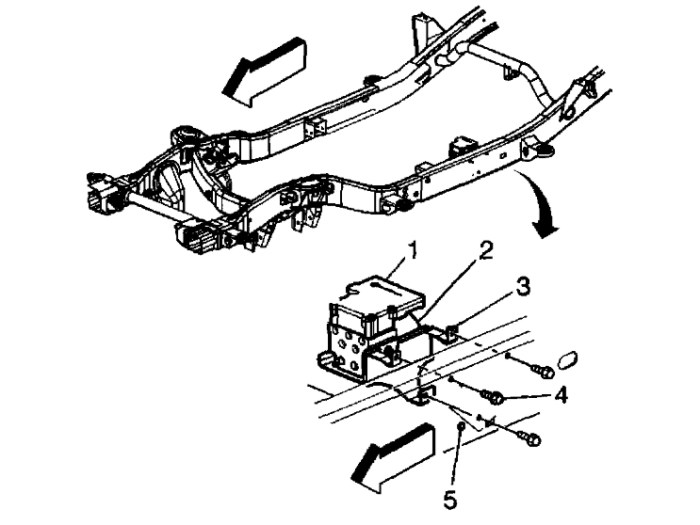
Component Locations on the Vehicle
Precise component placement is crucial for troubleshooting. The battery terminals are located in the engine compartment or under the hood. The fuse box is often found near the battery or in the fuse panel. The relay, responsible for switching the current to the pump, can be located in the fuse box, under the dashboard, or within the engine compartment.
The fuel pump itself is installed within the fuel tank assembly. Detailed location information is available in the vehicle’s service manual. Proper identification is key to pinpointing problems.
Variations in Schematics
Different Chevy Silverado models might employ variations in their fuel pump circuit schematics. These variations are often driven by safety and efficiency considerations. For example, some models might include additional sensors or safety cut-offs. Always reference the specific vehicle’s repair manual for precise wiring diagrams.
Component Function
Each component plays a vital role in the pump’s operation. The battery provides the electrical power. The fuse box protects the circuit from overloads. The relay acts as a switch, controlling the flow of current to the pump motor. The ground wire provides a return path for the current.
The fuel pump motor converts electrical energy into mechanical energy, creating the pressure required to move fuel. Understanding these functions is key to isolating faults.
Complete Pump Motor Circuit Diagram
A complete circuit diagram is crucial for understanding the intricate connections. This detailed diagram illustrates the complete circuit, showing the labeled components and wiring paths. A comprehensive diagram can be found in the vehicle’s repair manual. Note that the diagram is representative, not an exact reproduction of a specific model.
+-----------------+     +--------+     +-----------+     +-----------------+
|   Battery (+)   |-----| Fuse Box|-----| Relay (R)|-----| Pump Motor      |
+-----------------+     +--------+     +-----------+     +-----------------+
        |                     |       |      |           |
        |                     |       |      |           |
        |                     |       |      |           |
        |                     |       |      |           |
        |                     |       |      |           |
        |                     |       |      |           |
        |                     |       |      |           |
        |                     |       |      |           |
+-----------------+     +--------+     +-----------+     +-----------------+
|   Battery (-)   |-----| Ground   |-----| (Wiring) |-----| (Ground)        |
+-----------------+     +--------+     +-----------+     +-----------------+
Last Point
In conclusion, resolving a C0267 pump motor circuit open requires a multifaceted approach encompassing meticulous diagnostic testing, precise component identification, and, if necessary, skilled repair or replacement.
By following the steps Artikeld in this guide, vehicle owners can confidently tackle this challenging issue, ensuring the long-term reliability and performance of their Chevy Silverado.
Top FAQs
What are the typical symptoms of a C0267 code?
Symptoms can include the pump motor not functioning, warning lights illuminating on the dashboard, and unusual noises or vibrations emanating from the vehicle’s electrical system. The specific symptoms may vary depending on the exact nature of the circuit failure.
How can I prevent future pump motor circuit issues?
Regular electrical system inspections, including checks of wiring, relays, and fuses, can help mitigate the risk of future failures. Prompt attention to any warning signs, such as flickering lights or unusual noises, can prevent escalating problems.
What tools are necessary for diagnosing and repairing this issue?
A multimeter, wire strippers, screwdrivers, and a vehicle repair manual are essential tools. The specific tools needed may vary depending on the specific repair tasks involved.
What are the potential consequences of ignoring a C0267 code?
Ignoring a C0267 code could lead to more extensive and costly repairs. A faulty pump motor could cause further damage to other components in the vehicle’s electrical system or mechanical systems. It could also result in a complete failure of the pump system.
