How long does car paint take to dry? This crucial question confronts every automotive enthusiast and professional alike. Understanding the factors influencing drying time is paramount for achieving a flawless, long-lasting finish. From the type of paint to environmental conditions, application methods, and safety precautions, this comprehensive guide unravels the secrets behind optimal car paint drying.
This in-depth exploration will delve into the intricacies of car paint drying, covering everything from the different stages of the process to troubleshooting common issues. We’ll also discuss safety measures and techniques for achieving a professional-quality result. Get ready to master the art of car paint drying!
Factors Affecting Drying Time
Yo, car paint drying time ain’t no simple thing, it’s like a whole science experiment. From the type of paint to the weather outside, a bunch of factors play a role in how long it takes for your ride to get its fresh coat of color. Knowing these factors can save you a ton of time and frustration, so let’s dive in.Understanding these variables is crucial for anyone working with car paint, whether you’re a pro detailer or just trying to touch up your own ride.
Different paints react differently to various conditions, and knowing those reactions can mean the difference between a perfect finish and a paint job that looks like it was done by a five-year-old.
Paint Type and its Influence
Different types of car paint have varying drying characteristics. Single-stage paints, for example, are often quicker to dry than two-stage paints, which require multiple layers and curing processes. Two-stage paints typically yield a richer, more vibrant finish, but they take longer to fully cure. The chemical makeup of the paint directly affects the drying process, influencing the rate at which solvents evaporate and the time needed for cross-linking reactions to occur.
This difference in curing times is a key factor in ensuring a durable and long-lasting paint job. For example, a single-stage paint might be perfect for a touch-up job, but for a full repaint, the longer drying time of a two-stage system is essential for optimal results.
Weather Conditions Impact
Weather plays a huge role in the drying process. High temperatures generally speed up the evaporation of solvents in the paint, leading to faster drying times. Conversely, low temperatures can slow down the drying process significantly. Humidity also affects drying time. High humidity can hinder the evaporation of solvents, leading to longer drying times and potential issues like orange peel effect or runs in the paint.
Direct sunlight can also accelerate the drying process, but excessive exposure can lead to uneven drying and potential cracking.
Application Method and Additives
The method of application also influences drying time. Spray guns, for instance, often result in thinner coats of paint, leading to faster drying times compared to methods like airless spraying. The airless method, which uses higher pressure, can result in a thicker paint application, thus increasing the drying time. Additives in the paint can significantly alter the drying process.
For example, some additives are designed to accelerate drying, while others are formulated to improve adhesion or prevent dust from settling. Understanding these effects is critical for getting the right drying time for the job.
Determining Optimal Drying Time
Determining the optimal drying time for a specific paint system is a critical step in ensuring a quality finish. This usually involves consulting the manufacturer’s guidelines and observing the paint’s visual cues. Checking for tack-free conditions, or when the paint is no longer sticky to the touch, is an important indicator. Additionally, waiting for a specific curing period is vital to allow the paint to fully cure, developing its maximum hardness and durability.
Comparison of Drying Times
| Paint Type | Typical Drying Time (at 75°F/24°C, 50% Humidity) | Curing Time | Chemical Reactions |
|---|---|---|---|
| Single-Stage | 2-4 hours (depending on thickness and coat) | 24-48 hours | Solvent evaporation and surface hardening |
| Two-Stage | 4-8 hours (depending on thickness and coat) | 72 hours or more | Solvent evaporation, cross-linking, and hardener reaction |
| Epoxy | 8-24 hours (depending on thickness and coat) | 48-72 hours or more | Solvent evaporation and curing based on epoxy type |
This table provides a general guideline, and actual drying times can vary significantly based on factors like the specific product, application method, and environmental conditions. Always consult the manufacturer’s data sheet for precise information.
Drying Stages and Processes
Yo, car paint ain’t just magic spray; it’s a complex chemical dance. From the initial mist to the final, rock-solid finish, understanding the drying stages is crucial for a killer paint job. This ain’t no rushed quickie; it’s a meticulous process, each step essential for a durable and long-lasting paint job.The drying process of car paint isn’t a single event but a series of distinct stages, each with its own chemical reactions and timeframes.
These stages, from solvent evaporation to final curing, are like the different acts in a high-octane paint show. Each act is important, and missing one could leave the paint looking weak and vulnerable.
Solvent Evaporation
This initial stage is all about getting rid of the solvents that thin the paint. Imagine it like pouring out the water from a paint mix; the solvents are the water, and they evaporate into the air. This is a fast process, often taking just hours, depending on the ambient temperature and humidity. The rate of evaporation is critical; too fast and the paint might not level properly, too slow and the paint can take forever.
Initial Film Formation
Once the solvents are gone, the paint starts to form a solid film. This is where the real magic begins. The paint’s resins and pigments start to link up, forming a network that gives the paint its strength and color. This is a vital stage; it sets the foundation for the paint’s final look and durability.
Curing
This is the final act, the grand finale. It’s where the paint’s chemical reactions are completed, and the paint becomes incredibly tough and resistant to damage. This process involves cross-linking, where the polymer chains in the paint form even stronger bonds, making the paint incredibly durable. Think of it as the paint hardening, becoming a rock-solid barrier against the elements.
This is the slowest stage, often taking days or even weeks, and it’s essential for the paint to resist cracking and fading over time.
Importance of Each Stage
Each stage is vital for a quality finish. Solvent evaporation ensures the paint lays evenly. Initial film formation builds the foundation for strength. And curing makes the paint resilient to scratches, UV rays, and other environmental factors.
Drying Time vs. Curing Time
Drying time is about the paint changing from a liquid to a solid film. Curing time is the time needed for the paint to reach its maximum hardness and durability. Think of drying as the paint setting up, and curing as it becoming fully hardened and tough.
Drying Time Table
| Drying Stage | Drying Time (approx.) | Key Factors Affecting Time |
|---|---|---|
| Solvent Evaporation | Few hours | Temperature, Humidity, Paint Formulation |
| Initial Film Formation | Few hours to a day | Temperature, Humidity, Paint Formulation, Surface Preparation |
| Curing | Days to Weeks | Temperature, Humidity, Paint Formulation, Surface Preparation, Ambient Air Quality |
Application Techniques and Drying
Yo, car paint nerds! We’ve covered the science behind drying, but now let’s get down to brass tacks: how you apply the paint matters a ton. Different techniques affect drying time, finish, and even the overall look of your ride. Think of it like cooking – you can’t just throw everything in a pan and expect a Michelin-star meal.Different application methods, from the old-school brush to the high-tech airless spray, each have their own unique impact on the drying process.
It’s like choosing your battle armor – some methods are faster, some are more precise, and some are just plain more fun. Let’s dive into the nitty-gritty details.
Impact of Application Methods on Drying Time
Different application methods drastically influence drying times. A brushstroke, for example, creates a more uneven surface, potentially leading to uneven drying, whereas spray techniques can lead to faster drying if done correctly. The key is understanding how each method affects the paint’s exposure to the air and its ability to properly cure. Think of it like a paint-drying party – some methods are more social (like a spray party), and others are more intimate (like a brushstroke).
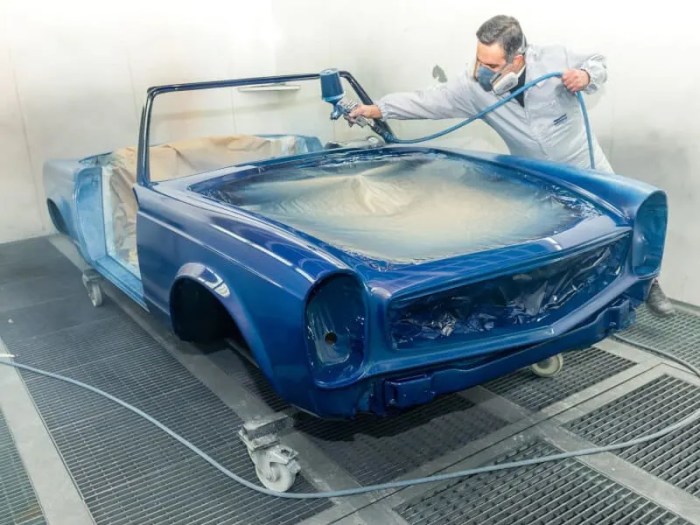
Spray Painting Drying Times and Gun Types
Spray painting is a popular method, but different spray gun types significantly impact drying time and finish. An HVLP (High Volume Low Pressure) gun, for example, delivers a fine mist, leading to a smoother finish and often faster drying times compared to a conventional spray gun. A conventional spray gun can have a less precise application and thus, can take longer to dry completely.
The key is to choose the right gun for the job and follow the manufacturer’s guidelines.
Optimal Spray Gun Pressure and Air Volume
Spray gun pressure and air volume are crucial for achieving the right drying time and finish. Too low a pressure might lead to paint splattering and uneven coverage, taking longer to dry. Too high a pressure could lead to paint overspray and an overly thick coating, potentially creating a rougher finish and a slower drying time. Finding the sweet spot is like hitting the sweet spot in a video game – it takes practice and knowing the nuances of your paint and gun.
Surface Preparation and Drying
Proper surface preparation is essential for a smooth and even drying process. Think of it like getting your kitchen ready before cooking – you want a clean surface to ensure a delicious meal. A properly prepared surface allows the paint to adhere properly, reducing the risk of bubbling, peeling, or uneven drying. If the surface isn’t clean and smooth, it’s like trying to cook a meal on a dirty stovetop – it’s not going to work out well.
Examples of Improper Application Methods
Improper application methods can have a negative impact on the drying process. Using too much paint in one area, for instance, can cause the paint to puddle and take longer to dry. Likewise, applying paint too thinly can lead to a weak finish and potentially uneven drying. Furthermore, failing to properly clean the spray gun between coats can lead to clogs and uneven application, hindering the drying process.
It’s like trying to bake a cake with too much flour – the result will be a disaster.
Safety and Precautions During Drying
Painting a car is a serious business, and proper safety measures are crucial for a smooth, successful, and, most importantly, safe job. Ignoring safety protocols can lead to serious health issues and costly mistakes. Think of it like a high-stakes game of paintball – you need to be strategic and protected!Proper ventilation, personal protective equipment, and careful handling of materials are essential to avoid accidents and ensure a healthy workspace.
It’s like having a safety net for your crew and yourself.
Ventilation Requirements
Proper ventilation is paramount during the drying process. Poor ventilation can lead to harmful solvent inhalation, which can cause serious respiratory issues and other health problems. This is non-negotiable. Think about the paint fumes – they’re not just smells, they’re chemicals.
- Adequate airflow is necessary to remove volatile organic compounds (VOCs) from the air. This is crucial for protecting the health of the workers and minimizing environmental impact.
- Use exhaust systems to direct fumes outside the work area. Imagine a powerful vacuum sucking up all the bad stuff. This is a must-have.
- Ensure proper ventilation in enclosed spaces to prevent buildup of harmful gases. This is essential in garages or smaller workshops.
Personal Protective Equipment (PPE)
Using appropriate personal protective equipment (PPE) is critical to safeguard against exposure to harmful substances. Think of it like wearing a superhero suit for your health.
- Wear respirators that are specifically designed for paint fumes. These masks are designed to protect your lungs from harmful particles.
- Use protective eyewear to shield your eyes from paint splashes or dust. Think safety goggles or face shields, depending on the situation.
- Use gloves and protective clothing to prevent skin contact with solvents and paint. Think rubber gloves and coveralls – your skin is your biggest asset.
Potential Hazards
Certain hazards can arise during the drying process, particularly related to solvent inhalation. These are significant risks to watch out for.
- Solvent inhalation is a significant hazard. Solvents used in car paint are often volatile and toxic. Breathing in these fumes can cause headaches, dizziness, nausea, and even long-term health issues.
- Skin contact with solvents can cause irritation, burns, and other skin problems. Keep your skin covered and use protective creams when necessary.
- Improper disposal of paint residues and solvents can contaminate the environment. Proper disposal is a must.
Proper Ventilation Procedures
Maintaining appropriate airflow is vital to preventing the accumulation of harmful fumes. Good airflow is like a shield against danger.
- Ensure adequate ventilation throughout the drying process. Keep the air moving.
- Use fans or other air circulation methods to improve airflow. This is an essential part of safety.
- Monitor the air quality in the work area to ensure it meets safety standards. Testing is a good practice.
Handling and Disposal Procedures
Proper handling and disposal of paint residues, solvents, and waste materials are critical to environmental protection. Proper disposal is a must for the planet.
- Follow local regulations for the disposal of hazardous waste. Check with your local authorities.
- Use appropriate containers for collecting waste solvents and residues. Use the correct containers for proper handling.
- Dispose of waste materials in designated areas to prevent contamination. Use specific containers for proper disposal.
Safety Precautions at Each Stage, How long does car paint take to dry
This table summarizes the essential safety precautions to take at each stage of the drying process.
| Drying Stage | Safety Precautions |
|---|---|
| Initial Application | Use appropriate PPE, ensure good ventilation |
| Drying | Maintain ventilation, monitor air quality, keep area clean |
| Final Inspection | Thorough check for any issues, follow up with ventilation |
Measuring and Monitoring Drying Time
Getting that perfect, showroom-worthy paint job on your ride requires precision, like a pro-level DJ mixing tracks. Knowing exactly when the paint is dry enough is crucial, preventing issues like unevenness, touch-ups, or worse, a whole new paint job down the road. This section dives deep into the methods for measuring and monitoring drying time, ensuring your paint job is a slam dunk, not a total fail.Accurate drying time measurement is paramount to achieving a professional finish.
It’s like hitting the sweet spot in a song; if it’s too early, it’s a mess, and if it’s too late, it’s just not right. Understanding the nuances of drying times allows for precise application techniques, preventing imperfections and ensuring a flawless, lasting finish.
Visual Inspection Methods
Visual inspection is a basic but effective method for initial monitoring. Different stages of drying exhibit distinct visual cues. For example, a wet film will appear glossy and smooth, while a nearly dry film will show signs of tackiness. Professional detailers have an eye for this, like a seasoned photographer knowing just the right light for a picture.
However, this method is subjective and depends heavily on the individual’s experience. Environmental factors, like temperature and humidity, can also affect the visual cues.
Moisture Meters: The Techy Approach
Moisture meters are electronic tools that measure the moisture content within the paint film. They’re like a high-tech moisture sensor, but for your car paint. These devices provide a more objective measurement of the drying process. They’re great for consistency and can help you nail down a precise drying time. The readings are usually numerical, and different manufacturers will have different units, but generally, a lower reading indicates lower moisture content and thus, a drier paint film.
Specialized Instruments: The Pro Level
Specialized instruments, like those used in industrial settings, offer even more precise measurements. These instruments often combine multiple factors like temperature, humidity, and specific chemical reactions in the paint to create a detailed analysis. Think of them as the ultimate paint drying detective, providing data for complex and demanding jobs, like high-performance racing car paint. However, they are usually more expensive and require more training to use effectively.
For a DIY job, they might be overkill, but for high-end restorations or specific application situations, they become essential.
Comparing Results: The Crucial Interpretation
Different measurement methods can yield different results, just like different cameras capture different nuances in a photograph. Visual inspection might suggest the paint is dry, while a moisture meter might show residual moisture. It’s critical to understand the limitations and advantages of each method to interpret the results correctly. This requires a deep understanding of how the tools function and the specific paint systems you’re working with.
Always consult the paint manufacturer’s guidelines for the best results.
Using Moisture Meters: A Step-by-Step Guide
- Ensure the meter is calibrated correctly, following the manufacturer’s instructions. This is like making sure your measuring tape is properly calibrated; otherwise, the results are worthless.
- Apply the meter’s probe to the paint film at various points. It’s important to test different areas to account for variations in the drying process.
- Record the moisture readings and correlate them with the visual inspection. This will give you a clearer understanding of the drying progress.
- Refer to the paint manufacturer’s data sheets for specific drying time recommendations for the paint type. This is crucial for getting the best possible outcome.
- Note environmental conditions (temperature, humidity) during measurement, as these can significantly impact the drying time.
Limitations and Advantages: A Balanced View
Visual inspection is quick and easy but lacks precision. Moisture meters offer a more objective measurement but can be affected by factors like the probe’s contact with the surface. Specialized instruments provide the most precise data but are often costly and complex to use. Choosing the right method depends on the project’s scope and the desired level of precision.
Think of it as picking the right tool for the job, whether it’s a screwdriver or a power drill.
Troubleshooting Drying Issues
Yo, car paint drying can be a total vibe killer if things go sideways. From uneven finishes to premature cracking, it’s like trying to nail a perfect selfie with a shaky phone. Understanding the potential problems and their fixes is key to pulling off a flawless paint job, so let’s dive into the troubleshooting game plan.
Common Drying Problems
Getting a smooth, flawless paint job is crucial for a killer car look. However, a few common issues can pop up during the drying process, like uneven drying, the dreaded orange peel effect, and premature cracking. These issues can stem from various factors, and knowing the causes and solutions can help you avoid these problems.
Uneven Drying
Uneven drying is a major paint nightmare. It’s like trying to blend a kaleidoscope of colors; the result is anything but harmonious. This often arises from inconsistent application or temperature fluctuations. If the paint isn’t applied evenly, some areas will dry faster than others, leading to visible differences in the finish. Temperature changes during the drying process can also cause uneven drying, creating a patchwork effect.
Orange Peel Effect
The orange peel effect is a real buzzkill. It’s like your paint job got a citrus makeover gone wrong. This is typically caused by improper spraying technique, excessive material build-up, or the use of inadequate spraying equipment. Think about how a spray can produces an uneven pattern; this translates to the car paint job.
Premature Cracking
Premature cracking is a total bummer. It’s like the paint job is trying to split apart before it even gets a chance to show off. This usually results from improper surface preparation, incompatible materials, or excessive moisture.
Identifying the Root Cause
Pinpointing the source of the problem is the first step to fixing it. Take a close look at the paint job, paying attention to areas of uneven drying, orange peel, or cracking. Note the conditions during the application process, like the temperature, humidity, and the type of paint used.
Troubleshooting Guide
This ain’t rocket science, but a methodical approach is crucial. Here’s a guide to help you diagnose and resolve these issues:
- Uneven Drying: If you see blotchy areas, double-check the spray pattern and application technique. Make sure you’re maintaining a consistent distance from the surface while spraying. Ensure the environment’s temperature is stable. If necessary, consider using a heat lamp or a controlled drying chamber to help regulate the process.
- Orange Peel: If the finish has a bumpy texture, it’s probably the spray gun or the material. Adjust the spray gun’s pressure, and ensure proper material mixing. Using the right spraying equipment for the paint job is vital.
- Premature Cracking: If cracks appear before the paint has had a chance to fully cure, review the surface prep. Ensure the surface is thoroughly cleaned and free from contaminants. Make sure the paint is compatible with the surface. If you suspect moisture, consider using a dehumidifier to control humidity levels.
Assessing the Final Paint Job
To ensure the quality of the final paint job, look for signs of incomplete drying. Check for any remaining moisture or wet spots. Examine the paint’s hardness and gloss. A properly dried paint job should have a smooth, consistent finish with no visible imperfections. The paint should be hard enough to resist minor scratches or dents.
Ending Remarks: How Long Does Car Paint Take To Dry
In conclusion, achieving a flawless car paint job hinges on a meticulous understanding of the drying process. By considering the diverse factors affecting drying time, from paint type to weather conditions, and implementing proper application techniques, you can significantly enhance the longevity and aesthetic appeal of your paint job. Remember to prioritize safety precautions throughout the process. With this knowledge, you’ll be well-equipped to confidently tackle any car painting project.
FAQ Insights
What’s the difference between drying time and curing time for car paint?
Drying time refers to the initial evaporation of solvents, while curing time encompasses the chemical reactions that make the paint hard and resistant to scratches and other damage.
How does humidity affect car paint drying time?
High humidity slows down the evaporation of solvents, leading to longer drying times. Lower humidity generally results in faster drying.
What are some common problems that can occur during the drying process?
Uneven drying, orange peel effect, and premature cracking are common issues. Understanding their causes and solutions is vital for achieving a professional finish.
What are the safety precautions when handling car paint solvents?
Adequate ventilation, personal protective equipment (PPE), and proper disposal of residues and waste materials are crucial for a safe drying process.
