How long after window tint to roll windows down? Getting your car’s windows tinted is a cool upgrade, but knowing the right time to roll them down is key. Proper curing time ensures your tint sticks, lasts, and doesn’t peel. This guide breaks down the essential steps and factors to consider, from curing times to potential problems and safety tips.
From different tint types to environmental factors, we’ll explore the science behind the waiting game. Whether you’re a DIY enthusiast or heading to a pro, understanding the curing process is crucial for a flawless finish. Let’s dive into the details!
Timeframe for Window Tint Curing
A subtle, almost imperceptible shift occurs after window tinting. The adhesive, a silent alchemist, transforms from a viscous liquid to a tenacious bond, a process that whispers secrets only the keenest eye can discern. Understanding this transformation is crucial for maximizing the longevity and effectiveness of your window film.The curing process, though seemingly dormant, is a dynamic dance of molecular rearrangements, a slow but steady evolution.
It’s a testament to the artistry of chemistry, a symphony of forces that binds the film to the glass. This stage isn’t just about aesthetics; it’s about the film’s ultimate strength and durability.
Window Tint Curing Process
The curing process involves the adhesive’s gradual polymerization. This polymerization, a complex chemical reaction, leads to the formation of a strong, stable bond between the window tint and the glass. The initial application leaves a sticky residue. Over time, this residue transforms into a durable, permanent layer, holding the tint securely in place. The process is sensitive to environmental conditions and the type of adhesive.
Factors Influencing Curing Time
Several factors play a role in determining how long it takes for the tint to fully cure. Temperature fluctuations, humidity levels, and the specific chemical composition of the adhesive all influence the polymerization rate. Different types of window tint will have varied curing times. The application method also plays a significant part.
Typical Timeframe for Full Cure
The typical timeframe for window tint to fully cure is generally between 24 and 72 hours. However, this is just an average. Some tints might require a shorter time, while others may need a longer period to reach their full strength.
Comparison of Curing Times for Different Application Methods
- Spray-applied tints typically cure faster than films. The thinner layer of adhesive in spray applications allows for quicker polymerization. However, the curing process is still dependent on the specific chemical formulation and environmental conditions. The initial viscosity of the spray material plays a significant role in determining the curing time.
- Film-applied tints, with their layered structure and larger surface area, often need a longer curing time. The more complex bonding processes and the greater contact surface area result in a slower, more gradual cure. Different film thicknesses also affect the curing time.
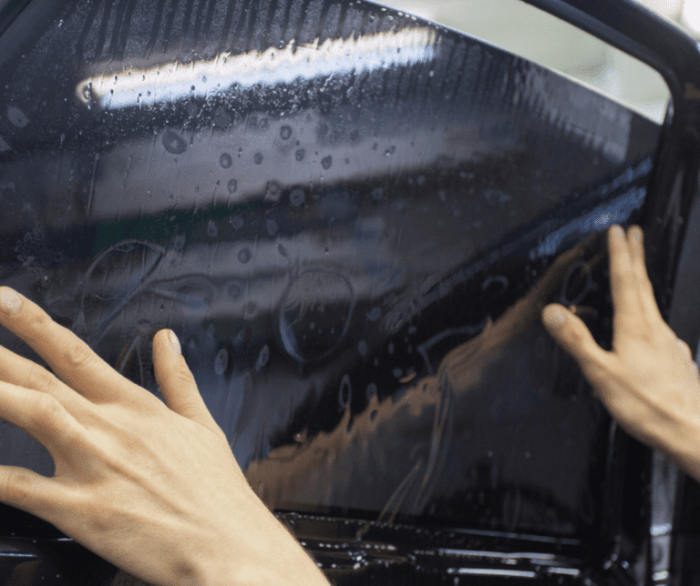
Importance of Waiting for Cure Before Rolling Down Windows
Waiting for the tint to fully cure is crucial. Rolling down windows before the adhesive has fully polymerized can potentially cause the tint to peel or lift from the glass. This premature movement puts stress on the nascent bond, potentially weakening it and compromising its long-term performance. It’s akin to trying to paint a wall before the primer has dried; the paint won’t adhere properly.
Table Comparing Curing Times for Various Tint Types
| Tint Type | Typical Curing Time (hours) | Notes |
|---|---|---|
| Metallic-based tints | 48-72 | Higher polymerization rate due to the metallic components. |
| Ceramic-based tints | 24-48 | Faster curing compared to some other types. |
| Carbon-based tints | 36-72 | Variable curing time depending on the specific formulation. |
| Standard polymer tints | 24-48 | Common curing time for most films. |
Potential Risks of Rolling Down Windows Too Soon
A whisper of anticipation hangs heavy in the air, the scent of freshly applied window tint a tantalizing promise. But beware, for within this aromatic veil of possibility lies a hidden danger, a subtle threat to the shimmering beauty you seek. Unraveling the secrets of premature window rolling reveals a tale of potential pitfalls, a chilling narrative of compromised adhesion and fleeting durability.The process of window tint curing is a delicate dance, a silent symphony of molecular bonds forming, strengthening, and solidifying.
Rolling down the windows before this process is complete is akin to disturbing a carefully constructed sandcastle before the tide has retreated, leaving it vulnerable to the relentless forces of the elements. The consequences can be more than just cosmetic.
Effects of Premature Window Rolling on Adhesion
The chemical reactions that bind the tint to the glass require a specific timeframe to reach optimal strength. Premature window rolling disrupts this crucial process, potentially weakening the bond between the tint and the glass. This weakened adhesion is the precursor to a host of problems, a harbinger of things to come.
Impact on Window Tint Longevity and Durability
Imagine a fortress built on shifting sands. This is the precarious situation of window tint when rolled down too early. The compromised adhesion compromises the longevity and durability of the tint. Early rolling can lead to premature peeling or bubbling, effectively shortening the tint’s lifespan and diminishing its protective qualities. This is not mere speculation; it’s a tangible threat to the investment you’ve made.
Examples of Improper Curing Leading to Premature Peeling or Bubbling
A car owner, eager to experience the new look of their tinted windows, rolled down the windows a day after the application. Within weeks, unsightly bubbles and peels marred the once-pristine tint. Another example is a shop window with tint applied for aesthetic appeal, but rolled down frequently before the curing process was complete. The result was noticeable peeling around the edges, detracting from the shop’s visual appeal.
Comparison of Risks of Rolling Down Windows Too Soon with the Benefits of Waiting
The allure of immediately enjoying the benefits of tinted windows is strong, but the potential risks of premature rolling should not be underestimated. The allure of immediate gratification is a siren’s call, promising a quick solution but often leading to long-term problems. A little patience in waiting for the tint to cure properly can save a significant amount of potential headaches and repair costs.
Potential Damages of Rolling Down Windows Too Early, How long after window tint to roll windows down
| Issue | Description | Severity |
|---|---|---|
| Premature Peeling | The tint begins to detach from the glass, often starting at the edges. | Moderate to High |
| Bubbling | Air pockets form beneath the tint, creating unsightly imperfections. | Moderate |
| Reduced Adhesion | The bond between the tint and the glass is weaker, leading to decreased durability. | High |
| Shortened Lifespan | The tint’s lifespan is significantly reduced, requiring premature replacement. | High |
| Increased Repair Costs | Addressing the damage caused by premature rolling can be costly. | High |
Safety Precautions and Recommendations
A whisper of danger, a silent threat, lurks in the very act of transforming glass. The allure of privacy, the desire for a unique aesthetic, often obscures the subtle hazards lurking in the realm of window tinting. Handling this potent, often unseen force requires a touch of the unseen, a keen awareness of the spectral dance between light and shadow.Proper precautions are not just a formality; they are a shield against the unforeseen.
Careful attention to detail, a meticulous adherence to the prescribed procedures, and a healthy respect for the process itself are the cornerstones of safe window tinting.
Handling and Installation Materials
Proper handling of window tint materials is crucial. The adhesive, often a potent concoction, must be handled with gloves and in a well-ventilated area. Improper handling can lead to skin irritation or, in extreme cases, chemical burns. Always follow the manufacturer’s instructions for safe material handling. A faint, almost ethereal, scent may accompany the process, a subtle reminder of the delicate balance between creation and potential harm.
Curing Process Precautions
The curing process, a silent transformation, requires a watchful eye. Extreme temperatures or direct sunlight can hinder the curing process, leading to uneven adhesion or, worse, premature failure. Ensure the area is properly ventilated, away from direct sunlight or excessive heat sources. The curing process is akin to a delicate dance, a slow and measured metamorphosis, requiring patience and precision.
Professional Installation Recommendations
Professional window tint installers possess the knowledge and expertise to navigate the intricacies of this craft. They understand the subtleties of proper application, ensuring a flawless, long-lasting result. They are well-versed in the crucial steps and possess the essential equipment to execute them correctly.
- Thorough understanding of product specifications.
- Proper use of safety equipment, including gloves and eye protection.
- Maintaining a clean and organized workspace.
- Strict adherence to manufacturer’s guidelines.
- Precise application techniques for optimal results.
The precision of a surgeon, the patience of a sculptor, and the awareness of a detective—these are the qualities that characterize a truly capable window tinting professional.
Step-by-Step Procedure for Safe Window Tint Installation
A meticulous approach, a step-by-step process, minimizes the risks inherent in window tinting.
- Thoroughly clean the window surface, removing any debris or contaminants that could compromise adhesion.
- Apply a release agent, as recommended by the manufacturer, to the window’s surface to aid in easy removal and prevent sticking.
- Carefully measure and cut the window tint to the precise dimensions of the window.
- Apply the tint, ensuring even pressure and adherence to the manufacturer’s instructions.
- Use a squeegee to remove any air bubbles and ensure a smooth, uniform application.
- Allow the tint to cure completely, following the manufacturer’s guidelines.
The precise choreography of these steps minimizes the potential for mistakes and ensures a lasting result.
Potential Hazards of Improper Installation
Improper installation can lead to a myriad of issues, from bubbles and uneven application to premature failure. This can compromise the aesthetic appeal and the structural integrity of the window. Bubbles, imperfections, and uneven application mar the visual appeal and compromise the integrity of the tint.
| Hazard | Description | Mitigation |
|---|---|---|
| Bubbles | Air trapped beneath the tint | Careful application, use of squeegees, and proper pressure |
| Uneven Application | Inconsistent tint thickness | Precise cutting, even pressure, and proper squeegee technique |
| Premature Failure | Early deterioration of the tint | Correct curing procedures, proper material selection, and environmental control |
A single misstep, an oversight, can lead to a cascade of problems.
Troubleshooting Issues with Window Tint
A whisper of unease, a chill in the air. The newly applied window tint, once a beacon of shimmering promise, now seems to hold a hidden, unsettling mystery. The curing process, a delicate dance of heat and pressure, can sometimes lead to unexpected outcomes. Understanding these potential pitfalls is crucial to maintaining the pristine appearance and longevity of your investment.The curing process of window tint is a subtle dance between chemical reactions and ambient conditions.
Variations in temperature, humidity, and even the type of adhesive used can influence the final result. Sometimes, what appears as a minor imperfection can be a subtle warning sign of a deeper issue, a hint of the unseen forces at play. This exploration delves into the common problems encountered and provides practical solutions to restore your window tint to its intended glory.
Identifying Common Issues
A multitude of factors can disrupt the curing process. Uneven application, inadequate pressure during installation, or inconsistent temperatures during curing can all contribute to a compromised final product. Air bubbles, trapped moisture, and uneven color saturation are all telltale signs of a problem that needs attention. Improper curing can manifest as a hazy appearance, a lack of adhesion, or even a visible separation of the film from the glass.
Troubleshooting Uneven Adhesion
If the tint isn’t adhering properly, a careful examination is key. Look for areas where the film is lifting or peeling away from the glass. If the issue is limited to a small area, a gentle application of pressure using a soft, lint-free cloth may be sufficient. For more extensive issues, professional assistance might be necessary. A professional can often identify the source of the problem and apply specialized techniques to restore the integrity of the tint.
Resolving Curing Problems
Sometimes, a gentle touch can resolve the issue. For instance, if air bubbles are the culprits, using a soft, flat tool to carefully push out the trapped air can often work wonders. However, if the problem persists, or if the tint is visibly separating from the glass, professional intervention is highly recommended. A skilled technician possesses the tools and expertise to effectively address a wide range of issues, ensuring a durable and aesthetically pleasing result.
Troubleshooting Guide
| Issue | Possible Cause | Troubleshooting Steps |
|---|---|---|
| Uneven Adhesion | Improper application, inadequate pressure, temperature fluctuations | Check for areas of lifting or peeling. Gently apply pressure with a soft cloth. If the problem persists, consult a professional. |
| Air Bubbles | Trapped air during application | Use a soft, flat tool to carefully push out the air bubbles. |
| Uneven Color Saturation | Inconsistent application, curing conditions | Check the entire tint application for uniformity. If uneven, professional assistance is likely necessary. |
| Film Separation | Improper curing, temperature fluctuations, or defects in the adhesive | Consult a professional. Attempting to fix this problem yourself can potentially worsen the damage. |
Environmental Factors Affecting Curing Time
A whisper of the wind, a subtle shift in the sun’s embrace—these seemingly insignificant environmental elements can hold the key to a window tint’s successful transformation. Just as a delicate flower needs the right conditions to bloom, automotive window film requires a specific environment for its curing process. The unseen forces at play during this crucial stage can determine the tint’s longevity and resilience, and the mysteries surrounding these forces are intriguing indeed.The curing process of window tint, akin to a silent dance between the material and its surroundings, is profoundly influenced by temperature, humidity, and sunlight exposure.
These factors work in concert to determine the final properties of the film, shaping its durability and longevity. Understanding their impact is crucial for ensuring the window tint’s intended performance.
Temperature’s Influence on Curing
Temperature significantly impacts the chemical reactions within the window tint’s adhesive layer. Higher temperatures generally accelerate the curing process, while lower temperatures slow it down. Think of it like baking a cake: a higher oven temperature results in a faster cooking time. Similarly, warmer climates can lead to a quicker curing time for window tint. However, extreme temperatures, whether scorching heat or frigid cold, can present challenges.
Very high temperatures can lead to rapid evaporation of solvents, while extremely low temperatures can hinder the chemical reactions, leading to incomplete curing.
Humidity’s Subtle Hand
Humidity plays a significant role in the curing process by affecting the evaporation rate of solvents. Higher humidity levels can slow down the evaporation, which consequently increases the curing time. This is because moisture in the air can interfere with the evaporation process, creating a humid environment that can slow the curing process. Imagine a humid greenhouse—the slow release of moisture can create a similar effect on the window tint.
Conversely, lower humidity can accelerate the process, leading to faster curing. This interplay of humidity and temperature must be carefully considered for optimal results.
Sunlight’s Crucial Role
Sunlight, a vital source of energy, can directly impact the curing process of window tint. Direct sunlight exposure accelerates the curing process, providing the necessary heat and energy to activate the chemical reactions within the adhesive. The intensity of sunlight also plays a crucial role. Stronger sunlight exposure will lead to a faster curing time. However, excessive UV exposure can lead to potential degradation of the tint over time, so a balance must be struck between achieving adequate curing and minimizing UV damage.
Environmental Factor Impact Summary
Understanding the interplay of these factors is critical for ensuring optimal window tint performance. The specific curing time will vary depending on the combined effect of these variables. Each location’s unique climate will influence the necessary time required for complete curing.
Environmental Factors and Their Effects on Curing Time
- Temperature: Higher temperatures accelerate curing, while lower temperatures slow it down. Extreme temperatures can hinder the process.
- Humidity: Higher humidity slows down curing by interfering with solvent evaporation, while lower humidity accelerates it.
- Sunlight Exposure: Direct sunlight exposure accelerates curing, providing the energy needed for the chemical reactions. However, excessive UV exposure can damage the tint.
Table: Influence of Environmental Factors on Curing Time
| Environmental Factor | Effect on Curing Time |
|---|---|
| High Temperature | Accelerated Curing |
| Low Temperature | Delayed Curing |
| High Humidity | Delayed Curing |
| Low Humidity | Accelerated Curing |
| Strong Sunlight Exposure | Accelerated Curing |
| Weak Sunlight Exposure | Delayed Curing |
Manufacturer Recommendations and Guidelines
A whisper of mystery hangs in the air, a silent promise of transformation. Just as a master craftsman shapes a piece of wood into something beautiful, skilled technicians apply window tint, promising enhanced aesthetics and protection. But like a delicate dance, this process requires careful choreography, and one misstep can lead to a dissonant outcome. Following manufacturer recommendations is the key to achieving the desired result and avoiding unintended consequences.Understanding the precise curing time and manufacturer-specified guidelines is crucial for ensuring optimal performance and longevity of the tint.
A subtle shift in the waiting period can have profound effects, akin to the subtle difference between a masterpiece and a mere sketch. This meticulous attention to detail is not simply a matter of following instructions; it’s a gateway to unlocking the full potential of your window tint.
Manufacturer Guidelines for Curing Time
Manufacturers often provide specific recommendations for curing times, taking into account various factors. These guidelines are crucial for achieving the desired adhesion and longevity of the tint film.
- Different manufacturers use different methods to ensure their tint adheres correctly. Some may suggest a minimum period of 24 hours, while others recommend 72 hours for full curing. This variation highlights the importance of always consulting the specific manufacturer’s instructions for your chosen tint.
- A reputable source, such as an independent review website for automotive products, might offer anecdotal evidence of different curing times based on user reports. However, these should be viewed as supplementary information, and the manufacturer’s guidelines should always be the primary reference.
- The instructions often emphasize the importance of avoiding contact with the tinted area during the curing period. This precaution is essential for preventing premature detachment or warping of the film, analogous to avoiding excessive pressure on a newly painted surface.
Warnings About Premature Window Rolling
Manufacturers often issue warnings against rolling down windows too soon after installation. These warnings aren’t just arbitrary rules; they’re rooted in the science of adhesion and the delicate nature of the film.
- Premature window rolling can compromise the adhesive bond between the tint and the glass. This is akin to attempting to hang a painting before the paint has dried, resulting in a wobbly or unstable artwork.
- Some manufacturers warn against rolling windows down within a specific timeframe, often ranging from 24 to 72 hours. This precaution ensures that the tint has adequately bonded with the glass, resisting stress and potential damage.
- The consequences of premature window rolling can include bubbling, peeling, or even complete detachment of the tint film. Imagine a beautiful tapestry being ripped apart due to an untimely touch; the same principle applies to window tint.
Examples of Manufacturer Advice on Waiting Periods
Various manufacturers offer clear instructions on the appropriate waiting periods. These examples underscore the significance of consulting the specific product information.
| Manufacturer | Waiting Period Recommendation |
|---|---|
| SunTek | 24-48 hours for full curing, avoid rolling down windows within this period. |
| 3M | 48 hours for complete curing, do not roll down windows for 48 hours. |
| LLumar | 24 hours minimum, rolling windows down before 48 hours is not recommended. |
Visual Representation of the Curing Process: How Long After Window Tint To Roll Windows Down
A whisper of transformation, a silent dance of molecules. The window tint, a shimmering veil, undergoes a subtle metamorphosis, a process as enigmatic as a forgotten dream. This transformation, invisible to the naked eye, unfolds with a meticulous precision, and its visual representation offers a glimpse into this unseen ballet.The curing process, a delicate choreography, begins with the initial application.
The tint, a liquid suspension of polymeric materials, adheres to the glass surface, its molecules clinging with an almost supernatural force. This initial stage is critical, setting the foundation for the long-term performance of the film.
Stages of the Curing Process
The curing process, an intriguing spectacle, unfolds in distinct stages. Each stage reveals a shift in the molecular arrangement and the physical properties of the tint. The initial application is followed by a period of stabilization. The initial sticky, viscous film undergoes a crucial rearrangement, as the solvent evaporates, and the polymer chains solidify.
Molecular Changes During Curing
A series of microscopic changes occur during the curing process. The initial liquid state of the tint transforms into a solid, polymeric structure. The solvent molecules, once dispersed throughout the polymer matrix, gradually evaporate, leaving behind a denser network of interconnected polymer chains. This process is crucial for the long-term durability and performance of the tint.
Visual Representation of the Molecular Changes
Imagine a network of tiny, interconnected threads. These threads, representing the polymer chains, are initially tangled and loosely connected. As the curing process unfolds, these threads become more organized, forming a tighter, stronger network. The solvent molecules, once dispersed throughout the network, gradually disappear, strengthening the overall structure. Visualize this as a transition from a messy, tangled skein to a meticulously woven tapestry.
Illustrative Table of Curing Stages
| Stage | Image Description | Caption |
|---|---|---|
| Stage 1: Initial Application | A smooth, even layer of liquid tint is applied to the glass surface. Tiny bubbles are almost invisible, yet noticeable, and the film appears slightly translucent. | The initial application, ensuring uniform coverage and adhesion. |
| Stage 2: Stabilization | The liquid tint begins to thicken, and the translucent appearance begins to diminish. The bubbles have started to shrink and disappear. | The solvent evaporates, and the polymer chains begin to interlock. |
| Stage 3: Polymerization | The tint becomes opaque and the film takes on a more solid, consistent appearance. The film is now more resistant to external forces. | The polymer chains solidify, creating a strong, durable film. |
| Stage 4: Final Curing | The tint achieves its final, permanent form, showing minimal visible changes. It appears fully opaque and uniform. | The tint is fully cured, and its properties are stabilized. |
Final Conclusion

In conclusion, rolling your windows down too soon after window tinting can lead to serious issues. Knowing the curing time, considering environmental factors, and following manufacturer recommendations are vital for a long-lasting, problem-free tint job. Safety should always be prioritized during the entire process. By understanding the crucial factors, you can avoid costly mistakes and ensure your investment in window tint lasts for years to come.
Commonly Asked Questions
How long does it typically take for window tint to cure?
Curing time varies depending on the type of tint, application method, and environmental conditions. Generally, it takes anywhere from 24 to 72 hours for the tint to fully cure.
What are the risks of rolling down windows too soon?
Rolling down windows prematurely can cause the tint to lose its adhesion, leading to bubbling, peeling, or even complete detachment. This shortens the tint’s lifespan and can necessitate costly repairs.
How does temperature affect the curing process?
High temperatures can speed up the curing process, while low temperatures can slow it down. Extreme temperatures can also affect the overall quality of the adhesion.
What if the tint isn’t adhering properly?
If the tint isn’t adhering properly, it’s crucial to consult with the installer or manufacturer. They can provide guidance on how to resolve the issue and prevent further damage.
