How long does it take to power wash a driveway? This depends significantly on several factors, including the size and condition of the driveway, the type of equipment used, and the operator’s experience. A thorough understanding of these variables is crucial for accurate time estimations and successful cleaning.
This comprehensive guide will explore the various factors influencing power washing time, from equipment selection to efficient techniques. It will also cover pre-washing procedures, effective cleaning strategies, and troubleshooting common issues.
Factors Affecting Driveway Power Washing Time

Driveway power washing, a crucial task for maintaining a clean and attractive home, involves several variables that significantly impact the overall time required. Understanding these factors allows homeowners and contractors to better estimate the process and manage expectations. Careful consideration of these factors is essential for efficient and effective cleaning.The time needed to power wash a driveway is influenced by numerous variables, from the size of the surface to the level of grime buildup.
Accurately assessing these factors is critical for scheduling and resource allocation, ensuring a smooth and efficient cleaning process.
Surface Area and Material Type
Driveway size directly correlates with the time needed for power washing. Larger driveways obviously require more time for thorough cleaning compared to smaller ones. Additionally, the material composing the driveway significantly impacts the washing process. Concrete driveways, for instance, often require more time for deep cleaning than asphalt due to their porous nature, which may trap dirt more effectively.
Brick driveways may necessitate a different approach, requiring careful attention to avoid damaging the delicate surface. Brick driveways might need more time for a gentler cleaning process, avoiding high pressure that could potentially damage the brickwork.
Dirt/Grime Buildup and Pressure Setting
The extent of dirt and grime buildup on the driveway is a crucial factor. Heavily soiled driveways with significant buildup will obviously take longer to clean than those with minimal dirt. This buildup can be from various sources, including everyday wear, seasonal elements, or specific contaminants. A substantial layer of caked-on dirt demands more time and potentially higher pressure settings for thorough removal.The pressure setting on the power washer significantly impacts the cleaning time.
Higher pressure settings, while effective for quickly removing dirt, can also potentially damage the surface if not used carefully, especially on delicate materials like brick. Lower pressure settings may take longer but are often gentler on the driveway surface. The appropriate pressure setting is crucial to both efficiency and surface preservation.
Experience Level of the Operator
The experience level of the person operating the power washer has a notable impact on the overall time needed for the task. Experienced operators, familiar with the nuances of different surface materials and pressure adjustments, can often complete the task faster and more effectively than those with limited experience. They are more likely to optimize pressure settings, avoid damaging the driveway, and cover the area efficiently.
Learning curves for this task are inevitable but do reduce the time it takes with repeated practice.
Typical Power Washing Time by Driveway Size
| Driveway Size | Typical Time (Estimate) |
|---|---|
| Small (e.g., 100 sq ft) | 1-2 hours |
| Medium (e.g., 200-300 sq ft) | 2-3 hours |
| Large (e.g., 400 sq ft+) | 3+ hours |
These are just estimates, and actual times will vary greatly depending on the factors discussed earlier. It’s important to consider all factors for accurate time predictions.
Equipment and Tools for Driveway Power Washing: How Long Does It Take To Power Wash A Driveway
Choosing the right equipment and tools is crucial for effective and safe driveway power washing. Proper selection ensures optimal cleaning results while minimizing damage to the surface and the equipment itself. A well-equipped power washer will save you time and effort, yielding a cleaner, more presentable driveway.
Essential Power Washing Equipment, How long does it take to power wash a driveway
A comprehensive power washing kit includes a power washer, various nozzles, and potentially a pressure regulator. The specific tools required will depend on the size of the driveway and the nature of the dirt or grime. Power washers are available in both gas-powered and electric models, each with its own set of advantages and disadvantages.
- Power Washer: Essential for high-pressure water delivery. Gas-powered models, such as the Honda HW150 or the Ryobi RY402, offer greater power and are useful for larger driveways or stubborn dirt. Electric models, like the Ego Power+ or the Worx WG355, are quieter, easier to maneuver, and better for smaller areas or for those prioritizing convenience over raw power.
Consider the size and shape of your driveway when making your decision.
- Nozzles: Different nozzle types are designed for various cleaning tasks. A standard spray nozzle is suitable for general cleaning, while a fan nozzle is better for covering large areas quickly. A concentrated stream nozzle is best for tackling stubborn stains or debris, and a rotating nozzle can be helpful for intricate surfaces. The choice of nozzle directly impacts the cleaning efficiency and effectiveness.
- Pressure Regulator (Optional): A pressure regulator allows you to control the water pressure, preventing damage to delicate surfaces or the power washer itself. Using a pressure regulator is particularly important for surfaces like brick or stone. It can extend the life of the power washer and improve the quality of the cleaning.
Importance of Nozzle Selection
Proper nozzle selection is critical for achieving optimal results and preventing damage. Different types of driveways and dirt buildup require different nozzle approaches. For example, a smooth concrete driveway may tolerate higher pressure than a porous brick or stone surface. Dirt buildup also dictates the nozzle choice. Stubborn stains might require a concentrated stream, while general dirt can be tackled with a wider spray.
- Concrete Driveways: For concrete, a standard spray nozzle is often sufficient. A fan nozzle can be useful for large areas. High-pressure cleaning is usually acceptable, but always check the manufacturer’s recommendations for the specific power washer model.
- Brick or Stone Driveways: For these materials, lower pressure and a more gentle spray are essential to avoid damaging the surface. A standard spray nozzle or a specialized nozzle designed for delicate surfaces should be used.
- Dirt Buildup: Stubborn stains or deeply embedded dirt often require a concentrated stream nozzle to break down the buildup. A rotating nozzle can help with cleaning in tight spaces or corners.
Recommended Pressure Settings
The optimal pressure setting varies depending on the material of the driveway and the nature of the dirt. Always prioritize the safety of the surface and the power washer. Excessive pressure can damage the surface or the equipment.
- Concrete: Typically, a medium to high pressure setting is appropriate for concrete. Test in a discreet area first to ensure optimal cleaning without damage.
- Brick or Stone: Lower pressure settings are recommended for brick or stone surfaces to avoid damage. Start with a low setting and gradually increase it only if necessary.
- Wood: Wood decks or driveways require extremely low pressure settings. A gentle spray is usually sufficient to remove dirt without causing damage.
Comparison of Power Washer Types
The following table highlights the advantages and disadvantages of gas-powered and electric power washers.
| Feature | Gas-Powered | Electric |
|---|---|---|
| Power | Higher | Lower |
| Portability | Less portable | More portable |
| Noise Level | Noisier | Quieter |
| Maintenance | Requires more maintenance | Requires less maintenance |
| Cost | Potentially higher initial cost | Potentially lower initial cost |
| Fuel Costs | Incur fuel costs | No fuel costs |
Preparation Before Power Washing a Driveway
Proper preparation is crucial for a successful and safe driveway power washing experience. A well-prepared area ensures efficient cleaning, minimizes damage to surrounding areas, and prevents accidents. Careful planning and execution of these pre-washing steps will save time and effort in the long run.
Removing Loose Debris
Thorough removal of loose debris is essential before power washing. This prevents the debris from being dislodged and scattering across the driveway or onto surrounding surfaces. Leaves, twigs, small stones, and other loose materials can be swept or vacuumed away to create a clean base for the power washing process. This preliminary step protects the power washer from clogging and ensures a more thorough cleaning of the driveway surface.
Protecting Nearby Plants and Objects
Protecting surrounding vegetation and objects from the high-pressure water stream is critical. Covering plants with tarps or sheets, and moving delicate items or furniture away from the power washing zone, will prevent damage. This proactive measure safeguards landscaping and property from potential water damage, preventing unnecessary clean-up and restoration. Proper covering or relocation is vital to maintaining a pristine and unblemished surrounding environment.
Checking for Potential Hazards
Inspecting the area for any potential hazards before power washing is a crucial safety measure. Look for loose wires, uneven surfaces, or any obstructions that could pose a tripping or injury risk. Checking for any hidden hazards will help to ensure a smooth and secure power washing operation. This proactive inspection will minimize the risk of accidents during the cleaning process.
Inspecting the Power Washer
A pre-power washing inspection of the power washer is vital to ensure its functionality and safety. Inspect the power cord for any damage or fraying, the nozzle for blockages or wear, and the pressure washer for leaks or cracks. A thorough check of the equipment is important for maintaining its efficiency and protecting against potential issues during operation.
A properly maintained power washer is critical for a safe and effective power washing job.
Safety Precautions
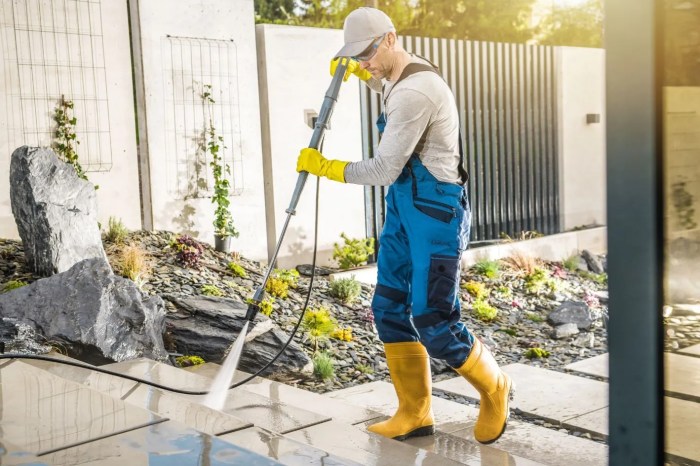
Safety precautions are paramount during power washing operations. Wear appropriate safety gear, such as eye protection and work gloves, to shield yourself from water splashes and debris. Always keep a safe distance from the power washer and avoid directing the water stream at yourself or others. Operating a power washer safely requires adhering to established safety protocols.
- Gather necessary tools, including a broom, dustpan, and tarps.
- Sweep or vacuum the driveway to remove loose debris like leaves, twigs, and small stones.
- Cover nearby plants, shrubs, or delicate items with protective coverings.
- Inspect the power washer for any damage or leaks.
- Check the power cord for any damage or fraying.
- Ensure the area is free of potential hazards, such as loose wires or obstructions.
- Wear appropriate safety gear, including eye protection and work gloves.
- Maintain a safe distance from the power washer.
- Avoid directing the water stream at yourself or others.
- Never operate the power washer if you are not familiar with its operation.
Techniques for Efficient Power Washing
Power washing a driveway effectively requires more than just aiming a high-pressure nozzle at the surface. Proper technique minimizes damage to the driveway while maximizing cleaning efficiency. Understanding the nuances of pressure, angle, and approach is crucial for achieving a spotless and durable result.Careful attention to technique is essential for preserving the driveway’s integrity. Employing the right approach prevents unnecessary wear and tear, ensuring a longer lifespan for your driveway.
This section details effective power washing techniques to achieve optimal results while avoiding potential damage.
Choosing the Right Pressure Setting
Driveway surfaces vary in composition and condition. Selecting the correct pressure setting is paramount to avoiding damage. Using too much pressure can etch or erode the surface, while too little pressure may not effectively remove dirt and grime. Experiment with different pressure settings to find the optimal balance for your specific driveway material. For example, concrete driveways typically require a lower pressure setting than asphalt driveways.
Start with a lower pressure and gradually increase if necessary. Observe the results and adjust accordingly. A pressure washer’s PSI (pounds per square inch) rating is a key indicator of the force it delivers.
Effective Nozzle Techniques
Using the correct nozzle type and angle significantly impacts the effectiveness and safety of power washing. Different nozzles are designed for various applications. A flat-fan nozzle is ideal for large, flat surfaces like driveways, providing a wide coverage area. For cleaning tight corners and edges, a narrow-tip nozzle is better suited. Rotating nozzles offer multiple angles for targeted cleaning, while some nozzles are designed for specific cleaning tasks like removing stubborn stains.
Always maintain a safe distance from the surface and avoid directing the nozzle at any specific point for an extended period to prevent damage.
Cleaning Different Driveway Sections
Different sections of the driveway may require varying approaches. For example, cleaning the edges of the driveway demands a different technique than cleaning the central area. The edge areas, often built with a different material or construction, may require a lower pressure setting or a different nozzle type to avoid damage.
Cleaning Corners and Hard-to-Reach Areas
Cleaning corners and hard-to-reach areas on the driveway is often overlooked. A narrow-tip nozzle is essential for effectively cleaning these areas. Gently move the nozzle back and forth, ensuring thorough cleaning without applying excessive pressure. Using a stiff brush attachment can be helpful for scrubbing off stubborn dirt and grime, but be mindful not to use too much force.
Avoiding Water Damage and Streaks
To prevent water damage or streaks, maintain a consistent movement across the driveway surface. Avoid lingering in one spot, as this can lead to uneven drying and potential damage. Use overlapping strokes to ensure comprehensive cleaning without leaving any areas unwashed. Maintain a consistent angle, avoiding excessive up-and-down movements that could lead to water pooling. Allow the driveway to dry completely before driving or parking on it to avoid potential skidding.
Example: Preventing Concrete Etching
Concrete driveways are particularly susceptible to etching if high pressure is applied directly. Avoid focusing the nozzle on one spot for extended periods. Instead, move the nozzle in overlapping strokes to distribute the water evenly and prevent localized damage.
Driveway Power Washing Procedures
Effective driveway power washing hinges on a systematic approach. Proper pre-washing, targeted application of the power washer, and a thorough post-washing routine are crucial for achieving a pristine result and preventing damage to the surface. This procedure ensures a safe and efficient cleaning process, preserving the longevity of your driveway.
Pre-Washing Procedures
Preparing the driveway for power washing is paramount. This step minimizes the risk of damaging the surface and ensures the effectiveness of the cleaning process. Clearing the area of loose debris, like leaves, twigs, and small stones, prevents these particles from being propelled by the high-pressure water stream, potentially scratching or marring the driveway. Removing any obstacles like toys, furniture, or gardening tools is also important.
These items could be dislodged by the water stream and cause damage or injury.
Applying the Power Washer
Optimal coverage and avoiding damage are key when applying the power washer. Starting from the highest point of the driveway, work your way downwards, ensuring a consistent and even application of water pressure. Employ a methodical pattern, such as overlapping strokes, to avoid missed areas and ensure thorough cleaning. Adjust the spray angle and nozzle settings as needed to target different types of stains and buildup.
Using a lower pressure setting for delicate surfaces like painted or sealed driveways is crucial to prevent damage.
Coverage Patterns and Overlap
Consistent coverage is vital for a thorough clean. A systematic pattern, like overlapping horizontal or vertical strokes, ensures all areas are adequately washed. Maintaining an overlap of approximately 15-20% between each pass is essential for complete coverage. This minimizes the risk of missed spots and ensures a uniform clean.
Handling Different Types of Stains and Buildup
Driveways accumulate various types of stains and buildup. Understanding how to address these effectively is critical for successful cleaning. For oil stains, a pre-treatment with a specialized cleaner might be necessary before applying the power washer. For stubborn dirt or grime, a slightly higher pressure setting can be used, but always check the driveway material’s tolerance. For algae or mold growth, a dedicated cleaning solution is often necessary, followed by a thorough rinsing with the power washer.
Post-Washing Procedures
Completing the washing process involves a post-washing routine. Allowing the driveway to dry completely before applying any sealant or treatment prevents issues with uneven drying and potential damage. Checking for any remaining stains or areas requiring further attention is also essential.
Flowchart of Driveway Power Washing Process
Note: The flowchart illustrates the steps involved in a standard power washing process. The specific actions may vary depending on the type of driveway material and the nature of the stains or buildup.

Estimating Power Washing Time
Accurately estimating the time needed for driveway power washing is crucial for project planning and client management. Knowing the approximate duration allows for better scheduling and resource allocation, preventing delays and ensuring customer satisfaction. This section details methods for estimating power washing time, considering factors like driveway size, surface type, and dirt accumulation.
Factors Impacting Power Washing Speed
Several factors influence the speed of a power washing job. Understanding these elements allows for more precise estimations. Driveway size, the material used for the driveway, and the complexity of the dirt build-up significantly impact the time required. Other factors include the pressure settings of the equipment, the experience of the power washer, and the availability of water supply.
- Surface Area: The larger the driveway, the longer the power washing job will take. A small, paved area will be cleaned faster than a large, uneven concrete surface.
- Material Type: Different materials respond differently to power washing. Concrete may require more time and effort than asphalt due to its porosity and tendency to absorb dirt. Stone or brick driveways, for instance, may require more time due to the varied surface textures.
- Dirt Complexity: Heavy, ingrained dirt or stubborn stains require more time and potentially higher pressure settings to remove effectively. Grease or oil buildup necessitates a more meticulous approach and longer cleaning time.
- Equipment Pressure: Higher pressure settings can speed up the cleaning process, but may also cause damage to certain surfaces. The appropriate pressure level should be chosen to maintain both efficiency and safety.
- Operator Experience: A skilled power washer can complete a job more efficiently and accurately. A novice may require more time to navigate the driveway and apply the appropriate cleaning techniques.
- Water Supply: A reliable water supply is essential for continuous power washing. Interruptions in the water supply will prolong the job and potentially lead to an incomplete cleaning.
Formula for Estimating Time
A basic formula for estimating power washing time is:
Time = (Surface Area in square feet) / (Average Cleaning Rate in square feet per hour)
The average cleaning rate is dependent on the factors listed above. For example, a skilled operator with high-pressure equipment might have an average cleaning rate of 500 square feet per hour on a relatively clean asphalt driveway. A larger, heavily soiled concrete driveway with challenging stains would necessitate a lower average cleaning rate.
Estimating Power Washing Time for Various Driveway Sizes and Conditions
| Driveway Size (sq ft) | Dirt Condition (Light/Medium/Heavy) | Estimated Time (hours) |
|---|---|---|
| 100 | Light | 0.2-0.5 |
| 100 | Medium | 0.5-1 |
| 100 | Heavy | 1-1.5 |
| 200 | Light | 0.4-1 |
| 200 | Medium | 1-2 |
| 200 | Heavy | 2-3 |
| 300 | Light | 0.6-1.5 |
| 300 | Medium | 1.5-3 |
| 300 | Heavy | 3-4.5 |
Note: These are estimations only. Actual times may vary depending on specific conditions.
Troubleshooting and Maintenance
Proper troubleshooting and maintenance are crucial for ensuring the safety and longevity of your power washer, and preventing costly repairs or accidents. Ignoring routine maintenance can lead to decreased performance, potential damage to the equipment, and even safety hazards. Addressing problems promptly, and understanding the importance of preventative maintenance, are key to maximizing the lifespan and effectiveness of your driveway power washing equipment.
Common Power Washer Problems and Solutions
Regular inspections and prompt fixes can prevent minor issues from escalating into major problems. Recognizing and resolving common problems will save time and money.
- Low Water Pressure: This can be caused by clogs in the water intake or filter, or a malfunctioning pump. Check the water supply line for kinks or blockages. Inspect the pump for any debris or damage. If the problem persists, consult a professional for further diagnosis.
- Nozzle Clogging: Mineral deposits, debris, or improper nozzle selection can block the spray pattern. Disassemble the nozzle and clean it thoroughly. Ensure you’re using the correct nozzle type for the surface you’re cleaning.
- Leaks: Leaks can result from damaged hoses, connections, or seals. Inspect all connections for tightness. Replace any damaged hoses or seals. If the leak is in the power washer itself, consult a professional repair technician.
- Motor Problems: Unusual noises, overheating, or reduced power output often signal motor issues. Inspect the motor for any visible damage or overheating. If the problem persists, consult a qualified repair technician.
- Electrical Issues: Problems with the power cord, outlet, or electrical components can cause malfunctions. Check the power cord for damage or fraying. Ensure the outlet is functional. If the problem persists, consult a qualified electrician.
Importance of Power Washer Maintenance
Regular maintenance not only prevents costly repairs but also improves performance and ensures safety. Properly maintained equipment is more efficient, and reduces the risk of injury.
- Safety First: Regular maintenance, including checking for frayed cords, damaged hoses, and loose connections, is crucial to prevent accidents and potential injuries. Inspect all components for any signs of wear or damage before each use.
- Optimal Performance: Proper maintenance keeps the power washer operating at peak efficiency. Cleaning and lubricating components ensures smooth operation and prevents wear and tear, which will extend the life of the equipment.
- Extended Lifespan: A well-maintained power washer will last much longer than one that’s neglected. By performing regular maintenance tasks, you can significantly increase the lifespan of your equipment and avoid costly replacements.
Power Washer Maintenance Checklist
A regular maintenance schedule is essential for optimal performance. This checklist should be followed to ensure your power washer is always functioning at its best.
- Regular Cleaning: Clean the power washer thoroughly after each use, removing any debris or dirt that may have accumulated.
- Lubrication: Lubricate moving parts as recommended by the manufacturer. This prevents friction and wear and tear.
- Inspection: Visually inspect the power washer for any signs of damage or wear, including hoses, connections, and seals.
- Filter Replacement: Replace the water filter regularly as recommended by the manufacturer to maintain optimal water flow.
- Electrical Component Check: Inspect the electrical components, including the cord and plug, for any signs of damage.
Wrap-Up
In conclusion, power washing a driveway’s duration is highly variable, influenced by numerous factors. Careful consideration of driveway size, surface material, dirt buildup, equipment capabilities, and operator skill is essential. This guide provides a comprehensive understanding to estimate and optimize power washing time, ensuring a clean and efficient driveway cleaning experience.
Helpful Answers
How much does power washing a driveway cost?
The cost of power washing a driveway varies greatly depending on factors such as the size of the driveway, the amount of dirt buildup, and the labor rate of the service provider. Estimates should be obtained from local professionals.
What types of stains can be removed with power washing?
Many types of stains, including oil, grease, and some types of mold, can be removed or significantly reduced with power washing. However, some stubborn stains may require additional cleaning methods.
What are the safety precautions for operating a power washer?
Always wear safety glasses, gloves, and appropriate footwear. Ensure the area is clear of obstructions and that bystanders are kept at a safe distance. Never point the power washer nozzle at yourself or others. Follow all manufacturer instructions for safe operation.
What is the best way to prepare a driveway for power washing?
Remove any loose debris, cover nearby plants or objects that may be damaged by water, and inspect for potential hazards. This preparation step is crucial to ensure a safe and effective cleaning process.
