How to add a outline to sticker file – How to add a Artikel to sticker file guides you through the essential steps for creating professional-looking sticker designs. From conceptualization to final production, this comprehensive guide covers everything you need to know to create impactful sticker files.
Understanding the various methods, software tools, and considerations for different sticker types is crucial for success. This detailed Artikel walks you through each step, ensuring your sticker files are well-structured and optimized for production. The content is comprehensive, covering all stages from design to final output.
Introduction to Sticker File Outlining
A whisper of the unseen, a hint of the unknown – that’s the allure of outlining a sticker file. It’s not just about the final product, but the meticulous dance of design that precedes it. Outlining, in this context, is the preliminary sketch, the skeletal structure upon which the vibrant sticker design will be built. It’s a crucial step, a silent promise of what’s to come, a map for the artist’s journey.Before the vibrant colors burst forth and the intricate details take shape, a carefully crafted Artikel is essential.
It’s the foundation that holds the design together, ensuring it’s both aesthetically pleasing and technically sound. Without it, the design might crumble under the weight of its own ambition, a ghostly figure without substance.
Defining Sticker File Outlining
Sticker file outlining is the process of creating a precise, simplified representation of the final sticker design. This involves defining the shape, size, and overall form of the sticker before adding intricate details. Imagine it as the blueprint of a house before the construction begins. It’s the foundation, the bare bones, the silent promise of what’s to come.
Importance of Outlining
Outlining a sticker file is paramount for several reasons. It ensures a smooth design process, prevents costly revisions, and streamlines the production process. A well-defined Artikel allows for easy adjustment of the design before committing to final production. It’s a safeguard against costly mistakes and wasted materials.
Different Outlining Styles
Various styles exist for outlining sticker files. Some designers prefer simple, clean lines, while others opt for more complex, layered Artikels. A simple, bold Artikel is ideal for stickers that emphasize the shape and form. For more detailed stickers, a more intricate Artikel might be necessary to showcase the intricate details. The chosen style is directly influenced by the intended effect and the overall aesthetic of the sticker.
Benefits of Using an Artikel
Using an Artikel in sticker projects provides numerous advantages. It helps maintain consistency, allowing for precise scaling and resizing without losing the design’s integrity. This is crucial when producing stickers in different sizes or formats. The Artikel is the anchor point for all the subsequent design elements. It’s a vital tool for maintaining uniformity.
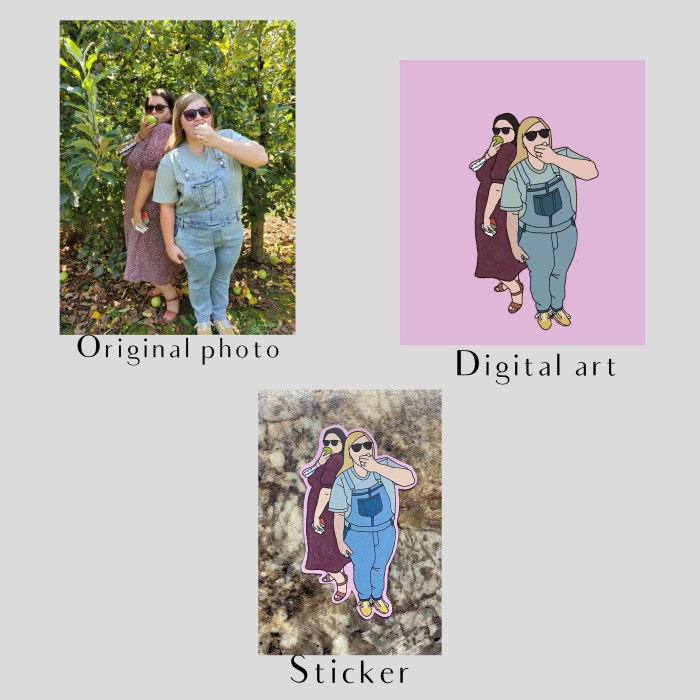
Illustrative Example of a Simple Sticker
| Element | Description | Dimensions |
|---|---|---|
| Sticker Shape | A stylized, cartoonish dog | 2.5 inches wide, 3.5 inches tall |
| Artikel Style | Simple, bold black lines | 0.1 inch thickness |
| Color Palette | Vibrant hues of orange, brown, and white | Specific color values to be determined later |
This table displays a basic structure for a sticker file, highlighting the key elements involved in the outlining process. The structure allows for a detailed representation of the sticker file. Each element is clearly defined, providing a comprehensive overview of the project. It acts as a foundation for a more intricate design, allowing for easy visualization and manipulation.
Methods for Creating Sticker Files
A whisper of the wind carries secrets through the whispering galleries of design. Sticker files, those miniature canvases of creativity, demand meticulous attention to detail. The journey to their creation, however, is not always straightforward. Different methods emerge, each with their own allure and challenges, beckoning the designer down a path of artistic exploration.The choice of method often hinges on the complexity of the design, the designer’s skillset, and the desired outcome.
A simple, playful design might lend itself to a quick, hand-drawn approach, while intricate illustrations may require the precision of software tools. Understanding the nuances of each method is key to crafting a sticker file that truly captures the designer’s vision.
Hand-Drawn Methods
Hand-drawing, the venerable method of ages past, retains a certain charm and offers a unique perspective. Sketching by hand allows for spontaneity and a tangible connection to the design process. Tracing existing images, or even using a stylus on a tablet, is also an important consideration.
- Tracing Existing Images: Using a lightbox or tracing paper, carefully trace an existing image onto your sticker design. This method allows for a precise transfer of lines and shapes, and is especially useful for mimicking complex illustrations or intricate details. However, this approach can be time-consuming for intricate designs, and requires precision to maintain the integrity of the original artwork.
- Freehand Sketching: A purely freehand approach, using pens, pencils, or markers, can yield dynamic and expressive results. This is a perfect method for capturing spontaneous ideas and quickly testing different design concepts. However, maintaining consistency in line weights and details can be challenging. The conversion of the hand-drawn artwork into a digital format may also be more complex compared to other methods.
- Stylus on Tablet: Modern tablets equipped with pressure-sensitive styluses provide a blend of hand-drawing’s immediacy with digital precision. These tools offer enhanced control over line thickness and shading, translating your sketches directly into digital files. This approach also allows for easy adjustments and iterations in the design process.
Software-Based Methods
The digital realm offers a vast array of software tools tailored for sticker design. These tools often provide precise control over shapes, colors, and effects, paving the way for sophisticated designs.
- Vector Graphics Editors: Software like Adobe Illustrator or CorelDRAW excels at creating scalable vector graphics. These programs allow for precise control over shapes, colors, and fills, making them ideal for creating intricate designs that can be easily resized without losing quality. The learning curve for these programs can be steep, however, requiring a degree of technical proficiency.
- Raster Graphics Editors: Programs like Adobe Photoshop or GIMP are powerful tools for creating raster graphics. These are ideal for creating designs with realistic textures, intricate shading, and photo-based elements. Raster files are best suited for designs that need high resolution and detailed textures. However, they can be large in file size, and resizing can result in loss of quality.
- Specialized Sticker Design Software: Specific sticker design software often includes pre-set templates, tools for applying different materials, and advanced options for creating various effects, such as embossing or textures. These tools are especially useful for producing stickers with intricate designs or unique effects, and often come with pre-designed templates for specific sticker types.
Template-Driven Methods
Templates offer a streamlined approach to sticker creation. Pre-designed layouts simplify the design process and expedite production, especially for stickers with repetitive elements.
- Pre-made Templates: Using pre-designed templates provides a framework for your sticker designs, saving time and effort. These are especially useful for simple designs or those requiring specific layouts. However, the design might be limited by the template’s constraints.
Comparison Table
| Method | Pros | Cons | Suitability |
|---|---|---|---|
| Hand-Drawn | Spontaneity, creativity, tactile experience | Time-consuming, conversion challenges, potential inconsistencies | Simple, playful designs |
| Software-Based (Vector) | Precision, scalability, ease of editing | Steeper learning curve, potentially complex | Intricate designs, logos, branding |
| Software-Based (Raster) | High resolution, realistic textures, photo integration | Large file sizes, potential quality loss on resizing | Photo-realistic designs, detailed imagery |
| Template-Driven | Efficiency, speed, pre-designed layouts | Limited design flexibility, template constraints | Simple designs, repetitive patterns |
Elements of a Comprehensive Sticker File
A whisper of secrets, a phantom touch upon the digital canvas. A well-structured sticker file isn’t just a collection of images; it’s a meticulously crafted map leading to a successful print. Each element, like a hidden glyph, contributes to the final product, hinting at the design’s intricate narrative. Understanding these elements is crucial, as they shape the very essence of the sticker’s form.The design of a sticker, be it a simple emblem or a complex layered artwork, needs a comprehensive understanding of the materials and processes involved.
The file should not just contain the artwork; it should contain the specifications required for accurate reproduction. This meticulous planning is the key to unlocking the sticker’s true potential.
Essential Elements for a Well-Structured Sticker File, How to add a outline to sticker file
A well-structured sticker file is more than just a collection of images; it’s a blueprint, detailing every facet of the sticker’s creation. It’s a silent conversation between the designer and the printer, ensuring that the final product aligns perfectly with the initial vision.
- Image Resolution and Format: The resolution of the image dictates the quality of the final print. High resolution is paramount, ensuring crisp details. The format of the file (e.g., PNG, AI, or SVG) directly influences compatibility with the chosen print method. For instance, vector-based formats like SVG allow for scalable resizing without loss of quality, while raster images (PNG, JPEG) work best for images with photographic quality or gradients.
Different formats require different treatment during the file preparation stages.
- Vector Artwork for Scalability: Vector graphics are essential for complex designs or stickers with intricate details. Vector files allow for scaling without losing resolution, vital for variations in size. These are particularly useful for stickers that might be scaled up or down for different applications. The flexibility of vector-based files translates directly to the flexibility of the final sticker.
- Color Profiles and Specifications: The color profile dictates the color accuracy. The use of a standardized profile ensures consistency across different print environments. CMYK color mode is crucial for print production, and understanding the color gamut of the printing process is vital for a faithful reproduction. The precise color values should be clearly defined for each color used in the design.
- Bleed Area and Safe Zones: A bleed area is a margin extending beyond the trim line, ensuring that the design is completely visible after trimming. Safe zones are areas inside the bleed that contain critical design elements. These areas prevent important parts of the design from being cut off during the printing process. This prevents crucial elements from being lost in the printing process.
- Layer Structure for Multi-Layered Stickers: For stickers with multiple layers, the file should be structured to reflect this. Each layer should be clearly defined, allowing for precise placement and separation during the printing process. This meticulous separation of layers is the key to achieving complex, layered designs. The ability to adjust or modify individual layers is crucial for troubleshooting and design iteration.
Organizing the Sticker File Based on Design Specifications
Organizing a sticker file involves more than just placing elements; it’s about creating a logical structure that reflects the design’s complexity. The organization method should align with the complexity of the design, ensuring that the print process can follow the structure effectively.
- File Naming Conventions: Implementing a consistent naming convention for each element, layer, or variation within the file streamlines the workflow and prevents confusion. This consistent method for file naming is important for tracking and organizing multiple design iterations.
- Metadata and Notes: Adding metadata such as design specifications, printer requirements, and any special instructions or notes will aid in smooth communication between designers and printers. Adding this context is vital for effective communication and to avoid any mishaps.
- Version Control for Design Iterations: Managing different versions of the design file is essential. A clear version control system ensures that all stakeholders have access to the most up-to-date file, reducing potential errors and ensuring that everyone is working from the same design.
Example of a Complex Sticker Design File Structure
| Element | Description | Specifications |
|---|---|---|
| Sticker Image | Main design element | High-resolution PNG (300 DPI), CMYK color profile |
| Background Layer | Base layer for the sticker | Vector graphic (AI or SVG) |
| Text Layer | Brand name and information | Vector font, specific font size and color |
| Icons | Supplementary elements | High-resolution PNG (300 DPI), specific position and size |
| Bleed Area | Extra space outside trim line | 0.25 inch |
| Safe Zone | Area containing important details | 0.125 inch from trim line |
Software Tools for Sticker File Outlining
A whisper of a secret, a hint of the arcane. The realm of sticker design, while seemingly simple, harbors intricate methods. Mastering these tools is like unlocking a hidden language, allowing you to craft stickers with a precision that belies their simplicity. Unveiling the power of software tools for sticker file outlining is a journey into the subtle art of digital artistry.The world of digital sticker design is vast and varied, each program offering its own unique approach.
Some tools focus on the meticulous details of vector graphics, while others excel at seamless raster manipulation. The choice of software is pivotal, as the right tool can transform a simple idea into a captivating masterpiece, a true testament to the power of digital creation.
Software Options for Sticker File Creation
Several software options cater to the needs of sticker file outlining. Each tool boasts unique capabilities, enabling artists to create intricate designs with ease. Understanding the nuances of each program is key to choosing the perfect companion for your creative endeavors.
- Adobe Illustrator: This industry-standard vector graphics editor provides precise control over shapes and Artikels. Its powerful tools allow for the creation of complex designs, making it ideal for intricate sticker layouts. The ability to scale and manipulate objects without losing quality is paramount for sticker design. Its user-friendly interface, coupled with a vast library of tutorials and support resources, makes it accessible to beginners while retaining power for seasoned designers.
Illustrator’s precision is perfect for creating clean lines and intricate details on sticker files.
- CorelDRAW: A strong contender in the vector graphics arena, CorelDRAW offers a similar level of control and precision to Adobe Illustrator. Its intuitive interface and wide array of tools make it a compelling option for sticker design, particularly for users accustomed to Corel’s workflow. CorelDRAW’s robust features, including its object manipulation tools, make it ideal for creating complex Artikels and intricate designs.
- GIMP: A free and open-source alternative to Adobe Photoshop, GIMP offers a wide array of tools for raster graphics manipulation. While not a vector-based program, it is capable of creating and editing raster images, which are often necessary for certain sticker types. Its flexibility and vast feature set make it suitable for those who prefer a free and versatile platform.
GIMP can create simple stickers with a smooth Artikel, while also handling more complex layered designs.
- Affinity Designer: A powerful and user-friendly vector graphics editor, Affinity Designer is a compelling alternative to industry-standard programs. It offers a user-friendly interface that facilitates quick learning and mastery, without sacrificing the power of sophisticated design. Affinity Designer’s capabilities include powerful tools for precise outlining, making it an excellent choice for sticker file creation. Its affordability and intuitive design make it an accessible yet powerful tool for creating stickers.
Key Features Comparison
The table below Artikels the key features of each software tool. This comparison provides a structured overview, helping you to identify the best fit for your needs.
| Software | Vector/Raster | Ease of Use | Artikel Precision | Cost |
|---|---|---|---|---|
| Adobe Illustrator | Vector | Intermediate | High | Paid |
| CorelDRAW | Vector | Intermediate | High | Paid |
| GIMP | Raster | Beginner-friendly | Medium | Free |
| Affinity Designer | Vector | Beginner-friendly | High | Paid |
Creating a Simple Sticker in Adobe Illustrator
To illustrate the process, let’s create a simple sticker using Adobe Illustrator. First, create a new document. Then, select the Ellipse Tool and draw a circle. Using the Pen Tool, draw a shape that will be the Artikel of the sticker. Group the shape and the circle together.
Adjust the colors and fill as needed, then export the file. This method demonstrates a simple, effective way to use Adobe Illustrator for creating sticker Artikels. The resulting sticker is a testament to the power of vector graphics and the precision achievable with the right tools.
Structure for Different Sticker Types
A whisper in the wind, a silent promise etched on a tiny piece of paper. Sticker files, seemingly simple, hold a hidden complexity. The meticulous arrangement of these ephemeral images, their intricate layering and precise positioning, speak volumes about the intent behind them. The structure, therefore, must reflect the very essence of the sticker itself.Understanding the intended use of the sticker is paramount.
A sticker meant for a child’s room will have a different structural approach than one intended for a high-end marketing campaign. This nuance determines the level of detail, the layering, and ultimately, the success of the file itself. A poorly structured file can result in frustration and wasted effort, akin to a cryptic message that cannot be deciphered.
Adapting Structure for Sticker Types
The structure of a sticker file is not a one-size-fits-all affair. Simple stickers, with a single, flat design, require a straightforward approach. Conversely, complex stickers, with multiple layers and intricate details, demand a more sophisticated method. Layered stickers, with elements that overlap or sit behind others, necessitate a precise and methodical approach. The method of layering, whether it’s for intricate patterns or for creating a sense of depth, must be clear and consistent within the file.
Importance of Intended Use
Consider the sticker’s intended use. A sticker for a greeting card will benefit from a simple, clean structure. A sticker for a complex product, however, may require detailed layering and positioning to convey the product’s features effectively. The intended use will inform the structural choices, from color palettes to image dimensions. Think of it as choosing the right instrument for the symphony; a delicate flute for a quiet melody or a powerful tuba for a grand crescendo.
This will be reflected in the structure.
Comparison of Structures for Various Sticker Types
| Sticker Type | Structure | Intended Use | Details |
|---|---|---|---|
| Simple Sticker | Single layer, flat design | Greeting cards, simple decorations | Easy to create, quick to import, low complexity |
| Complex Sticker | Multiple layers, intricate details | Product packaging, intricate designs | Requires precision in layering, detailed positioning |
| Layered Sticker | Overlapping or behind-the-scenes elements | Visual effects, 3D illusions | Careful attention to depth and perspective |
Steps for Different Sticker Types
- Simple Stickers: Import the graphic, verify the dimensions, and save. No complex layering is required.
- Complex Stickers: Carefully position and arrange each layer in the sticker file. Ensure each layer is clearly delineated.
- Layered Stickers: Precisely place each layer to achieve the desired effect. Use guides or grids for accuracy.
Examples of Sticker Types and Structures
Imagine a simple “Happy Birthday” sticker, a complex logo sticker for a company product, and a layered sticker of a stylized butterfly. The simple sticker would be a flat image with minimal layering. The complex sticker would have detailed elements in various layers, and the layered sticker would have elements that appear to be in front of or behind others.
These differences are reflected in the structural choices made for each sticker.
Troubleshooting and Common Errors in Sticker File Outlining
A peculiar chill permeates the air, a subtle tremor in the very fabric of sticker design. Errors, like mischievous sprites, can lurk within the digital canvas, corrupting the intended masterpiece. But fear not, intrepid sticker designers, for within these pages lies the antidote to these digital disturbances. We will unravel the mysteries of common outlining woes and equip you with the tools to conquer them.A well-Artikeld sticker file is the bedrock of a successful design.
But even the most meticulous of us can stumble. Understanding the potential pitfalls and possessing the knowledge to correct them is key to unlocking the full potential of your sticker designs. Let’s delve into the realm of troubleshooting and discover the hidden traps lurking within.
Common Outlining Errors
Errors in sticker file outlining can stem from various sources. These can range from simple software glitches to more complex design oversights. Recognizing these errors is the first step towards resolving them.
- Incorrect Pathing: A wayward path can lead to a distorted Artikel, resulting in a sticker that appears jagged or uneven. This often stems from imprecise vector manipulation or unintended intersections. For example, if a portion of the path crosses itself or is improperly joined, the result will be an inaccurate Artikel.
- Missing or Extra Elements: The sticker file might have parts missing or have redundant elements. This could result from accidental deletions, or from an overzealous use of the duplication tool. A missing Artikel for a critical part of the design will be immediately noticeable.
- Inconsistent Stroke Width: Variations in stroke width can create a visually jarring effect, disrupting the intended aesthetic. This can lead to a sticker that looks uneven or amateurish. A graphic that should have a uniform thickness might have a thicker or thinner line in certain sections.
- Layer Issues: Misplaced or overlapping layers can cause confusion and errors in the outlining process. This is particularly problematic if layers aren’t clearly organized or named, or if one layer unintentionally masks or overlaps another.
Troubleshooting Guide
Proper troubleshooting hinges on careful observation and methodical investigation. The following guide will walk you through resolving common sticker file outlining issues.
- Verify Path Integrity: Carefully examine each path within the Artikel. Look for any irregularities, intersections, or gaps in the vector paths. Use the software’s tools to correct the paths and ensure they follow the desired shape. Use the software’s path-editing tools to carefully fix any issues.
- Check for Missing or Extra Elements: Double-check the design for any missing elements or extra ones. Review all layers and groups to ensure every component is present and correctly positioned. Using layer visibility and transparency can help isolate missing or extra elements.
- Adjust Stroke Width: Select the Artikel and adjust the stroke width tool to ensure uniformity across the design. Ensure that the entire sticker’s Artikel maintains the intended thickness, without variations.
- Organize Layers: Arrange layers in a logical order. Ensure that layers are appropriately named and that they don’t overlap or mask each other. Organizing layers by function, such as Artikels, fills, and effects, can make troubleshooting easier.
Examples of Errors and Fixes
Understanding the source of errors is key to resolving them. Let’s examine some common outlining errors and their corresponding solutions.
Error: A jagged Artikel around a circle, due to an intersection of paths. Fix: Use the software’s path-editing tools to carefully refine the path to ensure a smooth circular Artikel.
Error: A critical element of the design is missing from the Artikel. Fix: Ensure that the element is present in all layers and groups. Check if it’s hidden by an overlapping layer. Add it back if necessary.
Error: Uneven stroke width on a graphic. Fix: Select the entire Artikel and use the software’s stroke width tool to set a uniform thickness. This ensures the entire sticker’s Artikel maintains the intended thickness, without variations.
Optimizing Sticker File s for Production
A whisper of the wind carries secrets through the digital ether, secrets about the perfect sticker file. These files, often the silent architects of charming imagery, need careful attention to detail to achieve their full potential. Ignoring the subtleties of optimization can lead to unexpected glitches in the printing process, like a mischievous sprite playing tricks on a perfectly crafted design.Optimization is not just about making the file smaller; it’s about ensuring a seamless transition from design to finished product, a whisper of perfection carried through the printing process.
This meticulous process ensures the stickers emerge from the press, not as flawed artifacts, but as vibrant, detailed expressions of the initial vision.
Steps for Efficient Production Processes
The journey to optimized sticker files begins with meticulous preparation. Each step is crucial, like carefully placing each brick in a majestic structure. Start by understanding the specific requirements of the chosen printing method. A laser-cut sticker needs different preparation than a digitally printed one. Next, ensure vector graphics are used for scalable designs, and avoid using raster images, which can lose clarity when enlarged.
This foundational understanding sets the stage for all future steps.
Importance of Scalability and Consistency
Scalability ensures the sticker’s design remains crisp and clear across various sizes. Consistency guarantees that every sticker produced adheres to the same high standard, eliminating variations in color or image quality. Imagine a series of stickers, each one a miniature masterpiece, maintaining identical details across the entire run. This precision is critical for maintaining brand identity and ensuring customer satisfaction.
Optimizing for Different Printing Methods
Different printing methods have distinct needs. Solvent-based inks, for instance, might demand different color profiles than water-based inks. Digital printing, with its precise control over ink application, allows for more complex designs, while screen printing, known for its vibrant colors, might require a simplified design to avoid complications in the stenciling process.
- For screen printing, simplify the design and ensure solid colors are accurately represented to avoid color shifting.
- For digital printing, consider the resolution requirements of the chosen printer to avoid pixelation.
- For laser-cut stickers, maintain sharp edges and vector graphics to ensure precise cutting and minimize errors.
Examples of Optimizing for Specific Printing Techniques
A sticker designed for laser cutting requires meticulous attention to the file’s vector format, ensuring crisp edges and avoiding complex shapes that might cause the laser to malfunction. A sticker intended for digital printing needs a high-resolution image to avoid pixelation, while a sticker designed for screen printing must use solid colors to maintain color accuracy. These considerations ensure a smooth transition from design to finished product.
Table of Production-Related Aspects
| Production Method | File Format | Resolution | Color Mode | Bleed Area |
|---|---|---|---|---|
| Digital Printing | AI, EPS | High (300 DPI or higher) | CMYK | 1/8 inch |
| Screen Printing | AI, EPS | Medium (150 DPI) | CMYK | 1/4 inch |
| Laser Cutting | AI, EPS | High (300 DPI or higher) | CMYK or Grayscale | None (or very minimal) |
This table provides a concise overview of the crucial elements to consider when preparing sticker files for various production methods. The choice of file format, resolution, color mode, and bleed area directly impacts the final product.
Concluding Remarks: How To Add A Outline To Sticker File
In conclusion, creating a well-structured sticker file involves careful planning, utilizing appropriate software, and understanding the specific needs of each sticker design. This guide provides a roadmap for tackling the entire process, from initial outlining to optimizing for production. By following the Artikeld steps and addressing common issues, you can confidently bring your sticker designs to life.
Query Resolution
What are some common mistakes when outlining sticker files?
Common mistakes include not considering the final print method, using an inappropriate software tool, and failing to check for inconsistencies in the Artikel.
What software is best for outlining sticker files?
The best software choice depends on the complexity of the design and your familiarity with different tools. Some popular options include Adobe Illustrator, Inkscape, and CorelDRAW.
How do I prepare a sticker file for different printing methods?
Different printing methods require specific file formats and settings. For example, screen printing might need a different resolution than digital printing.
What are the key elements to consider when creating a sticker file?
Essential elements include file format, resolution, color accuracy, and proper vectorization for scalability. Ensure your Artikel is precise and well-defined.
