How to bleed Chevy Colorado brakes? This ain’t no joke, fam. Your brakes are crucial for safety, and if they’re all messed up, you’re gonna be in a pickle. This guide breaks down the whole process, from identifying the bleeder valve to troubleshooting common issues. Get ready to level up your mechanic skills!
We’ll walk you through the steps, providing clear instructions and helpful visuals. Learning how to bleed your brakes is a totally doable task, even for beginners. Just follow along, and you’ll be a pro in no time. Plus, we’ll cover everything from the different types of brake fluid to the essential tools you’ll need.
Introduction to Bleeding Chevy Colorado Brakes
Proper brake system maintenance is crucial for the safety and longevity of your Chevy Colorado. Bleeding the brakes removes air pockets that can impair braking efficiency and responsiveness. This process ensures consistent brake pedal feel and prevents potential brake failure. A properly bled braking system translates to a safer and more controlled driving experience.The process of bleeding Chevy Colorado brakes involves systematically removing trapped air bubbles from the brake lines and hydraulic system.
This is accomplished by carefully releasing the brake fluid under pressure, allowing the brake fluid to push out any air pockets and restore hydraulic pressure. Consistent pressure and proper technique are paramount to effective bleeding.
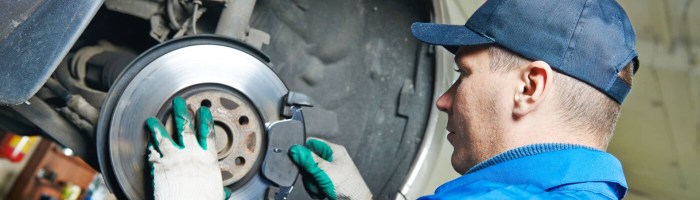
Brake Bleeding Procedure
The brake bleeding process requires a methodical approach to ensure complete removal of air from the system. Common tools and materials include a brake bleeder, a clean container for collecting brake fluid, a wrench, and a funnel. A second person to assist with the pedal pumping is highly recommended for a smoother process.
Tools and Materials Required
A comprehensive list of necessary tools and materials ensures a smooth and efficient brake bleeding process.
- Brake bleeder kit: This kit typically includes a bleeder hose, a collection container, and a fitting to connect to the brake caliper.
- Brake fluid: A high-quality brake fluid specific to your vehicle model is essential. Using the correct type is vital to ensure the system’s performance and safety. See the table below for recommended fluid types.
- Wrench or socket set: Used for accessing and tightening bleeder valves on the brake calipers.
- Funnel: A funnel aids in the transfer of brake fluid into the collection container.
- Clean rags or paper towels: These are used for cleaning up spills and ensuring a clean working environment.
- Gloves: Protective gloves protect your hands from brake fluid.
- Second person (optional but highly recommended): A second person to assist with the pedal pumping process significantly improves efficiency.
Brake Fluid Types
Different types of brake fluid are available, each with unique properties that influence their performance and compatibility. Choosing the right type is essential for optimal brake system function.
| Brake Fluid Type | Properties | Use Cases | Compatibility |
|---|---|---|---|
| DOT 3 | Generally considered a less expensive option with a lower boiling point. | Suitable for older vehicles that do not require high-performance braking. | May not be compatible with newer vehicles requiring higher boiling points. |
| DOT 4 | Offers a higher boiling point and improved resistance to moisture absorption compared to DOT 3. | Recommended for modern vehicles requiring higher performance levels and temperature resistance. | Generally compatible with most modern vehicles. |
| DOT 5.1 | Boasts the highest boiling point and is glycol-based, making it resistant to moisture. | Ideal for high-performance vehicles or applications requiring extended periods in high temperatures. | Usually compatible with newer vehicles but consult your vehicle’s owner’s manual. |
Identifying the Bleeder Valve
Mastering the art of bleeding Chevy Colorado brakes hinges on precisely identifying the correct bleeder valve. Proper identification ensures efficient removal of air bubbles, leading to optimal brake function. Incorrect valve selection can lead to wasted time and potentially hinder the entire bleeding process.Locating the bleeder valve depends on the specific model year and trim level of your Chevy Colorado.
Variations in design and component placement necessitate a careful approach. A detailed understanding of the valve’s location, coupled with visual confirmation, guarantees the success of your brake bleeding efforts.
Bleeder Valve Locations
Different brake lines on a Chevy Colorado have bleeder valves in specific positions. Careful observation and understanding of these locations are essential for successful bleeding.
| Brake Line | Bleeder Valve Location (Front/Rear) | Description | Diagram Description |
|---|---|---|---|
| Front Left | Front Left Wheel Well | The bleeder valve for the front left brake line is typically found on the caliper, positioned within the wheel well. It’s often accessible from the front of the vehicle. | Imagine a stylized drawing of a Chevy Colorado. A red dot marks the bleeder valve on the front left caliper, which is visible from the wheel well. An arrow points to the valve’s location. |
| Front Right | Front Right Wheel Well | Similar to the front left, the front right bleeder valve is located on the caliper within the wheel well, accessible from the front. | A similar drawing, but with the red dot positioned on the front right caliper. An arrow again points to the valve’s location. |
| Rear Left | Rear Left Wheel Well (often behind the axle) | The rear left bleeder valve is situated on the caliper, typically positioned slightly behind the axle. Access might require working from under the vehicle. | A drawing of the Chevy Colorado from the side, showing the rear left wheel well, with a red dot on the rear left caliper bleeder valve, and an arrow pointing to the valve. Include a note about potential need for undercarriage access. |
| Rear Right | Rear Right Wheel Well (often behind the axle) | The rear right bleeder valve is analogous to the rear left, located on the caliper behind the axle, requiring potential undercarriage access. | Same as the rear left drawing, but with the red dot positioned on the rear right caliper. |
Identifying the Correct Valve
Visual verification, along with reference to the vehicle’s service manual, are crucial for accurate bleeder valve identification.
- Visual Inspection: Thoroughly examine the caliper area for the specific bleeder valve. Pay close attention to its physical characteristics and location. Refer to your vehicle’s owner’s manual for specific diagrams and details.
- Service Manual Reference: Consulting your Chevy Colorado’s service manual is paramount. The manual contains detailed diagrams and instructions, providing a precise guide to locating the bleeder valves for each brake line. This is especially important for older models or those with unique configurations.
Preparing the System
Proper preparation is crucial for a successful brake bleeding procedure. A well-prepared system minimizes complications and ensures efficient fluid exchange, ultimately leading to optimal brake performance. This involves meticulous attention to safety, vehicle support, fluid compatibility, and tool assembly. A systematic approach to these steps guarantees a smooth and effective bleeding process.
Vehicle Preparation
Thorough preparation of the vehicle is paramount to a successful brake bleeding procedure. This includes ensuring the safety of the work environment and the proper support of the vehicle. The vehicle must be securely supported to prevent any accidental movement during the bleeding process. Incorrect support can lead to safety hazards and potential damage to the vehicle.
- Securing the Vehicle: Park the vehicle on a level surface, engaging the parking brake firmly. Apply wheel chocks to prevent any rolling. This critical step ensures the safety of both the technician and the vehicle.
- Raising the Vehicle: Employ a reliable jack and jack stands to safely lift the vehicle. Position the jack stands firmly beneath the vehicle’s frame, ensuring proper support. Ensure the jack stands are appropriate for the weight of the vehicle and in good condition. Always verify the manufacturer’s specifications for proper jacking points.
- Disconnecting the Wheel: Carefully remove the wheel nuts and safely detach the wheel. Ensure all components are appropriately disconnected and stored securely to avoid potential accidents.
Brake Line Integrity
Correct brake line connection is essential for the proper functioning of the brake system. Improper connections can lead to leaks, reduced braking power, and potential safety issues.
- Checking Connections: Inspect all brake lines for any signs of damage, leaks, or loose connections. Tighten any loose connections to ensure a secure seal. This includes inspecting the brake lines for any kinks or damage.
- Correct Fluid Type: Use the correct type of brake fluid specified by the vehicle manufacturer. Using the wrong fluid can compromise the brake system’s performance and lifespan. Consult the vehicle’s owner’s manual for the recommended brake fluid type.
Gathering Materials
A well-equipped toolbox is crucial for efficient brake bleeding. Having the necessary tools and materials on hand avoids interruptions and ensures the procedure’s completion without delays.
- Tools: Gather the required tools, including a brake bleeder, a clean container for the brake fluid, and a funnel. Also include a wrench to adjust the bleed valve and safety glasses.
- Brake Fluid: Purchase the correct type of brake fluid from a reputable vendor. Brake fluid should be new and free of contaminants. Ensure the fluid is appropriate for the vehicle’s brake system and use the recommended quantity.
The Bleeding Process: How To Bleed Chevy Colorado Brakes
Mastering the brake bleeding procedure is crucial for maintaining optimal braking performance in your Chevy Colorado. A properly bled brake system ensures consistent stopping power and prevents potential brake-related issues down the line. This section delves into the step-by-step process, emphasizing the importance of technique and the identification of completion cues.
Steps Involved in Bleeding the Brake System
The brake bleeding process involves carefully removing air bubbles from the brake lines. Consistent pressure and proper valve manipulation are paramount to success. Failure to follow these steps can result in a system that’s underpowered or prone to failure.
- Establish the Proper Workspace. Ensure a clean, well-lit area. Gather necessary tools and materials. This includes a suitable container for collecting brake fluid, clean rags or towels, and a jack and jack stands for vehicle support.
- Positioning the Vehicle. Raise the vehicle safely using a jack and jack stands. Secure the vehicle to prevent movement during the process. Proper vehicle support is essential for safety and avoiding potential accidents.
- Identifying the Bleeder Valve. Locate the bleeder valve on the brake caliper. Each caliper typically has one. This is critical for directing fluid flow effectively.
- Preparing the Bleeder Valve. Ensure the bleeder valve is accessible. Clean any dirt or debris from the valve. Proper valve accessibility and cleanliness are essential to avoid impediments to the bleeding process.
- Attaching the Bleeder Tool. Connect the brake bleeder tool to the bleeder valve. Ensure a tight seal to prevent leaks and maintain proper pressure.
- Opening the Bleeder Valve. Slowly open the bleeder valve to allow the brake fluid to flow. This step is crucial to allow the air to escape.
- Collecting the Brake Fluid. Collect the brake fluid in the container. Observe the fluid color for any unusual discoloration. Discoloration might signal a problem that requires attention.
- Repeating the Process. Repeat steps 6 and 7 until no more air bubbles are present. This step ensures the entire system is free from air. The process should be repeated for all the calipers to ensure optimal system performance.
- Closing the Bleeder Valve. Close the bleeder valve once a consistent stream of brake fluid is observed. This step prevents fluid leakage.
- Completing the Process. Lower the vehicle safely from the jack stands. Test the brakes to ensure proper functionality. This final step is crucial for confirming the successful completion of the process.
Proper Technique for Operating the Bleeder Valve
Maintaining a steady flow of brake fluid is critical. Too rapid a release of pressure can lead to issues with the brake system. Careful manipulation of the bleeder valve ensures an even flow and minimizes the risk of problems.
- Consistent Pressure. Apply consistent pressure to the brake bleeder tool to maintain a steady flow of brake fluid. This is crucial to prevent air from re-entering the system.
- Avoiding Rapid Opening/Closing. Avoid rapidly opening and closing the bleeder valve. This can cause inconsistent fluid flow and potential air re-entry.
- Monitoring the Brake Fluid. Continuously monitor the brake fluid coming from the bleeder valve. A smooth, uninterrupted flow indicates a well-functioning system.
Signs of Complete Bleeding
Recognizing when the bleeding process is complete is vital. The following signs indicate the system is adequately bled.
- Constant Fluid Flow. A steady, consistent flow of brake fluid without any air bubbles suggests the system is clear of air.
- Clear Brake Fluid. The brake fluid should be a clear, transparent liquid. Any discoloration or particulate matter indicates a potential issue that requires investigation.
- Absence of Air Bubbles. The absence of air bubbles in the brake fluid is a key indicator of a fully bled system. The absence of air bubbles confirms the system’s readiness.
Using a Brake Bleeder Tool
A brake bleeder tool is essential for effectively bleeding the brake system. Safety precautions must be taken when working with brake fluid.
- Safety Precautions. Always wear safety glasses and gloves when working with brake fluid. Brake fluid can cause skin irritation and damage. Proper safety gear is essential to avoid any potential risks.
- Proper Tool Usage. Follow the manufacturer’s instructions for the specific brake bleeder tool being used. This will ensure that the tool is used correctly and efficiently.
Troubleshooting Common Issues

Troubleshooting common issues during the brake bleeding process is crucial for ensuring a smooth and effective operation. Identifying and resolving these issues promptly can prevent potential safety hazards and ensure optimal brake performance. This section will guide you through common problems and their solutions, enabling you to maintain the integrity of your Chevy Colorado’s braking system.
Air Pockets in Brake Lines, How to bleed chevy colorado brakes
Air pockets in the brake lines are a frequent occurrence during bleeding. These pockets interrupt the flow of brake fluid, leading to reduced braking efficiency and a spongy brake pedal. Proper identification and removal of these air pockets are vital for restoring optimal braking performance.
- Identifying Air Pockets: A spongy brake pedal is often the first indication of trapped air. The pedal may feel soft or unusually light when depressed. Listen for a hissing sound as air escapes from the bleeder valve during the bleeding process. If no hissing sound is heard, air may be trapped.
- Addressing Air Pockets: To remove air pockets, ensure the bleeder valve is properly tightened. Continue the bleeding process until the brake fluid is consistently free of air bubbles. Frequent and steady pressure on the brake pedal during bleeding can help push the air out of the lines.
Brake System Leaks
Leaks in the brake system can lead to a significant loss of brake fluid, reducing braking power and potentially compromising safety. Early detection and appropriate repair are crucial.
- Identifying Leaks: Inspect the brake lines, calipers, and master cylinder for any signs of fluid leakage. Look for wet spots or puddles of brake fluid near the brake components. A noticeable decrease in brake fluid level in the master cylinder reservoir is also a strong indicator.
- Addressing Leaks: If a leak is identified, do not attempt to drive the vehicle. Seek professional assistance to locate and repair the leak promptly. Brake fluid leaks can cause significant problems if left unaddressed. Professional repair is crucial to prevent further damage and ensure safety.
Brake Fluid Contamination
Contaminated brake fluid can negatively impact the performance and lifespan of the braking system. Moisture, dirt, or other contaminants can cause corrosion and reduce the fluid’s effectiveness.
- Identifying Contamination: Examine the brake fluid in the reservoir for any unusual color changes, particulates, or signs of moisture. If the fluid appears cloudy, dark, or contains visible debris, it is likely contaminated.
- Addressing Contamination: If contamination is detected, replace the brake fluid entirely. Contaminated fluid should never be reused. Using a high-quality brake fluid designed for the vehicle’s specific system is recommended to prevent future issues. This ensures optimal brake function and safety.
Brake Pedal Height Adjustment
Maintaining the correct brake pedal height is crucial for optimal braking response and driver comfort.
- Checking Brake Pedal Height: The brake pedal should be positioned at a height that allows for a comfortable and controlled braking action. Too high a pedal requires excessive force to depress, while too low a pedal can lead to a risk of over-applying the brakes.
- Adjusting Brake Pedal Height: Adjusting brake pedal height usually involves adjusting the master cylinder. This procedure typically requires professional assistance to ensure proper adjustment and prevent damage. Improper adjustment can lead to a loss of braking effectiveness or safety concerns.
Maintaining the System
Proper maintenance is crucial for the longevity and reliable operation of your Chevy Colorado’s braking system. Neglecting routine checks and fluid changes can lead to reduced braking performance, potentially dangerous situations, and costly repairs down the road. Consistent maintenance ensures your brakes remain efficient and safe.Maintaining a consistent brake fluid level is vital for optimal braking performance. Brake fluid is hygroscopic, meaning it absorbs moisture from the air.
This moisture absorption can affect the braking system’s efficiency and lead to corrosion. A consistently full brake fluid reservoir ensures the system operates at peak performance and avoids premature component failure.
Changing Brake Fluid
Brake fluid should be changed periodically to remove moisture and contaminants. This ensures the system operates efficiently and avoids corrosion. Changing brake fluid is a relatively straightforward process but requires meticulous attention to detail. Incorrect procedures can lead to leaks or damage.
- Gather necessary materials: Ensure you have a new brake fluid bottle, a clean container for draining the old fluid, appropriate tools (sockets, wrenches), and protective gear (gloves, eye protection). The exact tools required will vary depending on your specific vehicle’s brake system design. Refer to your vehicle’s service manual for specific requirements.
- Prepare the vehicle: Park the vehicle on a level surface and engage the parking brake. Locate the brake fluid reservoir. Ensure the engine is turned off and the parking brake is fully engaged.
- Drain the old fluid: Carefully open the bleeder valve on the brake caliper. Place the container beneath the valve to catch the draining fluid. Allow the old fluid to drain completely. Dispose of the old fluid properly according to local regulations. Never pour brake fluid down the drain.
- Fill the reservoir: Replace the cap on the reservoir. Slowly add the new brake fluid to the reservoir, ensuring you do not overfill. Use the correct type of brake fluid specified by your vehicle’s manufacturer. Never mix different types of brake fluid.
- Bleed the system: Using the appropriate bleeding procedures, bleed the air from the brake lines. Refer to your vehicle’s service manual for specific instructions. This step is crucial for ensuring a smooth brake pedal feel and optimal braking performance. Incorrect bleeding procedures may result in air pockets within the lines.
Inspecting the Brake System
Regularly inspecting the brake system for leaks or damage is essential to prevent potential issues. Visual inspection can identify many potential problems.
- Visual Inspection: Check for any leaks around the brake lines, calipers, or the brake fluid reservoir. Look for signs of rust, corrosion, or damage to the brake components. Examine the brake pads for wear and tear; excessive wear can affect braking performance.
- Brake Pedal Feel: Check the brake pedal feel. A spongy or soft pedal could indicate a problem with the brake system. A firm pedal is essential for efficient stopping.
- Wheel Cylinders: Check for any signs of leaks or damage around the wheel cylinders.
- Brake Lines: Inspect brake lines for any kinks, bends, or signs of damage. Damaged lines can compromise braking efficiency and are a potential safety hazard.
Frequency of Brake Fluid Changes and Inspections
The frequency of brake fluid changes and inspections depends on driving conditions and vehicle maintenance history. It is recommended to consult your vehicle’s service manual for specific guidelines. However, as a general guideline, the following table provides a summary:
| Component | Frequency | Inspection Steps |
|---|---|---|
| Brake Fluid | Every 2 years or 24,000 miles, whichever comes first. | Visual inspection of the brake fluid reservoir, checking for leaks, and proper fluid level. Drain and refill the brake fluid according to manufacturer’s recommendations. |
| Brake Pads/Rotors | Every 12,000 – 15,000 miles, or as needed based on wear | Visual inspection for wear, checking the thickness of the brake pads and the condition of the rotors. Replace worn brake pads and rotors according to manufacturer recommendations. |
| Brake Lines/Components | Every 3 years or 36,000 miles, whichever comes first. | Visual inspection for damage, leaks, or corrosion. Check for kinks, bends, or other damage to brake lines. Inspect all brake components for any signs of deterioration. |
Conclusion
So, you’ve learned how to bleed Chevy Colorado brakes. You’re now equipped with the knowledge and skills to tackle this essential maintenance task. Remember, proper brake maintenance is key to safe driving. By following these steps, you’re not just maintaining your vehicle; you’re ensuring your safety and the safety of others on the road. Keep those brakes healthy, and you’ll be rolling smoothly for miles to come!
FAQ Explained
What kind of brake fluid should I use?
Use the type recommended in your vehicle’s owner’s manual. Usually, it’s DOT 3, DOT 4, or DOT 5.1. Don’t mix ’em up!
How long does it take to bleed brakes?
Bleeding time varies depending on the car and how much air is in the system. Expect it to take anywhere from 30 minutes to an hour or more. Patience is key!
What are some signs that the bleeding process is complete?
The brake pedal should feel firm and not spongy. You should also notice a consistent brake pedal height. If you still see air bubbles in the reservoir, keep bleeding.
What if I can’t find the bleeder valve?
Refer to your owner’s manual or do a quick search online for your specific Chevy Colorado model. There are diagrams that can help you locate the bleeder valve for each brake line.
