How to buy hydraulic brakes for your bike is a crucial step in upgrading your cycling experience. Hydraulic brakes offer superior stopping power and modulation compared to traditional mechanical brakes, making them a popular choice for cyclists of all levels. Understanding the different types, installation procedures, and maintenance requirements is key to ensuring a smooth and safe ride.
This comprehensive guide explores everything from the fundamental principles of hydraulic braking to the crucial factors to consider when making a purchase. We’ll delve into the various types of hydraulic brakes, their pros and cons, and the essential considerations for selecting the perfect set for your bike and riding style.
Introduction to Bike Hydraulic Brakes
Hydraulic brake systems are a significant advancement in bicycle technology, offering superior performance and control compared to mechanical brakes. This enhanced performance stems from the use of hydraulic pressure to transmit force from the lever to the brake caliper, resulting in a more powerful and responsive braking experience. This system’s efficiency and control make it a popular choice for cyclists seeking high-performance braking.The basic design of hydraulic brakes relies on a closed system containing brake fluid, enabling the transmission of force from the lever to the caliper, which applies pressure to the brake pads.
This design, unlike mechanical brakes, minimizes the mechanical advantage required for effective braking, resulting in a lighter and more efficient braking system.
Components of a Hydraulic Brake System
Hydraulic brake systems are comprised of several key components, each playing a crucial role in the overall function. Understanding these components is essential for comprehending the system’s operation.
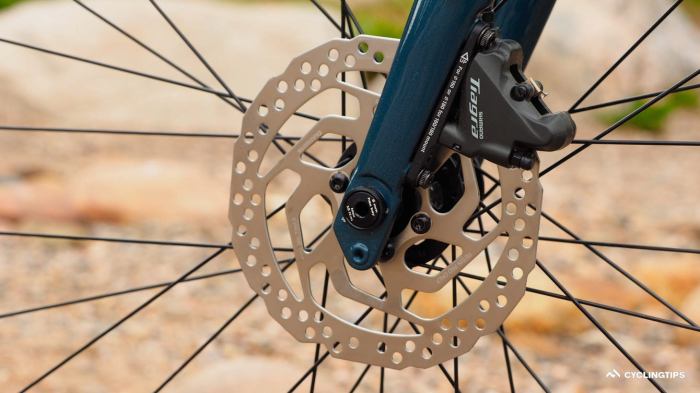
- Caliper: The caliper is the component at the wheel end of the system, housing the brake pads. It is responsible for applying pressure to the brake pads, causing them to grip the rotor and slow the wheel. Caliper design varies depending on the specific brake model, but all calipers share the fundamental function of applying pressure to the pads.
- Lever: The lever is the component grasped by the cyclist, controlling the braking force. Lever design impacts the cyclist’s feel and the amount of force required to engage the brakes. Different lever designs cater to various riding styles and preferences.
- Fluid Reservoir: The reservoir stores the brake fluid, which is crucial for transmitting the force from the lever to the caliper. The reservoir’s level is an important indicator of the system’s health and should be monitored regularly.
- Brake Fluid: The brake fluid is the critical component that transmits the pressure from the lever to the caliper. Brake fluid has specific properties, such as high boiling point and resistance to degradation, that ensure reliable operation across various temperatures and conditions.
- Brake Rotor: The rotor is a component affixed to the wheel hub, against which the brake pads press. Rotors are designed to provide a smooth surface for the brake pads to engage, minimizing friction and wear.
- Brake Pads: Brake pads are designed to generate the necessary friction to slow or stop the wheel. Pads are critical for converting the hydraulic pressure into braking force. Different materials and compositions of pads cater to various braking needs.
Working Principle of Hydraulic Braking
Hydraulic braking relies on Pascal’s principle, which states that pressure applied to a confined fluid is transmitted undiminished to every portion of the fluid and to the walls of its container. In bicycle hydraulic brakes, the force applied to the lever is amplified by the hydraulic fluid. This amplified force acts on the brake pads, resulting in the friction required to slow the wheel.
“Pascal’s principle is fundamental to the efficient operation of hydraulic brakes, ensuring consistent and reliable braking power.”
Comparison of Hydraulic and Mechanical Brakes
| Feature | Hydraulic Brakes | Mechanical Brakes |
|---|---|---|
| Mechanism | Uses hydraulic pressure to transmit force. | Relies on cable tension to transmit force. |
| Pros | Superior stopping power, modulation, and feel; lighter lever effort. | Simple design, lower cost, often more durable. |
| Cons | More complex design, susceptible to fluid leaks and maintenance issues. | Less stopping power, less modulation, and heavier lever effort. |
| Maintenance | Regular fluid checks and potential bleeding required. | Minimal maintenance required. |
| Cost | Generally higher initial cost. | Lower initial cost. |
Types of Hydraulic Brakes
Hydraulic brakes, a common feature in modern bicycles, utilize fluid pressure to transfer force from the lever to the brake caliper. This system provides precise control and powerful stopping ability, crucial for rider safety and performance. Different types of hydraulic brake systems cater to various bike types and rider preferences, each with its own set of advantages and disadvantages.
Post-Mount Brakes
Post-mount brakes are a traditional mounting system for hydraulic brakes. They are characterized by their mounting configuration on the frame’s brake bridge, commonly found on road bikes and some mountain bikes. This design is relatively straightforward and cost-effective, often providing an excellent balance between performance and price.
- Advantages: Post-mount brakes are typically easier to install and maintain, and often offer a wider range of brake caliper options. They are frequently lighter than disc brakes and may be less expensive.
- Disadvantages: Post-mount brakes may be less powerful and less reliable than disc brakes, especially under heavy braking conditions. The mounting position can also be less adaptable to different frame designs.
Disc Brakes
Disc brakes, a more recent advancement, utilize a rotor and caliper system. The rotor is mounted directly to the wheel hub, and the caliper applies pressure to the rotor via hydraulics. This design provides superior braking power and modulation, particularly in challenging conditions like wet or muddy terrain.
- Advantages: Disc brakes offer significantly more braking power, particularly in wet or muddy conditions. They provide superior modulation, allowing for precise control of braking force, which is crucial for downhill riding or mountain biking. This enhanced stopping power translates to improved safety and confidence in various riding scenarios. The system’s responsiveness often allows for quicker stops, reducing the stopping distance compared to post-mount brakes.
- Disadvantages: Disc brakes can be more expensive to purchase and maintain than post-mount brakes, requiring more components and potentially more specialized servicing. They are often slightly heavier than post-mount brakes and might require more careful maintenance to prevent potential malfunctions.
Comparative Analysis of Post-Mount and Disc Brakes
The choice between post-mount and disc brakes depends largely on the intended application and the rider’s preferences. Post-mount brakes are suitable for riders seeking a budget-friendly and relatively simple braking system for road bikes or some casual mountain bikes. Disc brakes are preferred by mountain bikers, commuters, or riders seeking superior braking power and modulation, especially in challenging weather conditions.
| Brake Type | Mounting | Braking Power | Cost | Weight | Maintenance |
|---|---|---|---|---|---|
| Post-Mount | Frame brake bridge | Moderate | Lower | Lighter | Easier |
| Disc | Directly on wheel hub | High | Higher | Heavier | Potentially more complex |
Choosing the Right Hydraulic Brakes
Selecting the appropriate hydraulic brakes for a bicycle is crucial for optimal performance and rider safety. Considerations must encompass the bike’s intended use, the rider’s weight and style, and the specific requirements of the braking system. This careful selection process ensures the brakes effectively address the demands of different riding terrains and conditions.
Bike Type and Rider Characteristics
Rider weight and riding style significantly impact brake selection. Heavier riders and those engaging in aggressive riding require more powerful braking systems. Mountain bikes, for example, often necessitate higher-performance brakes capable of withstanding substantial forces, unlike road bikes designed for smoother surfaces. Road bikes often benefit from lighter brakes, but still need adequate braking power for safety.
Similarly, commuters or riders focusing on urban environments might not need the same level of power as those riding off-road. Understanding the bike’s intended use is a vital part of the selection process.
Brake Caliper Compatibility
Ensuring brake caliper compatibility with the bike frame is paramount. Different bike frames utilize various mounting standards. Incorrect caliper mounting can lead to poor brake performance or even damage to the frame. Thorough research into the bike’s frame type and the corresponding caliper mounting standards is essential before purchase. For example, a post-mount caliper requires a different mounting style than a direct-mount caliper, requiring careful consideration of the frame geometry and the brake lever’s mounting location.
Brake Lever Reach and Adjustability
Rider preferences regarding brake lever reach and adjustability are significant. Ergonomic considerations play a vital role in the comfort and efficiency of the braking system. Different hand sizes and riding styles necessitate adjustments for optimal lever positioning. Adequate reach and adjustability ensure that the rider can easily and effectively apply the brakes in any riding scenario. Some brake levers offer adjustable reach to accommodate different hand sizes and riding positions.
Brake Fluid Type
The type of brake fluid significantly influences braking performance. Modern hydraulic brakes utilize mineral-based or DOT-4/DOT-5.1 brake fluids. Choosing the right fluid is crucial for consistent and reliable braking performance. DOT-4 fluids offer a good balance of performance and cost-effectiveness, while DOT-5.1 fluids, often favored for their resistance to boiling, are more suitable for extreme conditions or riders prioritizing fade resistance.
However, the selection should consider the bike’s intended use. For example, DOT-5.1 is a better choice for aggressive off-road riding, whereas DOT-4 is usually adequate for road riding.
Flowchart for Choosing Hydraulic Brakes

Start
|
V
Assess Bike Type (Road, Mountain, etc.)
|
V
Determine Rider Weight & Riding Style
|
V
Identify Frame Mounting Standard
|
V
Select Caliper Compatible with Mounting
|
V
Evaluate Brake Lever Reach & Adjustability
|
V
Choose Brake Fluid Type (DOT-4, DOT-5.1)
|
V
Confirm Compatibility & Order
|
V
End
Purchasing Hydraulic Brakes
Acquiring high-quality hydraulic brakes is crucial for enhancing bike handling and safety. This process involves careful consideration of various factors, from reputable retailers to customer reviews and price comparisons.
Understanding these aspects ensures a safe and effective braking system for your bicycle.
Selecting the appropriate hydraulic brake system demands a thorough evaluation of available options. This involves considering crucial aspects such as the brake type, component compatibility, and budget constraints. A well-informed decision guarantees a smooth and efficient braking experience.
Reputable Online Retailers
Finding trustworthy online retailers is vital for purchasing hydraulic brakes. Reputable retailers prioritize customer satisfaction and provide reliable support. Their websites often feature detailed product descriptions, user reviews, and clear return policies. Researching various online bike shops and reading reviews can help identify vendors with positive track records.
Customer Reviews and Ratings
Analyzing customer reviews and ratings is essential for evaluating the performance and reliability of hydraulic brakes. Positive feedback from previous buyers can provide valuable insights into the brakes’ effectiveness, durability, and ease of installation. Negative reviews can highlight potential issues or shortcomings, allowing informed purchasing decisions. Seek out reviews from multiple sources, not just those from a single retailer.
Price Comparisons and Deals
Comparing prices from different retailers is crucial for finding the best value. Retailers may offer various discounts, promotions, or bundles, potentially reducing the final cost. Utilizing price comparison websites and actively monitoring sales events can reveal significant cost savings.
Essential Factors to Consider Before Buying
Careful consideration of specific factors is paramount before committing to a hydraulic brake purchase. This includes evaluating the compatibility with your bike’s frame, ensuring appropriate lever reach and lever feel, and selecting a brake caliper size appropriate for your wheel size.
- Compatibility: Verify the brake’s compatibility with your bike’s frame, ensuring the brake lever, caliper, and rotors align with your specific bike model. Compatibility charts provided by the manufacturer are essential for confirming suitability.
- Lever Reach and Feel: Assess the lever reach and feel to determine comfort and responsiveness. A proper lever reach ensures ease of use, while a comfortable lever feel enhances control during braking.
- Caliper Size: Select a caliper size appropriate for your wheel size to guarantee optimal braking performance. Incorrect sizing can lead to reduced braking efficiency.
- Rotor Size: Ensure the rotor size aligns with your wheel type. Using the incorrect rotor size will compromise braking performance.
- Budget: Establish a budget to guide your purchasing decisions. Compare different brake models within your budget to find the best value.
Summary Table of Retailers
The following table provides a comparative overview of online retailers, their prices, and available discounts. Note that prices and discounts can vary; this table is a snapshot at a particular time.
| Retailer | Price (USD) | Discount | Availability |
|---|---|---|---|
| BikeParts.com | $150 | 10% off with code “NEWBIE” | In stock |
| CyclingSupply.net | $165 | Free shipping on orders over $200 | In stock |
| GearUpBikes.com | $145 | 15% off for first-time customers | Limited stock |
Installing Hydraulic Brakes
Proper installation of hydraulic bike brakes is crucial for optimal performance and rider safety. A poorly installed system can lead to reduced braking power, unpredictable behavior, and potential accidents. This section details the necessary tools, materials, and step-by-step procedure for a successful installation.
Required Tools and Materials
A successful hydraulic brake installation requires a range of tools and materials. Careful preparation ensures a smooth and efficient process. Essential tools include a torque wrench, a hex key set (including the appropriate sizes for your specific brake model), cable cutters, and a bleed kit. Specific tools might vary depending on the brake type and model. Additional items like grease, new brake fluid, and a clean work area are also essential.
Step-by-Step Installation Procedure
The installation process, though potentially complex, can be broken down into manageable steps. A systematic approach helps to avoid errors and ensure the integrity of the system.
- Disassembly and Preparation: Carefully disconnect the brake levers from the caliper housing, and remove any old or damaged components. Ensure the surfaces are clean and free of debris. Proper preparation minimizes potential complications later in the process.
- Mounting the Brake Caliper: Attach the caliper to the frame using the provided mounting hardware. Precise alignment is vital for proper brake function. Ensure the caliper is positioned correctly and secured tightly, using the appropriate torque specifications.
- Connecting the Brake Lines: Connect the brake lines to the caliper and the brake lever. Pay close attention to the orientation of the lines to avoid any kinks or bends that could hinder the brake fluid flow. Secure the connections with appropriate fittings.
- Bleeding the Brake System: Bleeding the brake system is a critical step to remove air bubbles from the hydraulic lines. This process ensures optimal brake performance. Follow the manufacturer’s instructions carefully for proper bleeding procedures. A dedicated bleed kit with the appropriate fittings for your brake system is necessary.
- Testing and Adjustment: After the bleeding process, test the brakes by applying firm but controlled pressure. Adjust the brake lever’s reach and feel if necessary. Ensure the brakes operate smoothly and deliver consistent stopping power.
Bleeding the Brake System
The process of bleeding the brake system is essential to remove air pockets that can hinder brake performance. A systematic approach is key to successful bleeding. This procedure involves a controlled flow of new brake fluid into the system, replacing any air. Using the correct bleeding method is crucial for achieving optimal brake function.
- Gather necessary equipment: This includes a bleed kit, new brake fluid, and a clean container to catch the old fluid.
- Locate the bleed screw: The bleed screw location varies depending on the brake model. Refer to the manufacturer’s instructions for the precise location.
- Position the bleed reservoir: Ensure the bleed reservoir is properly positioned to allow gravity to facilitate the fluid flow.
- Open the bleed screw: Slowly open the bleed screw to allow air to escape. Apply firm but controlled pressure to the brake lever to push out the air.
- Repeat the process: Repeat the process until the brake fluid coming out is clear and free of air bubbles.
- Replace the bleed screw: Close the bleed screw tightly.
Finding Installation Guides
Numerous online resources provide comprehensive installation guides and videos. Websites of brake manufacturers often have detailed instructions and visual demonstrations. YouTube channels dedicated to bike maintenance and repair offer a wealth of tutorials. These resources provide valuable insights and practical guidance.
Importance of Proper Installation
Proper installation is paramount for optimal brake performance and rider safety. Faulty installation can lead to reduced braking power, unpredictable brake response, and compromised safety. Correct installation ensures consistent braking performance and minimizes the risk of accidents.
Maintaining Hydraulic Brakes
Proper maintenance of hydraulic bike brakes is crucial for consistent performance, safety, and longevity. Neglecting regular maintenance can lead to decreased braking power, reduced responsiveness, and potentially dangerous situations during critical maneuvers. This section Artikels the essential procedures for maintaining the optimal functionality of your hydraulic brake system.
Regular Maintenance Procedures
Regular inspection and cleaning are essential to maintain optimal brake performance. Inspect the brake lever and caliper for any signs of damage, such as cracks, bends, or corrosion. Clean the brake components with a non-abrasive cleaner and a soft cloth. Ensure all moving parts are free of obstructions. This preventive measure will maintain the integrity of the brake system and prevent premature wear.
Checking and Replacing Brake Fluid
Brake fluid is a crucial component of the hydraulic system. Its condition directly affects the responsiveness and performance of the brakes. Inspect the brake fluid reservoir level regularly. If the fluid level drops below the minimum mark, refill it with the correct type of DOT 4 or 5.1 fluid, as specified by the manufacturer. Avoid mixing different types of brake fluid.
Replacing the fluid every one to two years is a best practice, or more frequently if the fluid shows signs of degradation, such as discoloration.
Bleeding the Brakes
Periodic bleeding of the brake system is vital for removing air bubbles that can significantly reduce braking power and responsiveness. Air bubbles create voids in the hydraulic circuit, hindering the proper transmission of pressure from the lever to the caliper. Incorrect bleeding techniques can lead to inconsistent braking and potential brake failure. Proper bleeding procedures involve releasing the air trapped in the lines using a specific technique, usually involving a bleeding tool or a dedicated bleeder screw.
Following the manufacturer’s instructions for the specific brake model is paramount for efficient bleeding.
Troubleshooting Common Brake Issues
Troubleshooting common brake issues involves systematically identifying the source of the problem. A spongy or unresponsive brake lever may indicate air in the lines. If the brake lever feels unusually hard to pull, this may be caused by a blockage or low fluid level. A squealing sound during braking can often be attributed to a worn pad or caliper.
Refer to the manufacturer’s troubleshooting guide for detailed information and specific procedures for each issue.
Maintenance Schedule and Procedures
| Maintenance Task | Frequency | Procedure |
|---|---|---|
| Visual Inspection of Brake Components | Weekly | Check for damage, corrosion, and obstructions. Clean with a non-abrasive cleaner. |
| Brake Fluid Level Check | Monthly | Verify fluid level in the reservoir. Top off with the correct type of fluid if needed. |
| Brake Bleeding | Every 6 months or as needed | Follow manufacturer’s instructions for bleeding procedure using a bleeding tool. |
| Brake Pad Inspection | Every 500-1000 miles or as needed | Check brake pad thickness. Replace if worn. |
Troubleshooting Common Issues
Proper maintenance and troubleshooting are crucial for ensuring optimal performance and longevity of hydraulic bike brakes. A thorough understanding of potential problems and their solutions is essential for safe and effective riding. Ignoring or misdiagnosing issues can lead to reduced braking power, inconsistent performance, and potentially hazardous situations.
Effective troubleshooting involves systematically identifying the source of the problem, applying appropriate diagnostic techniques, and implementing effective solutions. This section provides a comprehensive guide to common hydraulic brake issues and their resolution.
Squeaking Brakes
Squeaking brakes often indicate a problem with the brake pads or the caliper’s contact points. Excessive friction between the brake pads and rotor or the caliper’s internal components can generate the squeak. The noise can be particularly noticeable during initial braking or at low speeds.
- Inspect Brake Pads: Worn or contaminated brake pads are a common cause. Visual inspection for excessive wear or debris accumulation is critical. Replace pads if necessary. Cleaning the pads with a suitable solvent can remove any embedded particles that might be causing the squeak.
- Clean Caliper: Accumulated dirt or debris can also contribute to the squeak. Carefully clean the caliper’s contact points with a soft cloth and appropriate cleaning solvent. Ensure that the surfaces are free of contaminants.
- Adjust Caliper Alignment: If the caliper isn’t properly aligned with the rotor, it can cause excessive friction and noise. Consult the manufacturer’s instructions for adjusting the caliper’s alignment. Professional adjustment might be necessary in some cases.
Hard Braking
Hard braking, or a sensation of increased resistance during braking, can be indicative of several issues, including air in the hydraulic system, worn brake pads, or a malfunctioning caliper. This issue can lead to reduced braking power and compromised stopping ability.
- Air in the Lines: Air bubbles trapped in the hydraulic lines impede the transmission of fluid pressure, resulting in reduced braking force. Bleeding the brakes is often necessary to remove air.
- Worn Brake Pads: Insufficient brake pad material thickness diminishes braking force. Regularly inspect the brake pads for wear. Replacing worn pads is crucial for restoring optimal braking performance.
- Caliper Malfunction: A malfunctioning caliper, such as a sticky piston or damaged seals, can hinder fluid flow, leading to hard braking. Inspection and repair of the caliper might be required.
Lack of Responsiveness
Lack of responsiveness in braking indicates a reduced ability of the brakes to engage effectively. This can be caused by similar issues to hard braking, or other system problems. It’s essential to diagnose the specific cause to restore effective braking.
- Air in the Lines: As mentioned, air bubbles can impede the flow of brake fluid, resulting in a lack of responsiveness. Bleeding the brakes is necessary to eliminate these air pockets.
- Low Brake Fluid Level: Insufficient brake fluid can restrict the pressure transmission within the hydraulic system, leading to decreased responsiveness. Check the fluid level and replenish if necessary.
- Worn Brake Pads: Worn brake pads can also lead to a lack of responsiveness. Replacing worn brake pads is essential for optimal braking.
Problem-Solving Flowchart (Simplified)
| Symptom | Possible Causes | Troubleshooting Steps |
|---|---|---|
| Squeaking Brakes | Worn/contaminated pads, caliper alignment issues, debris | Inspect pads, clean caliper, adjust alignment |
| Hard Braking | Air in the lines, worn pads, caliper malfunction | Bleed brakes, inspect pads, check caliper functionality |
| Lack of Responsiveness | Air in the lines, low fluid level, worn pads | Bleed brakes, check fluid level, inspect pads |
Safety Considerations: How To Buy Hydraulic Brakes For Your Bike
Proper operation of hydraulic bike brakes is paramount for rider safety. Neglecting safety protocols can lead to serious accidents. Understanding the importance of technique, maintenance, and proper adjustments is crucial for avoiding potential hazards.
Importance of Proper Braking Technique
Effective braking requires a consistent and controlled application of force. Sudden or excessive braking can lead to loss of control and potentially cause falls. Smooth, progressive braking, adjusting pressure as needed, is essential for maintaining balance and reacting to changing road conditions. Anticipating turns and slowing down gradually before a curve is a key element of safe braking technique.
Safety Implications of Worn Brake Pads or Incorrect Installation, How to buy hydraulic brakes for your bike
Worn brake pads compromise braking performance, leading to longer stopping distances and potentially reduced control. Incorrect installation can result in uneven pad wear, reduced braking force, or even damage to the brake caliper. The reduced stopping power presented by worn pads or improper installation can have serious consequences. A sudden stop in high-speed situations, or on slippery surfaces, can have severe results.
Proper maintenance and adherence to installation procedures are critical to prevent these issues.
Importance of Regular Brake Inspections and Maintenance
Regular brake inspections are essential for maintaining optimal performance and safety. Visual inspection for wear and tear on brake pads, calipers, and lines should be performed frequently. Checking for leaks in the hydraulic system is also critical. Early detection of potential issues allows for prompt repair and prevents sudden brake failure. This preventative maintenance is vital for ensuring safe and reliable braking in various conditions.
Importance of Adjusting Brake Reach and Lever Feel
Adjusting brake reach and lever feel ensures a comfortable and responsive braking experience. An optimal reach minimizes the distance required to engage the brakes, allowing for quicker responses. Proper lever feel allows for a precise understanding of the braking force applied, enabling riders to adapt to varying road conditions. Adjusting these factors contributes to a more intuitive and controlled braking system.
Potential Hazards Associated with Improper Hydraulic Brake Usage and How to Avoid Them
Improper hydraulic brake usage can lead to a variety of safety hazards. These include brake failure, loss of control, and potential injuries. Overuse of brakes in high-speed situations can cause brake fade, leading to a reduced stopping power. Insufficient brake pressure can also be a serious hazard, as it may lead to an inability to stop in a timely manner.
Avoiding aggressive or sudden braking, maintaining consistent maintenance, and ensuring proper installation practices are key to preventing these issues. Always prioritize safety over speed.
End of Discussion
In conclusion, purchasing hydraulic brakes for your bike is a rewarding investment that can significantly enhance your riding experience. By carefully considering the different types, installation procedures, and maintenance requirements, you can ensure optimal performance and safety. This guide has provided a detailed overview, empowering you to confidently navigate the world of hydraulic brakes and make informed choices for your cycling needs.
General Inquiries
What are the common types of hydraulic brakes for bicycles?
Common types include post-mount and disc brakes. Post-mount brakes are typically integrated into the bike’s frame, while disc brakes use separate rotors and calipers. The choice often depends on the specific bike frame and desired performance.
What are the key factors to consider when choosing the right hydraulic brake?
Key factors include the bike type, rider weight, riding style, caliper compatibility, brake lever reach and adjustability, and brake fluid type. Matching these factors to your specific needs will help ensure a proper fit and optimal performance.
How much do hydraulic brakes typically cost?
Hydraulic brake prices vary considerably depending on the brand, type, and features. A basic set can range from around $50 to $200 or more for high-end components. Shopping around and comparing prices is recommended.
Where can I find reputable retailers for hydraulic brakes?
Reputable online retailers include specialized bicycle shops and major online marketplaces that cater to cyclists. Always check reviews and ratings before making a purchase.
