How to CVT fluid Civic 23006 hybrid? This guide provides a step-by-step process for changing the CVT fluid in your Honda Civic 23006 hybrid. Proper CVT fluid maintenance is crucial for optimal performance and extending the life of your transmission. Understanding the specific requirements and procedures is key to successful maintenance.
This comprehensive guide will walk you through the entire process, from preparation and safety precautions to the actual fluid replacement and post-maintenance checks. We’ll cover everything you need to know, from the necessary tools and materials to troubleshooting common issues. Learn how to keep your CVT transmission running smoothly and efficiently for years to come.
Introduction to CVT Fluid Changes in Honda Civic Hybrid 2023006
Continuously variable transmissions (CVTs) are becoming increasingly prevalent in modern automobiles, offering smooth power delivery and potentially improved fuel efficiency. However, like any transmission system, CVT transmissions require regular maintenance to ensure optimal performance and longevity. Proper fluid management plays a critical role in this maintenance process.Maintaining the CVT fluid in optimal condition is essential for the smooth operation and extended lifespan of the transmission.
A properly maintained CVT system will deliver a better driving experience and avoid potential costly repairs down the line. This includes adhering to the recommended fluid type and service intervals.
CVT Transmission Fluid Requirements
CVT transmissions utilize a specialized fluid formulated to handle the unique demands of continuous variable ratios. This fluid is crucial for lubrication, cooling, and preventing wear on the internal components of the transmission. Unlike traditional automatic transmissions, CVT fluids are not interchangeable and require specific viscosity and chemical properties to function correctly. Improper fluid can lead to premature wear, damage, and ultimately, transmission failure.
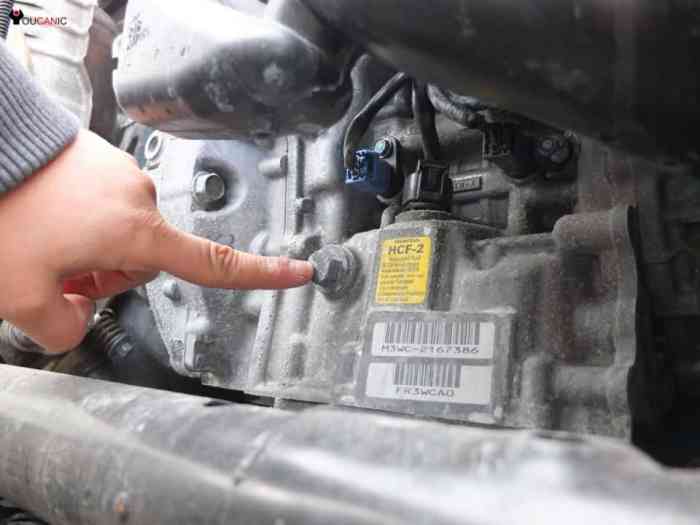
Recommended CVT Fluid Type for Honda Civic Hybrid 2023006
The Honda Civic Hybrid 2023006 likely requires a specific CVT fluid type. Consult the owner’s manual for the exact specifications, as this information is critical for ensuring proper lubrication and performance. Using the incorrect fluid can lead to damage and reduced performance of the CVT. This fluid type is tailored to the specific components of the Honda Civic Hybrid CVT, optimizing its operation and extending its lifespan.
Typical Service Intervals for CVT Fluid Changes
Regular CVT fluid changes are essential for maintaining optimal performance. The frequency of these changes is dictated by the vehicle’s usage and driving conditions. The recommended service intervals for the Honda Civic Hybrid 2023006 can vary, but are typically linked to mileage or time, whichever comes first. Consulting the owner’s manual is crucial to accurately determine the recommended service interval for this specific vehicle model.
Excessive mileage or harsh driving conditions may necessitate more frequent fluid changes to maintain optimal transmission health.
CVT Maintenance Procedure and Necessary Tools
Proper maintenance procedures for CVT fluid changes are essential for the transmission’s health. These procedures vary depending on the specific vehicle model. Consult the owner’s manual for a detailed procedure. The following table provides a general Artikel of CVT maintenance.
| Maintenance Aspect | Frequency | Procedure | Necessary Tools |
|---|---|---|---|
| CVT Fluid Change | As per owner’s manual | Drain and refill the CVT fluid according to the manufacturer’s instructions. | Appropriate CVT fluid, drain pan, funnel, torque wrench, and possibly a transmission fluid filter replacement kit if applicable. |
Preparing for the CVT Fluid Change
Proper preparation is crucial for a successful and safe CVT fluid change in your 2006 Honda Civic Hybrid. This involves meticulous planning and gathering of necessary tools and materials, as well as adhering to safety precautions. Skipping these steps could lead to damage to the vehicle’s components or personal injury. Understanding the procedure and taking the required steps ensures a smooth and efficient process.
Essential Tools and Materials
Thorough preparation requires gathering the correct tools and materials. This includes not only the tools for accessing the CVT fluid reservoir but also those for safely handling the fluid and ensuring a clean workspace. The following list details the crucial items needed for the procedure.
- Socket Set: A comprehensive socket set is essential for loosening and tightening bolts and fasteners involved in accessing the CVT fluid reservoir. Specific sizes will vary based on the vehicle’s design, and referring to the vehicle’s manual is recommended for accuracy.
- Torque Wrench: A torque wrench is vital for ensuring that bolts and fasteners are tightened to the manufacturer’s specifications. This prevents over-tightening, which can damage components, or under-tightening, which can lead to leaks or premature failure. Using the correct torque setting is paramount for longevity and performance.
- Drain Pan: A suitable drain pan is necessary to collect the old CVT fluid during the draining process. The size of the pan should be large enough to accommodate the expected fluid volume to prevent spillage. A leak-proof pan is recommended for added safety.
- New CVT Fluid: The correct type and amount of new CVT fluid is critical. Using the incorrect fluid can damage the CVT system. Always refer to your vehicle’s owner’s manual for the specified CVT fluid type and quantity.
- Gloves: Protecting your hands from the fluid is essential. Chemical-resistant gloves are recommended to prevent skin irritation or damage from the fluid. The choice of glove material depends on the type of fluid used. For example, nitrile gloves offer a good barrier against many fluids.
- Eye Protection: Eye protection is essential to safeguard your eyes from potential splashes of fluid or debris during the procedure. Safety glasses or goggles are recommended.
- Jack and Jack Stands: A jack and jack stands are required to safely elevate the vehicle to access the CVT fluid reservoir. This will provide ample space for working under the vehicle.
- Wrench Set: A wrench set of appropriate sizes is required for loosening and tightening nuts and bolts in the area surrounding the CVT fluid reservoir.
Safety Precautions
Adhering to safety precautions is paramount for a safe and successful CVT fluid change. Proper preparation minimizes risks and ensures a smooth process.
- Vehicle Stability: Ensure the vehicle is securely supported on jack stands before working underneath. Improper support can lead to the vehicle collapsing, causing injury or damage.
- Fluid Handling: Carefully handle the old CVT fluid, as it may be hot or contain harmful chemicals. Use the appropriate safety equipment (gloves, eye protection). Proper disposal methods for used fluids are also important.
- Environmental Considerations: Dispose of the used CVT fluid according to local regulations. Improper disposal can harm the environment. Be aware of the environmental implications of waste disposal.
- Work Area: Ensure the work area is clean and well-lit. This will improve visibility and safety.
Accessing the CVT Fluid Reservoir
Following the steps Artikeld below will allow for safe and efficient access to the CVT fluid reservoir.
- Prepare the Vehicle: Park the vehicle on a level surface and engage the parking brake. Ensure the engine is turned off and the vehicle is cool.
- Locate the Reservoir: Consult your vehicle’s owner’s manual for the exact location of the CVT fluid reservoir. This will typically be in the engine compartment.
- Safety First: Use jack stands and safely support the vehicle. Always ensure that the vehicle is stable before working underneath.
- Access and Drain: Follow the procedure Artikeld in the owner’s manual for safely accessing and draining the old CVT fluid.
Tools and Materials Needed, How to cvt fluid civic 23006 hybrid
| Tool/Material | Specific Use |
|---|---|
| Socket Set | Loosening and tightening bolts and fasteners around the CVT fluid reservoir. |
| Torque Wrench | Ensuring fasteners are tightened to the correct specifications. |
| Drain Pan | Collecting the old CVT fluid. |
| New CVT Fluid | Replacing the old fluid with the correct type and amount. |
| Gloves | Protecting hands from the fluid. |
| Eye Protection | Protecting eyes from potential splashes or debris. |
| Jack and Jack Stands | Safely lifting the vehicle for access to the CVT fluid reservoir. |
| Wrench Set | Loosening and tightening nuts and bolts in the area surrounding the CVT fluid reservoir. |
Procedure for CVT Fluid Replacement: How To Cvt Fluid Civic 23006 Hybrid
Replacing the continuously variable transmission (CVT) fluid in your 2006 Honda Civic Hybrid is crucial for optimal performance and longevity. Proper fluid change intervals, as Artikeld in the vehicle’s maintenance schedule, should be followed. Ignoring these intervals can lead to premature wear and tear on the CVT components. This procedure Artikels the steps for a safe and effective fluid replacement.Replacing the CVT fluid requires careful attention to detail.
Incorrect procedures can result in damage to the CVT system. The steps below provide a detailed guide for draining and refilling the CVT fluid, ensuring accurate fluid level maintenance.
Draining the Old CVT Fluid
Properly draining the old CVT fluid is the first step in the replacement process. This ensures that the system is clear of contaminants and debris before introducing fresh fluid. A clean and well-maintained CVT system translates to improved performance and extended life for the vehicle.
- Position the vehicle on a level surface. Ensure the parking brake is engaged.
- Locate the CVT fluid drain plug. This is typically located on the bottom of the transmission housing.
- Place a suitable container beneath the drain plug to collect the old fluid.
- Carefully remove the drain plug using the appropriate wrench.
- Allow the old fluid to drain completely. This may take several minutes.
- Once the draining is complete, replace the drain plug and tighten it securely.
Replacing the CVT Fluid with New Fluid
After draining the old fluid, the next crucial step is replacing it with fresh, specified CVT fluid. Using the correct fluid type is essential for maintaining the transmission’s health and efficiency.
- Locate the CVT fluid fill plug.
- Using a clean container, carefully measure the required amount of new CVT fluid. The amount is usually specified in the vehicle’s owner’s manual or a reliable online resource.
- Carefully insert the fill plug, ensuring it is aligned properly.
- Slowly pour the measured amount of new fluid into the fill opening.
- Avoid overfilling the reservoir.
- Recheck the fluid level. The fluid level should be within the specified range indicated in the vehicle’s manual.
Checking and Adjusting the Fluid Level
Precisely checking and adjusting the fluid level is essential to ensure optimal CVT performance. Maintaining the correct fluid level is crucial to prevent damage and ensure the CVT operates smoothly.
- After adding the fluid, check the fluid level.
- If the fluid level is low, add more fluid until it reaches the proper level.
- Refer to the vehicle’s owner’s manual or a reliable online resource for the correct fluid level specifications.
- Always use the correct CVT fluid type as recommended by the manufacturer.
Procedure Summary Table
| Step | Action | Picture Description |
|---|---|---|
| 1 | Position vehicle on a level surface, engage parking brake. | Image showing the vehicle positioned on a level surface with the parking brake engaged. |
| 2 | Locate drain plug, place container beneath. | Image showcasing the CVT fluid drain plug and the container positioned beneath it. |
| 3 | Remove drain plug, allow fluid to drain completely. | Image depicting the removal of the drain plug and the process of fluid draining. |
| 4 | Replace and tighten drain plug. | Image demonstrating the replacement and tightening of the drain plug. |
| 5 | Locate fill plug, measure new fluid. | Image highlighting the location of the fill plug and the process of measuring the required fluid amount. |
| 6 | Slowly pour new fluid into fill opening. | Image illustrating the pouring of the measured fluid into the fill opening. |
| 7 | Check fluid level, add more if needed. | Image demonstrating the process of checking the fluid level and adding more fluid if necessary. |
Troubleshooting and Common Issues
Troubleshooting CVT fluid changes, like any mechanical task, can reveal potential problems. Careful observation and systematic diagnosis are crucial for identifying and resolving issues effectively, preventing further damage to the CVT system.
Understanding common problems, their causes, and solutions is key to a successful fluid change and maintaining optimal CVT performance.Identifying and addressing problems promptly is essential to avoid costly repairs or further complications. Careful attention to detail during the fluid change process and proper diagnosis of any issues encountered can prevent significant problems down the line.
Potential Problems During the Fluid Change Process
Potential problems during the CVT fluid change process can range from minor inconveniences to serious complications. Careful observation and adherence to the procedure can help mitigate these issues. A critical factor is ensuring proper tools and techniques are employed to avoid damaging the CVT system.
- Low Fluid Levels: Insufficient CVT fluid can lead to inadequate lubrication, causing premature wear and tear on the CVT components. This can manifest as unusual noises, reduced performance, or even complete failure. Visual inspection of the fluid reservoir and proper fluid level checks are crucial steps to prevent this issue. Ensuring the correct amount of fluid is added after the change is also important.
- Leaks: Leaks in the CVT system can lead to fluid loss and component damage. Early detection is key to preventing major issues. Visual inspection for leaks around the fluid reservoir, lines, and associated components is critical. Checking for any unusual fluid stains under the vehicle can aid in early detection. Address any leaks immediately to avoid further damage.
A leak can be caused by loose or damaged hoses, seals, or gaskets.
- Incorrect Fluid Type: Using the wrong type of CVT fluid can severely damage the CVT system. Always ensure the correct type of fluid is used as specified by the vehicle manufacturer. Using an incorrect type of fluid can cause the fluid to thicken or become incompatible with the components, affecting the CVT’s performance.
Diagnosing Low Fluid Levels and Leaks
Diagnosing low fluid levels and leaks requires careful inspection and testing. A methodical approach can help pinpoint the source of the problem.
- Low Fluid Levels: Visually inspect the CVT fluid reservoir. The fluid level should be within the specified range indicated in the vehicle’s owner’s manual. If the level is low, add the correct CVT fluid to the specified level.
- Leaks: Inspect the CVT system for any signs of fluid leakage. Look for any stains or puddles of fluid under the vehicle, particularly around the fluid reservoir, lines, and associated components. A methodical check can reveal the source of any leak. If a leak is found, identify the source (e.g., a damaged hose, a loose connection, or a faulty gasket).
Resolving Fluid-Related Issues
Addressing fluid-related issues promptly can prevent more significant problems. Specific steps for resolving these issues are important for proper maintenance.
- Low Fluid Levels: Top off the CVT fluid reservoir with the correct type of fluid to the specified level. Refer to the owner’s manual for the correct procedure and fluid type.
- Leaks: Repair or replace any damaged or faulty components causing the leak. Consult a qualified mechanic if necessary for more complex issues.
Preventing Future CVT Fluid Problems
Proactive maintenance can significantly reduce the likelihood of future CVT fluid problems.
- Regular Fluid Changes: Adhering to the recommended CVT fluid change intervals specified by the manufacturer is crucial for maintaining optimal CVT performance. Regular fluid changes help prevent the build-up of contaminants that can cause premature wear and tear.
- Proper Fluid Type: Always use the correct CVT fluid specified by the vehicle manufacturer to ensure compatibility and optimal performance. Using the correct fluid type is crucial to preventing damage to the CVT components.
- Routine Inspections: Regularly inspect the CVT fluid reservoir and associated components for leaks or low fluid levels. This preventative maintenance can help detect issues before they become more significant problems.
Comparison of Common CVT Fluid Problems
| Problem | Cause | Solution |
|---|---|---|
| Low Fluid Level | Insufficient fluid in the reservoir | Add correct CVT fluid to the specified level. |
| Leaks | Damaged hoses, seals, gaskets, or connections | Repair or replace damaged components; consult a mechanic if necessary. |
| Incorrect Fluid Type | Using an incompatible fluid | Replace with the correct CVT fluid specified by the manufacturer. |
Post-Fluid Change Verification
Following a CVT fluid change in your 2023 Honda Civic Hybrid, proper verification is crucial to ensure optimal performance and longevity of the Continuously Variable Transmission (CVT). This involves checking fluid levels, identifying any leaks, assessing CVT function, and establishing a post-maintenance driving protocol. Accurate verification confirms the change was successful and minimizes potential issues.
Fluid Level Verification
Verifying the CVT fluid level is essential. Incorrect levels can hinder optimal performance. Use the dipstick provided by Honda for accurate measurement. Ensure the engine is off and the transmission has cooled to room temperature. Insert the dipstick, wipe it clean, and reinsert it.
Withdraw the dipstick and check the fluid level against the markings on the dipstick. If the level is low, add the correct CVT fluid, following the Honda recommended specifications. If the level is high, do not add more fluid and consult a qualified mechanic.
Leak Detection
Thorough leak detection is critical after any fluid exchange. Inspect the area around the CVT for any signs of fluid leakage. Look for stains, drips, or puddles beneath the vehicle. Pay close attention to the transmission pan, the surrounding hoses, and any visible joints or seals. Document any findings, including location, size, and color of any suspected leakage.
CVT Performance Testing
Evaluating CVT performance is key to determining the effectiveness of the fluid change. A smooth and consistent shift between gears, without any hesitation or unusual noises, indicates proper operation. Perform several acceleration and deceleration maneuvers under various driving conditions. Note any unusual noises, vibrations, or jerky movements during gear shifts. Record your observations for analysis.
Refer to your owner’s manual for specific performance benchmarks.
Post-Maintenance Driving Procedure
Proper driving after the fluid change is important for ensuring the fluid properly circulates and the new fluid’s effectiveness. Avoid aggressive driving, high-speed acceleration, or extreme engine braking. Drive in a range of driving conditions to allow the fluid to settle and distribute throughout the CVT. After approximately 500 miles, take the vehicle in for a check-up to assess the long-term performance and maintenance of the system.
Post-Maintenance Checks
| Check Item | Expected Result |
|---|---|
| Fluid Level | Within the specified range on the dipstick. |
| Leaks | No visible leaks or stains around the CVT. |
| CVT Performance | Smooth gear shifts, no unusual noises or vibrations. |
| Driving after fluid change | Avoid aggressive driving and maintain a consistent driving style. |
Maintenance Tips and Recommendations
Proper maintenance is crucial for extending the lifespan of your Honda Civic Hybrid’s Continuously Variable Transmission (CVT). Neglecting regular checks and replacements can lead to premature wear and tear, costly repairs, and potential safety concerns. This section Artikels essential maintenance tips to ensure optimal CVT performance and longevity.
Maintaining Optimal CVT Fluid Condition
Regularly monitoring CVT fluid condition is paramount for preventing premature transmission failure. The fluid acts as a lubricant and coolant, ensuring smooth operation and dissipating heat generated during transmission operation. Low fluid levels or contamination can lead to overheating, friction, and damage to internal components.
- Regular Fluid Checks: Visually inspect the CVT fluid level regularly. Use the dipstick provided in the owner’s manual. Ensure the fluid level is within the specified range, as indicated on the dipstick. This simple check can prevent major issues down the road.
- Fluid Quality: Over time, CVT fluid degrades and can become contaminated with debris. The fluid’s quality directly impacts the transmission’s efficiency and longevity. Replacing the fluid as per the manufacturer’s recommendations is vital for maintaining its effectiveness. Regular fluid changes are essential to remove contaminants and ensure optimal lubrication.
- Proper Fluid Type: Use only the CVT fluid specified by the vehicle manufacturer. Using incorrect fluid can lead to serious damage. Refer to the owner’s manual for the correct fluid type and specifications.
Preventing Future Issues
Proactive maintenance practices are key to preventing future CVT problems. Following a schedule and adhering to recommended maintenance procedures significantly reduces the risk of costly repairs.
- Avoid Harsh Driving: Sudden acceleration, hard braking, and aggressive shifting can place excessive stress on the CVT. Gentle driving habits can significantly extend the life of the transmission.
- Regular Inspections: Schedule regular inspections of the CVT system to detect potential issues early. Early detection and prompt action can prevent minor problems from escalating into major repairs.
- Driving Habits: Avoid frequent, short trips, which can lead to incomplete warm-up of the transmission system. Longer trips allow the fluid to circulate effectively and maintain optimal temperature.
Importance of Regular Fluid Checks and Replacements
Regular fluid checks and replacements are vital for the long-term health of the CVT. Ignoring these maintenance steps can lead to reduced efficiency, premature wear, and costly repairs.
- Reduced Efficiency: Contaminated or low-level CVT fluid reduces the transmission’s efficiency, impacting fuel economy and overall performance.
- Premature Wear: Lack of lubrication and cooling can lead to accelerated wear on the transmission components, shortening the transmission’s lifespan.
- Costly Repairs: Ignoring maintenance can lead to major transmission failures requiring expensive repairs, often exceeding the cost of preventative maintenance.
Extending the Life of the CVT Transmission
Implementing preventative maintenance practices can significantly extend the life of your CVT transmission.
- Adhering to Schedule: Following the manufacturer’s recommended maintenance schedule for fluid changes and inspections is critical.
- Using Correct Fluid: Using the correct type and amount of CVT fluid as specified by the manufacturer is paramount for maintaining optimal performance.
- Avoiding Harsh Driving: Adopting a gentle driving style, avoiding abrupt acceleration and braking, is a simple but effective way to protect the CVT from undue stress.
Preventative Maintenance Schedule for CVT Transmission
The following table provides a suggested preventative maintenance schedule for the CVT transmission. This schedule is a guideline; consult your owner’s manual for specific recommendations for your vehicle.
| Maintenance Item | Frequency | Description |
|---|---|---|
| CVT Fluid Check | Every 30,000 miles | Visually inspect fluid level and condition. |
| CVT Fluid Replacement | Every 60,000 miles or as recommended in owner’s manual | Replace CVT fluid with the correct type specified by the manufacturer. |
| CVT System Inspection | Every 60,000 miles or as recommended in owner’s manual | Inspect for any signs of damage or wear on the transmission components. |
Outcome Summary

In conclusion, changing the CVT fluid in your Honda Civic 23006 hybrid is a manageable task with the right guidance. By following the steps Artikeld in this guide, you can ensure your CVT transmission receives the necessary maintenance for optimal performance and longevity. Remember to prioritize safety and use the correct CVT fluid type recommended by the manufacturer. With proper care and attention to detail, you can maintain your vehicle’s CVT system and enjoy a smooth driving experience.
Questions and Answers
What type of CVT fluid should I use?
Always refer to your vehicle’s owner’s manual for the specific CVT fluid type recommended by the manufacturer. Using the wrong type can damage your transmission.
How often should I change the CVT fluid?
The recommended service intervals for CVT fluid changes vary by vehicle model and driving conditions. Consult your owner’s manual for specific guidelines.
What tools are needed for this procedure?
You’ll need tools like a drain pan, funnel, measuring tools, and possibly a torque wrench, depending on the specific procedures. Refer to the guide’s preparation section for a complete list.
What are the potential risks if I don’t change the CVT fluid on time?
Delayed CVT fluid changes can lead to reduced transmission performance, premature wear, and potentially serious damage to the transmission system. Proper maintenance is essential for preventing such issues.
