How to deactivateinactive vendors in sage 300 – How to deactivate inactive vendors in Sage 300? This comprehensive guide illuminates the process of efficiently managing vendor relationships within the Sage 300 ERP system. A crucial aspect of any robust business operation, understanding vendor deactivation is key to optimizing financial processes and maintaining a streamlined workflow. Imagine the clarity of a meticulously organized vendor list, free from outdated entries and the potential for costly errors.
This detailed walkthrough will navigate you through the process, from initial considerations to post-deactivation procedures, ensuring a smooth transition and a proactive approach to vendor management.
From the initial identification of inactive vendors to the meticulous handling of outstanding transactions, this guide provides a clear and detailed roadmap. Each step is presented in a straightforward manner, ensuring that even those unfamiliar with Sage 300 can easily follow the process. The potential pitfalls and solutions are meticulously Artikeld, equipping you with the knowledge and confidence to successfully deactivate vendors in Sage 300.
Introduction to Vendor Deactivation in Sage 300: How To Deactivateinactive Vendors In Sage 300
In the bustling world of Sage 300 ERP, managing vendors effectively is crucial for streamlined operations. A vital component of this management is the ability to deactivate vendors who are no longer active or require specific handling. This process, while seemingly straightforward, offers significant benefits and necessitates careful consideration.Deactivating a vendor in Sage 300 is a deliberate action that removes a vendor’s profile from the system.
This proactive step ensures the system’s data integrity and prevents errors associated with inactive entities. Understanding the reasons behind deactivation, potential consequences, and the system’s vendor statuses is critical for maintaining a healthy and efficient ERP environment.
Reasons for Vendor Deactivation
A vendor might require deactivation for several reasons. Perhaps the vendor has gone out of business, relocated, or simply ceased providing services to your company. Furthermore, a vendor may have switched to a different supplier. Other reasons include issues with payment terms, contractual obligations ending, or disputes resolved. Proper documentation of the reasons behind deactivation is important for auditing and future reference.
Potential Consequences of Not Deactivating Inactive Vendors
Failing to deactivate inactive vendors can lead to several issues. Unnecessary clutter in vendor lists, potentially impacting reporting and data analysis, is a common concern. Furthermore, incorrect vendor information can lead to errors in invoices, payments, and other crucial financial transactions. Inaccurate records can cause inefficiencies in the accounting department and may result in financial discrepancies.
Vendor Statuses in Sage 300
Maintaining an accurate record of vendor status is crucial for effective management. A well-structured vendor status system facilitates efficient accounting practices. Below is a table outlining the various statuses a vendor can have in Sage 300:
| Vendor Status | Description |
|---|---|
| Active | Indicates a vendor currently doing business with the company. All transactions are processed under this status. |
| Inactive | Indicates a vendor that is no longer active in business with the company. Further transactions are not expected. |
| Pending | Indicates a vendor that is awaiting confirmation or approval before being added to the active list. |
| Blocked | Indicates a vendor that is temporarily prevented from processing transactions due to specific circumstances. |
Methods for Deactivating Vendors in Sage 300
Sage 300 empowers businesses to manage their vendor relationships effectively. Deactivating inactive vendors is a crucial aspect of maintaining a streamlined and accurate vendor database. This process ensures that only active and relevant vendors are reflected in the system, preventing errors and unnecessary complications in transactions. This section details the various methods for deactivating vendors within the Sage 300 interface.Proper vendor deactivation not only streamlines your system but also prevents potential discrepancies in financial reporting and order processing.
By removing inactive vendors, you maintain data integrity and improve the overall efficiency of your Sage 300 operations.
Step-by-Step Vendor Deactivation Procedure
The process for deactivating vendors in Sage 300 is straightforward and can be accomplished through a user-friendly interface. Following these steps will ensure a smooth and accurate deactivation.
- Locate the Vendor Master record: Navigate to the appropriate menu section in Sage 300 responsible for managing vendor records. This typically involves accessing the vendor master file.
- Identify the vendor to deactivate: Within the vendor master list, identify the specific vendor you wish to deactivate. This may involve searching by vendor name, ID, or other relevant criteria.
- Initiate the deactivation process: Select the vendor you wish to deactivate. The system will present options for actions relating to the vendor, including deactivation. Click the appropriate button to begin the process.
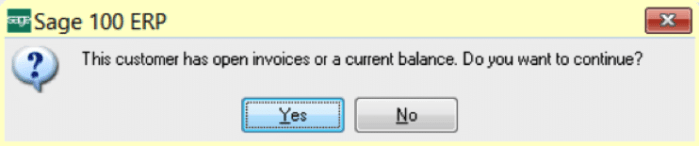
- Confirm the deactivation: Sage 300 will likely prompt you to confirm the deactivation. This confirmation step is critical to ensure that the vendor is correctly removed from the system. Double-check the selection before confirming.
- Save the changes: Once the deactivation is confirmed, the changes will be saved. The vendor will no longer appear in active vendor lists, and transactions will not be associated with this vendor.
Specific Menu Options and Fields Involved
The exact menu options and fields involved in the deactivation process may vary slightly depending on the specific version of Sage 300 you are using. However, the fundamental principles remain consistent. Typically, you’ll find the vendor management tools under the ‘Vendors’ or ‘Accounts Payable’ menu. Specific fields for confirmation, such as a confirmation box or a drop-down menu indicating the status change, are standard components of the deactivation procedure.
Comparison of Deactivation Methods (if any)
In most versions of Sage 300, there is typically only one method for deactivating vendors. This single method involves navigating to the vendor master file, identifying the vendor, and selecting the appropriate action to deactivate the vendor. There are no alternative or secondary methods.
Important Considerations Before Deactivating a Vendor
Navigating the intricate world of vendor management often requires delicate decisions. Deactivating a vendor, while seemingly straightforward, demands careful consideration. Before initiating this process, a thorough assessment of existing transactions is crucial. Ignoring these details could lead to unforeseen complications down the road. Proactive preparation minimizes potential disruptions and ensures a smooth transition.Thorough preparation is paramount when contemplating vendor deactivation.
Understanding the potential implications, from outstanding invoices to archived data, is essential to a successful transition. This process should be treated as a calculated move, not a hasty action.
Identifying Outstanding Transactions
A critical step before deactivation is identifying any outstanding invoices or payments associated with the vendor. Unpaid invoices can lead to disputes and create financial complications for your organization. Similarly, payments already made but not yet recorded can cause discrepancies in financial reporting. It is essential to reconcile all financial interactions with the vendor to avoid complications.
Data Backup and Archiving
A robust backup strategy is a cornerstone of any data management system. Before making significant changes, such as deactivating a vendor, it is imperative to back up all relevant data. This precaution protects against potential data loss and ensures that historical information remains accessible. This step is non-negotiable.Thorough archiving of vendor information is also critical. This includes not only financial records but also any communication logs, contracts, and other relevant documents.
A well-maintained archive allows for future reference and facilitates compliance with regulations.
Handling Outstanding Payments and Invoices
Addressing outstanding payments and invoices is a vital part of the deactivation process. Reach out to the vendor to clarify the status of any outstanding items. This proactive approach helps avoid misunderstandings and ensures that all transactions are accurately accounted for. Confirm that all invoices have been received and processed correctly. Follow up with payment reminders, if necessary.
If the vendor fails to resolve the outstanding items, consider appropriate legal actions. It is also important to note that some invoices might have been processed but not paid.
Implications of Deactivating a Vendor with Outstanding Transactions
The table below illustrates the potential ramifications of deactivating a vendor with outstanding transactions. A proactive approach to identifying and resolving these issues before deactivation minimizes the risk of these negative outcomes.
| Outstanding Transaction Type | Potential Implications of Deactivation |
|---|---|
| Unpaid Invoices | Financial loss, potential disputes, damage to vendor relationships, and disruptions in supply chain. |
| Unrecorded Payments | Inaccurate financial reporting, potential audit issues, and loss of financial visibility. |
| Unprocessed Invoices | Delays in receiving critical supplies, and disruptions in operational efficiency. |
Post-Deactivation Procedures and Considerations
Deactivating a vendor in Sage 300 is a crucial step, but it’s equally important to manage the aftermath effectively. Proper post-deactivation procedures ensure a smooth transition and prevent future complications. This section delves into the essential steps for a successful vendor deactivation process, from handling outstanding transactions to preventing errors.
Managing Remaining Transactions
After a vendor is deactivated, it’s vital to address any outstanding transactions. This may include invoices awaiting payment, purchase orders yet to be fulfilled, or credit memos needing processing. Thorough review and resolution of these items is essential to maintain accurate accounting records.
- Review all open invoices and purchase orders related to the deactivated vendor. Identify any pending payments or goods/services that are yet to be received or delivered.
- For invoices, either fully settle the balance or issue a credit memo to adjust the account.
- Ensure any related purchase orders are either canceled or marked as complete if the goods have already been received.
- If outstanding payments are due, these should be addressed with alternative payment methods, or a refund initiated if appropriate.
Preventing Future Issues
Implementing preventive measures is just as important as addressing immediate concerns. Proactive steps can minimize the risk of future issues stemming from the vendor deactivation.
- Update all relevant records to reflect the vendor’s deactivation status, including system-wide records and internal documents.
- Communicate the deactivation to all relevant departments or personnel. This will ensure a smooth transition and prevent confusion if future tasks or requests relate to the deactivated vendor.
- Establish a clear protocol for handling transactions or communications from the deactivated vendor.
- Create a backup of all important data related to the vendor before deactivation, in case any issues arise or if there’s a need to restore the vendor record in the future.
Error Prevention During Deactivation
Careful attention to detail during the deactivation process can prevent costly errors. Following a standardized procedure minimizes the risk of discrepancies.
- Verify the vendor’s account information before initiating the deactivation process. Double-check all details to avoid mistakes.
- Review all pending transactions and ensure they are addressed appropriately. This step is crucial to prevent any discrepancies in financial reporting.
- Confirm the correct reason for deactivation, documenting the rationale to ensure compliance and accountability.
- Confirm all necessary approvals before deactivating a vendor. Thorough authorization ensures the process is legitimate.
Deactivated vs. Deleted Vendors, How to deactivateinactive vendors in sage 300
Understanding the distinction between deactivated and deleted vendors is crucial for maintaining accurate records.
| Characteristic | Deactivated Vendor | Deleted Vendor |
|---|---|---|
| Status | Inactive; can be reactivated. | Permanently removed; cannot be reactivated. |
| Transactions | Transactions related to the vendor are typically blocked or routed through alternative methods. | Transactions related to the vendor are not permitted. |
| Data | Vendor data is retained but inaccessible. | Vendor data is permanently removed. |
| Access | Vendor information can be viewed but not updated. | Vendor information cannot be viewed. |
Troubleshooting Deactivation Issues
Navigating the digital landscape of Sage 300 vendor deactivation can sometimes present unexpected challenges. Understanding potential pitfalls and their resolutions is crucial for maintaining data integrity and operational efficiency. This section provides a structured approach to identifying, diagnosing, and resolving common issues that may arise during the deactivation process.
Potential Deactivation Conflicts
Addressing potential conflicts before deactivation is critical. A vendor with outstanding invoices, pending payments, or active purchase orders can lead to data inconsistencies and errors. Thorough pre-deactivation review prevents disruptions later. Unresolved issues must be addressed before attempting to deactivate a vendor.
Common Errors and Solutions
Troubleshooting deactivation errors requires a systematic approach. A clear understanding of common problems and their solutions allows for swift resolution and minimal disruption.
- Error: Unable to Deactivate Vendor with Outstanding Transactions: This error arises when a vendor has unpaid invoices, pending payments, or active purchase orders. Correct this by resolving outstanding transactions. Contact the accounts payable department to clear any open balances. Once all transactions are finalized, the vendor can be deactivated without conflict.
- Error: Deactivation Process Halted Due to System Lock: System locks, often temporary, can halt the deactivation process. Verify if the lock is related to another concurrent process. Wait for the lock to release and retry the deactivation procedure. If the issue persists, consult the Sage 300 documentation for specific system lock resolution methods.
- Error: Vendor Data Integrity Issues: Data integrity problems can also block deactivation. A vendor with missing or incorrect information might cause an error. Review and update vendor records, ensuring all fields are complete and accurate. This often requires manual intervention to correct any issues with the vendor’s data.
Resolving Deactivation Conflicts
Conflicts during deactivation necessitate a proactive resolution strategy. Proper identification and resolution minimize data inconsistencies and operational disruptions. The following actions will help resolve these issues.
- Identify the Root Cause: Thoroughly investigate the cause of the conflict. This often involves examining vendor records, outstanding transactions, and any related system logs. Precisely determining the reason for the error enables a focused solution.
- Correct the Underlying Issue: Once the root cause is identified, take the necessary steps to rectify it. If outstanding payments exist, resolve them. If data integrity is the issue, correct the records. Taking the correct action resolves the conflict.
- Retry Deactivation: After resolving the underlying issue, retry the deactivation process. Successful deactivation confirms the resolution of the conflict. If the error persists, consult Sage 300 support or a qualified IT specialist.
Accessing and Correcting Errors
Accessing and correcting errors in the deactivation process requires a detailed understanding of the Sage 300 system. A systematic approach ensures a timely and effective resolution. Accessing the appropriate system areas will lead to successful error resolution.
- Review System Logs: System logs provide valuable insights into errors and their context. Reviewing the logs can help identify the specific reason for the error and guide the troubleshooting steps. Reviewing system logs is a key part of error resolution.
- Consult Sage 300 Documentation: Sage 300 documentation provides comprehensive information on the deactivation process, including potential error codes and solutions. Referencing the documentation ensures the most effective solution is implemented. Utilize the documentation to get a complete view of the solution.
- Seek Support from Sage 300 Support: If the issue persists, contact Sage 300 support. Experienced support personnel can provide guidance and assistance in resolving complex deactivation issues. Seeking support is a crucial step for complex issues.
Common Error Messages and Causes
A table summarizing common error messages and their possible causes can streamline the troubleshooting process. Understanding the connection between the message and the cause can accelerate resolution.
| Error Message | Possible Causes |
|---|---|
| “Vendor has outstanding transactions.” | Unpaid invoices, pending payments, or active purchase orders. |
| “System lock preventing deactivation.” | Concurrent processes or system maintenance. |
| “Data integrity issue with vendor record.” | Missing or incorrect data in vendor information. |
| “Deactivation process failed.” | Errors during the deactivation process; system issues; or conflicting data. |
Best Practices for Vendor Management in Sage 300
Nurturing strong vendor relationships is crucial for any business operating efficiently. A well-managed vendor database in Sage 300 allows for streamlined processes, cost optimization, and improved communication, ultimately contributing to a more robust supply chain. Implementing best practices for vendor management in Sage 300 can significantly enhance these aspects.Effective vendor management involves more than just deactivation. It encompasses a proactive approach to maintaining accurate records, minimizing errors, and maximizing the benefits of a well-structured vendor management system.
By adhering to these best practices, businesses can optimize their Sage 300 operations and foster successful partnerships with their vendors.
Maintaining Accurate Vendor Records
Maintaining up-to-date and accurate vendor records is paramount for the efficient operation of any business. Inaccurate vendor data can lead to errors in invoices, payments, and reporting. Implementing robust data entry procedures and utilizing the features of Sage 300 effectively will help ensure accuracy.
- Regularly review and update vendor information, including contact details, addresses, and payment terms. This proactive approach prevents discrepancies and ensures smooth transaction processing.
- Employ a system for verifying vendor information periodically. This can involve cross-referencing data from different sources or conducting simple validation checks.
- Establish clear procedures for handling changes in vendor information. These procedures should be documented and communicated effectively to all relevant personnel.
Minimizing Errors in Vendor Management
A well-structured vendor management system significantly minimizes the risk of errors. By implementing checks and balances, businesses can ensure that transactions are processed accurately and efficiently. Robust processes are key to avoiding costly mistakes.
- Implement a system of internal controls. This includes establishing clear roles and responsibilities for handling vendor transactions, as well as regular audits to verify accuracy.
- Utilize the built-in validation tools in Sage 300 to identify potential errors in vendor data before they impact transactions. This proactive approach helps maintain data integrity.
- Automate tasks whenever possible. Automating routine tasks such as invoice processing and payment generation can reduce manual errors and save time.
Benefits of a Well-Structured Vendor Management System
A well-structured vendor management system offers numerous advantages. It allows for better tracking of vendor performance, facilitates communication, and promotes cost optimization. A streamlined approach to vendor management can have a substantial positive impact on business operations.
- Improved visibility into vendor performance. This allows businesses to identify areas for improvement and foster stronger relationships.
- Enhanced communication and collaboration. Well-defined communication channels streamline interactions and reduce misunderstandings.
- Cost optimization. Analyzing vendor performance data can help businesses negotiate better pricing and identify potential cost-saving measures.
Key Considerations for Vendor Management in Sage 300
A comprehensive approach to vendor management in Sage 300 requires careful consideration of several factors. This proactive approach is key to maximizing the effectiveness of the system.
- Vendor categorization. Grouping vendors based on criteria like product type or industry can improve reporting and analysis.
- Performance tracking. Monitoring vendor performance metrics, such as delivery times and quality, is essential for evaluating and improving relationships.
- Regular communication. Open communication with vendors ensures that issues are addressed promptly and relationships remain strong.
Final Review
In conclusion, deactivating inactive vendors in Sage 300 is a vital aspect of effective vendor management. By following the detailed steps Artikeld in this guide, you can streamline your vendor list, minimize potential errors, and optimize your financial processes. Remember to prioritize data backups, carefully consider outstanding transactions, and implement post-deactivation procedures to maintain a healthy and accurate vendor database within your Sage 300 system.
This comprehensive approach ensures a smooth and error-free vendor deactivation process, ultimately contributing to a more efficient and organized business operation.
Query Resolution
What happens to invoices and payments associated with a deactivated vendor?
Outstanding invoices and payments related to the deactivated vendor must be addressed before deactivation. You’ll need to either settle the outstanding balance or adjust the records to reflect the vendor’s inactive status.
What are the differences between deactivating and deleting a vendor?
Deactivating a vendor removes them from active vendor lists, but their records remain in the system for potential future use. Deleting a vendor permanently removes all records, making them inaccessible. Careful consideration is needed before opting for deletion.
Can I reactivate a deactivated vendor later?
Yes, in most cases, a deactivated vendor can be reactivated. The exact process depends on the specific configuration of your Sage 300 system. Consult your Sage 300 documentation or support for specific instructions.
What are some common errors during the deactivation process?
Common errors include forgetting to address outstanding transactions, failing to back up data, or making incorrect selections in the Sage 300 interface. This guide provides detailed instructions to mitigate such errors and ensure a successful deactivation.
