How to file the edges of plastic laminate without a specialized tool? This guide provides a comprehensive approach to achieving professional-looking results, even without access to expensive equipment. Discover effective methods using readily available tools, like utility knives and sandpaper, while emphasizing safety and precision. Learn how to prepare surfaces, handle various laminate types, and troubleshoot common issues.
The article dives into a detailed explanation of the characteristics of plastic laminate surfaces, outlining various types and their properties. It also highlights the importance of proper edge finishing for aesthetics and damage prevention. Understanding the potential consequences of poorly finished edges is key to achieving a professional outcome.
Introduction to Plastic Laminate Edge Finishing
Plastic laminate, a popular choice for countertops, cabinets, and other furniture, presents a sleek and durable surface. However, the aesthetic appeal and longevity of these surfaces are heavily reliant on the quality of the edge finishing. Understanding the characteristics of plastic laminate and the potential consequences of improper finishing is crucial for maintaining a beautiful and functional workspace or home.Laminate surfaces, while visually appealing, are susceptible to damage if not properly treated.
Different types of laminate, from high-pressure laminate (HPL) to melamine-faced particleboard, exhibit varying degrees of resilience to impact and moisture. The strength and longevity of the entire piece depend directly on how well the edges are sealed and reinforced.
Characteristics of Plastic Laminate Surfaces
Plastic laminate, often used for its resistance to stains and scratches, consists of a decorative paper or film bonded to a substrate. The substrate material, usually a particleboard or plywood core, affects the overall strength and durability of the laminate. The decorative layer contributes to the aesthetic appeal and visual variations. These layers are crucial in creating a strong, visually appealing, and resilient surface, which requires careful consideration for the edges to ensure its longevity.
Types of Plastic Laminate Materials
Various types of plastic laminate materials exist, each with unique properties:
- High-Pressure Laminate (HPL): HPL is known for its exceptional strength and resistance to impact, heat, and moisture. Its high density makes it a popular choice for high-traffic areas and applications requiring durability, such as kitchen countertops.
- Melamine-faced Particleboard: This type of laminate features a melamine resin coating, which provides a moderate level of resistance to scratches, moisture, and stains. Melamine-faced particleboard is often used for budget-friendly applications, like cabinets or tabletops.
- Other Laminates: Other laminate types exist, each with their own strengths and weaknesses, influencing the specific edge finishing requirements.
Importance of Proper Edge Finishing
Proper edge finishing is paramount to maintaining the aesthetic appeal and preventing damage to plastic laminate surfaces. A well-finished edge not only looks professional but also protects the underlying substrate from moisture intrusion and mechanical stress. This protective layer is vital in extending the life of the laminate, preventing costly replacements or repairs in the future.
Common Issues from Improper Edge Finishing
Improper edge finishing can lead to several problems:
- Moisture Penetration: Unsealed edges allow moisture to seep into the substrate, potentially causing warping, swelling, or delamination. This is a common problem, especially in high-humidity environments.
- Mechanical Damage: Exposed edges are more susceptible to chipping, cracking, and other mechanical damage. This is especially true for HPL, where the lack of protection can cause significant wear and tear over time.
- Aesthetic Degradation: Rough or unfinished edges detract from the overall aesthetic appeal of the laminate surface. This can affect the overall appearance of the project, making it look unfinished and unprofessional.
Consequences of Leaving Laminate Edges Unfinished, How to file the edges of plastic laminate without a
Leaving laminate edges unfinished can have several detrimental consequences:
- Reduced Lifespan: Unprotected edges lead to quicker deterioration and damage, significantly shortening the lifespan of the laminate surface.
- Increased Maintenance: Unfinished edges require more frequent maintenance and repairs to address the damage, resulting in added expenses and inconvenience.
- Safety Concerns: Rough or sharp edges can pose safety hazards, especially in areas with high foot traffic.
Traditional Edge Finishing Methods (without specialized tools)
A variety of methods exist for achieving a professional-looking edge finish on plastic laminate without expensive tools. This section explores the use of readily available materials, such as utility knives and sandpaper, to create a functional and aesthetically pleasing edge finish. These techniques offer a cost-effective solution for smaller projects or when specialized equipment is unavailable.
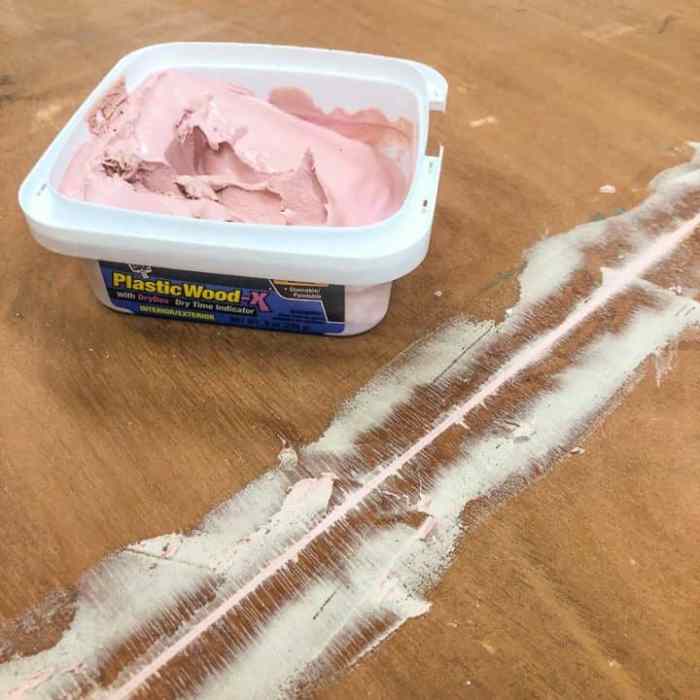
Utility Knife and Sandpaper Procedure
This method utilizes the precision of a utility knife for initial shaping and sandpaper for subsequent smoothing. Proper technique minimizes damage to the laminate and ensures a consistent edge.
- Preparation: Secure the laminate piece on a stable surface. Use masking tape to protect the surrounding areas from accidental cuts. Ensure the laminate is firmly pressed against the work surface to prevent slippage during the cutting process.
- Initial Cut: Using a sharp utility knife, carefully score the edge of the laminate. Make several shallow cuts along the edge to create a precise cut line. Avoid applying excessive pressure, as this can lead to chipping or tearing of the laminate. Be cautious of the blade’s sharpness; practice proper handling and safety precautions to prevent injury.
- Edge Shaping: Carefully lift the laminate edges, ensuring you don’t damage the surface. This step is crucial to ensure a clean cut, free of jagged edges or irregularities.
- Sanding: Begin sanding with a higher grit sandpaper (e.g., 120-grit) to remove any sharp edges or imperfections from the initial cut. Gradually reduce the grit size (e.g., 180-grit, 220-grit, and finally 320-grit) for a smoother finish. This gradual approach ensures a refined and polished surface.
- Smoothing: After each sanding step, visually inspect the edge for any remaining imperfections. Continue sanding until the edge is smooth and uniform. This process allows for gradual refinement of the laminate edge, minimizing the risk of over-sanding and creating a consistent finish.
Safety Precautions for Utility Knife Use
Safe handling of a utility knife is paramount to prevent accidents.
- Proper Blade Selection: Ensure you are using the appropriate blade type for the material being cut. Choose a blade designed for plastic or laminate for optimal results.
- Sharp Blade Maintenance: Always use a sharp utility knife blade to ensure clean and precise cuts. A dull blade increases the risk of slippage and accidents. Regularly check the blade’s sharpness and replace it as needed.
- Protective Gear: Wear safety glasses or goggles to protect your eyes from flying debris or accidental blade contact. A well-fitted pair of gloves is recommended for added protection.
- Secure Work Area: Work on a stable surface to prevent the laminate from shifting during cutting. Ensure the surrounding area is clear of any obstructions or distractions.
- Proper Disposal: Dispose of used blades in a designated sharps container to prevent injury.
Sandpaper Grit Comparison
The grit of sandpaper significantly impacts the final smoothness of the laminate edge.
- Higher Grit (e.g., 120-grit): Removes significant imperfections and creates a relatively rougher surface, ideal for initial shaping.
- Medium Grit (e.g., 180-grit, 220-grit): Gradually smooths the surface, removing minor imperfections and creating a more refined edge.
- Lower Grit (e.g., 320-grit): Produces the smoothest finish, suitable for final polishing. Using progressively finer grits leads to a gradual reduction in surface irregularities, culminating in a high-quality finish.
Utility Knife and Sandpaper Advantages and Disadvantages
| Feature | Advantages | Disadvantages |
|---|---|---|
| Cost | Low cost, readily available tools | May require more time for finishing |
| Ease of Use | Simple tools and techniques | Potential for damage if not handled carefully |
| Accuracy | Can achieve a satisfactory level of accuracy | May not achieve the same level of precision as specialized tools |
| Time | Can be time-consuming depending on the size and complexity of the laminate | Can be more time-consuming than other methods |
Limitations and Suitability
This method, while effective for many laminate types, has limitations. It may not be suitable for extremely delicate or high-precision applications. The final smoothness achieved is dependent on the skill and care of the user. The laminate type also influences the effectiveness of this approach. Some laminate types may require different sanding grits or techniques to achieve a satisfactory finish.
Alternatives to Filing (without specialized tools)
Beyond the time-consuming and potentially damaging process of filing laminate edges, there are alternative methods that deliver a professional finish with significantly less effort. These methods, particularly edge banding, offer a practical and efficient solution for various projects, from simple repairs to large-scale installations.Effective edge finishing is crucial to maintaining the aesthetic appeal and structural integrity of laminate surfaces.
Alternatives like edge banding tape provide a durable, aesthetically pleasing solution, saving time and effort compared to traditional filing methods.
Edge Banding Tape Application
Edge banding tape, a versatile material, offers a quick and clean alternative to filing. Its application process is straightforward and requires minimal specialized tools.
To apply edge banding tape effectively, carefully measure the length of the laminate edge to be covered. Cut the tape to the appropriate length, ensuring a slight overlap for a secure bond. Next, prepare the edge of the laminate, ensuring it is clean and free of debris. Apply a thin layer of adhesive to the back of the tape, ensuring even distribution.
Press the tape firmly onto the laminate edge, ensuring good contact. Use a straightedge or a similar tool to ensure a smooth application. Allow the adhesive to cure according to the manufacturer’s instructions. Finally, trim any excess tape with a utility knife or sharp blade.
Materials and Tools for Edge Banding
A successful edge banding project requires specific materials and tools. Essential materials include edge banding tape, adhesive, and a suitable straightedge or similar tool.
- Edge banding tape: Select a tape that matches the color and style of the laminate. Different types of tape exist for various needs, ranging from simple repairs to more complex projects.
- Adhesive: The adhesive used should be compatible with the laminate and edge banding tape to ensure a strong and long-lasting bond. Different adhesives are available for different situations; it’s crucial to choose the right type.
- Straightedge: A straightedge or similar tool ensures a consistent and straight application of the tape.
- Utility knife or sharp blade: Use this tool to trim any excess tape after application. A sharp blade ensures a clean cut.
Pros and Cons of Edge Banding
Edge banding offers numerous advantages over filing, but also has some limitations. Understanding these factors is crucial for making informed decisions.
| Method | Time | Effort | Appearance | Durability | Cost |
|---|---|---|---|---|---|
| Filing | High | High | Variable | Medium | Low |
| Edge Banding | Medium | Medium | High | High | Medium |
Edge banding offers a superior aesthetic compared to filing. The tape provides a seamless and professional look, particularly for large projects. Edge banding tape also significantly improves the durability of laminate edges. It provides a protective layer against chipping and damage, which is important for both furniture and other applications.
However, edge banding might not be suitable for all situations. The cost of materials can be higher than simple filing, and the process requires a certain degree of precision. Furthermore, some projects may not lend themselves to the application of edge banding tape, such as very intricate designs or extremely fragile surfaces.
Preparation and Safety Measures
Proper preparation and adherence to safety protocols are paramount when working with plastic laminate. Neglecting these crucial steps can lead to accidents, damage to the material, and compromised results. Careful surface preparation, the use of appropriate safety gear, and understanding potential risks are integral to a successful and safe edge finishing process.
Surface Preparation for Laminate
Thorough surface preparation is essential to ensure a consistent and clean edge for filing. Begin by meticulously cleaning the laminate surface. Remove any dust, debris, or previous adhesive residue. A damp cloth or specialized laminate cleaner can be used for this purpose, ensuring that the surface is completely free of contaminants. Next, inspect the edge for any imperfections, such as splinters or unevenness.
These should be addressed before proceeding to avoid creating further difficulties during the filing process. A sharp object like a utility knife can be used to carefully trim away any rough edges, working from the back to avoid damaging the laminate face.
Safety Gear and Protective Equipment
Appropriate safety gear is crucial when working with sharp objects. This includes, but is not limited to, safety glasses or goggles to protect the eyes from flying debris, dust, or potential sharp fragments. Use of gloves is also advised to safeguard hands from cuts and abrasions. A face mask or respirator is recommended if there is any potential for the release of dust or fine particles during the filing process.
The choice of protective equipment should align with the specific tasks involved and the type of laminate being used.
Risks of Improper Techniques and Tools
Improper techniques or unsuitable tools can significantly increase the risk of injury and damage to the laminate. Using dull or damaged files can lead to uneven filing and cause more extensive damage. The improper use of pressure during the filing process can cause the laminate to splinter or crack. Furthermore, a lack of proper support for the laminate during filing can result in slips and falls, which could cause severe injuries.
Safety Tips and Guidelines for Working with Sharp Objects
Safe handling of sharp objects is critical to prevent injuries. Following these guidelines will significantly reduce the risk of accidents.
| Safety Tip | Action |
|---|---|
| Maintain a clear workspace | Ensure a clutter-free area to avoid tripping hazards. |
| Use proper lighting | Sufficient lighting helps to clearly see the work area and prevent mistakes. |
| Inspect tools before use | Check files for damage or sharpness before beginning the task. |
| Use appropriate cutting techniques | Avoid excessive pressure and unnecessary force when filing. |
| Wear appropriate protective gear | Always wear safety glasses, gloves, and a face mask or respirator, as applicable. |
| Keep sharp objects in designated areas | Store sharp tools in designated areas when not in use. |
Handling and Disposal of Laminate Scraps
Proper handling and disposal of laminate scraps are essential for environmental responsibility and safety. Collect laminate scraps in a sturdy container, preferably one with a lid, to prevent accidental scattering. Label the container clearly as containing potentially sharp or hazardous materials. Avoid mixing laminate scraps with other waste materials. Follow local regulations regarding the disposal of construction or demolition debris.
Properly disposing of laminate scraps prevents potential hazards and ensures environmental protection.
Troubleshooting Common Problems
Edge finishing plastic laminate can sometimes present challenges. Understanding potential issues and their solutions empowers you to achieve professional-looking results, even without specialized tools. This section details common problems and provides practical solutions for achieving smooth, even edges.Careful attention to detail and proper technique are crucial to prevent problems. Incorrect procedures can lead to uneven edges, chipping, or other imperfections.
By understanding the causes and employing the correct troubleshooting steps, you can effectively address these issues and ensure a satisfactory outcome.
Uneven Edges
Uneven edges often result from inconsistent pressure during the filing process. Maintaining a consistent, controlled pressure throughout the entire filing stroke is key. Varying pressure leads to inconsistencies in the depth of the file cuts, creating an uneven surface. Beginners often apply too much pressure initially, causing premature wear on the file and inconsistent results. Conversely, insufficient pressure may result in shallow cuts that fail to remove the excess laminate, leaving an uneven finish.
It’s essential to learn to apply a constant, controlled pressure throughout the filing process.
Chipping
Chipping during edge finishing arises from several factors. Using a dull or damaged file is a significant contributor. A dull file exerts excessive pressure on the laminate, increasing the risk of chipping. Furthermore, excessive pressure, regardless of the file’s sharpness, can cause the laminate to break or chip. Applying too much pressure, particularly at sharp angles, can create stress concentrations that lead to fractures in the material.
Using a sharp, appropriate file and applying consistent, moderate pressure can help prevent chipping.
Filing Marks
Filing marks are undesirable impressions left on the laminate’s edge. They often result from improper filing techniques. Insufficient or uneven strokes can create these marks. Furthermore, using an inappropriate file type for the laminate thickness can also cause filing marks. It’s crucial to use a file with appropriate grit and shape for the laminate’s thickness.
Employing consistent, controlled strokes and selecting the right file are vital for preventing these marks.
Table of Troubleshooting Steps
| Problem | Cause | Troubleshooting Steps |
|---|---|---|
| Uneven Edges | Inconsistent pressure during filing, using a dull file, or improper filing technique | Ensure consistent pressure throughout the filing stroke. Sharpen the file if necessary. Practice controlled strokes, and use a light touch. |
| Chipping | Dull file, excessive pressure, improper angle, or using an unsuitable file for the laminate | Use a sharp file. Apply moderate pressure and maintain a consistent angle. Select a file appropriate for the laminate thickness. |
| Filing Marks | Insufficient strokes, using an inappropriate file, or inconsistent pressure | Use a file suited for the laminate thickness. Ensure even strokes with controlled pressure. |
Visual Aids (Illustrative Examples)
A well-executed laminate edge finishing project significantly enhances the aesthetic appeal and longevity of any project. Visual aids are crucial in understanding the process and identifying potential pitfalls. These examples will demonstrate the desired outcome, common errors, and crucial safety precautions.Proper visual representation helps in the comprehension of the laminate edge finishing procedure. By viewing examples of well-finished and poorly finished edges, along with safety procedures, the user can develop a clear understanding of the necessary steps and potential risks.
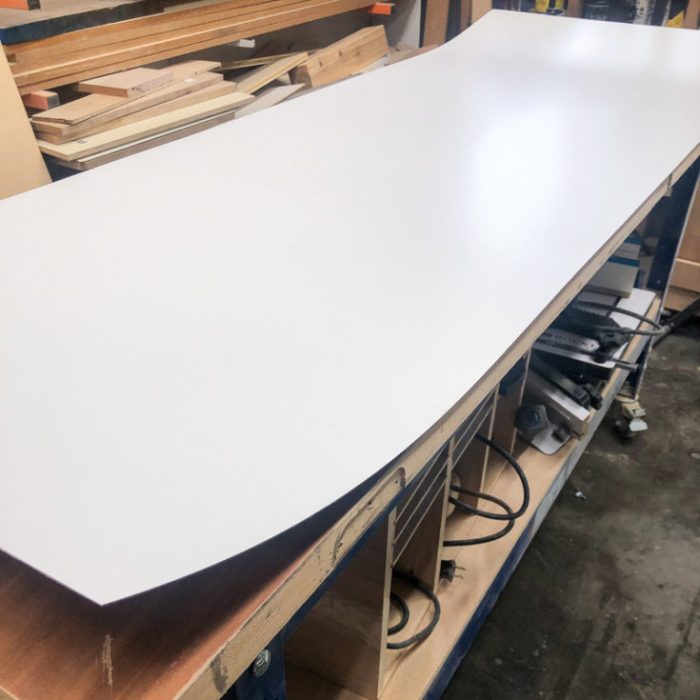
A Well-Finished Laminate Edge
A well-finished laminate edge exhibits a seamless transition between the laminate surface and the edge. The edge is free from gaps, splinters, or unevenness. The surface is smooth and uniform, with no visible signs of damage or imperfections. The color of the edge matches the laminate seamlessly. It presents a professional, polished appearance, ensuring a high-quality finish.
An Improperly Finished Laminate Edge with Damage
An improperly finished laminate edge displays visible imperfections. This could include gaps, splinters, or rough edges, all stemming from insufficient preparation or technique. The color of the edge may not match the laminate, leading to an uneven appearance. These imperfections diminish the overall aesthetic appeal and may compromise the structural integrity of the laminate. Such an edge is indicative of an incomplete or poorly executed process.
Proper Use of Safety Gear
Visualizing the proper use of safety gear during laminate edge finishing is critical. A worker should wear safety glasses to protect their eyes from flying debris, and dust masks or respirators to prevent inhalation of fine particles. Gloves should be worn to protect hands from cuts and abrasions. A picture showing a person working with laminate, wearing all these protective items, effectively demonstrates the importance of safety precautions.
Proper safety gear minimizes the risk of accidents.
Different Types of Sandpaper
Various grades of sandpaper are employed for different stages of laminate edge finishing. A coarse grit sandpaper, typically between 60 and 80, is used for initial shaping and smoothing. Medium grit sandpaper, ranging from 100 to 150, provides further refinement and detail. Fine grit sandpaper, such as 180 to 220, is used to achieve a smooth, polished finish.
The selection of the correct sandpaper grade is crucial for achieving the desired outcome. Different grades are specifically designed to address varying stages of refinement.
| Grit | Description | Purpose |
|---|---|---|
| 60-80 | Coarse | Initial shaping and smoothing |
| 100-150 | Medium | Further refinement and detail |
| 180-220 | Fine | Smooth, polished finish |
Applying Edge Banding Tape
Applying edge banding tape requires precision and attention to detail. The process involves meticulously measuring and cutting the tape to the appropriate length and width for the laminate edge. The tape is then carefully adhered to the edge, ensuring a snug and even fit. Pressing the tape firmly to eliminate air bubbles and achieving a clean, smooth finish is paramount.
Following these steps ensures a durable and aesthetically pleasing result.
- Measure the length of the laminate edge carefully.
- Cut the edge banding tape to the measured length.
- Apply a thin layer of adhesive to the edge of the laminate and the back of the tape.
- Position the tape on the laminate edge, ensuring a flush and even fit.
- Press the tape firmly to remove air bubbles and create a secure bond.
- Allow the adhesive to cure completely according to the manufacturer’s instructions.
Different Laminate Types and Their Edge Finishing Needs: How To File The Edges Of Plastic Laminate Without A
Plastic laminate comes in various types, each with unique properties influencing the best edge finishing approach. Understanding these distinctions is crucial for achieving a professional and durable finish. The choice of method significantly impacts the final look and longevity of the project.Different laminate types exhibit varying responses to different edge-finishing techniques. High-pressure laminates, for example, often require a more robust approach than melamine, while melamine’s softer nature necessitates a more gentle touch.
This section explores the nuances of each type, outlining the most effective methods for each.
High-Pressure Laminate (HPL) Edge Finishing
HPL, known for its durability and resistance to scratches and moisture, presents unique challenges during edge finishing. Its rigid structure demands precise cutting and careful handling to prevent chipping or damage during the process. Filing, while possible, may not be sufficient for achieving a truly professional look. More robust methods like using a laminate edge banding machine, or specialized edge banding tape and tools, are often recommended for a durable and aesthetic finish.
Melamine Laminate Edge Finishing
Melamine laminate, with its softer composition, often tolerates filing techniques more readily. Filing, if performed with appropriate care and patience, can yield satisfactory results. However, for a seamless and professional finish, edge banding or specialized edge banding tape and tools might be the preferred choice, particularly for high-traffic areas. The choice of method affects the final appearance, with edge banding creating a more polished and complete look.
Other Laminate Types
Other types of plastic laminates, such as those with decorative overlays or special finishes, may require specific techniques. Understanding the specific composition and characteristics of each laminate type is essential to ensure a successful and durable edge finish. Careful consideration of the laminate’s specific properties and characteristics is vital for achieving the best possible outcome. Consult product specifications for the recommended edge finishing approach.
Summary Table of Suitable Methods
| Laminate Type | Suitable Edge Finishing Methods |
|---|---|
| High-Pressure Laminate (HPL) | Laminate edge banding machine, edge banding tape and tools |
| Melamine Laminate | Filing (with care), edge banding, edge banding tape and tools |
| Decorative Overlay Laminates | Specific techniques may be needed; consult product specifications. |
Challenges in Working with Specific Laminate Types
Certain laminate types may present specific challenges during edge finishing. HPL’s rigidity requires specialized tools to avoid damage. Melamine’s softer nature, while sometimes easier to file, might require more care to avoid excessive wear. Proper preparation, safety measures, and the selection of appropriate tools are essential to mitigate these challenges and achieve a successful outcome.
Conclusion
In conclusion, achieving flawless plastic laminate edges without specialized tools is achievable through careful technique and a methodical approach. This guide provides actionable steps for using readily available tools, such as utility knives and sandpaper, while prioritizing safety and precision. We’ve explored alternative methods like edge banding tape and emphasized the importance of proper preparation, safety measures, and troubleshooting.
By understanding the different laminate types and their specific requirements, you’ll be well-equipped to tackle any edge finishing project.
Common Queries
What types of plastic laminate are suitable for this method?
Most types of plastic laminate, including high-pressure laminate and melamine, can be filed using the methods Artikeld in this guide. However, the specific technique might need adjustment depending on the laminate’s thickness and hardness.
What safety precautions should I take when using a utility knife?
Always wear safety glasses and gloves. Ensure a stable work surface. Cut in a well-lit area, and follow the steps for proper handling and disposal of laminate scraps.
How do I avoid chipping the laminate while filing?
Apply light pressure and use progressively finer grits of sandpaper. Maintain a consistent angle during filing. Consider using a sanding block for better control and precision.
What are the limitations of using only a utility knife and sandpaper?
This method may not be suitable for extremely thick or complex laminate edges. The results may not be as smooth or aesthetically pleasing as with specialized tools, but the approach is cost-effective and accessible.
