How to get rid of microblading? This guide delves into the various methods for removing microblading, from laser treatments to home remedies. Understanding the nuances of each approach is crucial for making an informed decision about your aesthetic goals. We’ll cover the pros and cons of different removal techniques, helping you navigate the process with confidence and clarity.
From initial consultations to long-term maintenance, this comprehensive resource will empower you to achieve your desired outcome.
Microblading, a popular cosmetic procedure, can sometimes require removal. This comprehensive guide provides a roadmap for safely and effectively addressing this need. We explore a range of options, from professional techniques to at-home remedies, to assist you in understanding your choices and reaching a satisfying resolution.
Understanding Microblading Removal Methods
Microblading, a popular cosmetic procedure, can sometimes require removal. Understanding the various methods available and their implications is crucial for informed decision-making. A careful evaluation of the procedure and potential risks is essential for a positive outcome.The removal process for microblading can vary significantly, impacting the overall experience and recovery time. Choosing the appropriate method is essential to achieving a satisfactory result while minimizing potential complications.
Methods for Microblading Removal
Various techniques are employed to remove microblading, each with unique characteristics. These methods encompass a spectrum of approaches, from minimally invasive procedures to more aggressive treatments.
- Laser Treatments: Laser treatments utilize concentrated light energy to target and break down the pigment deposited during microblading. Different laser types, such as Q-switched lasers, are used for varying degrees of pigment removal. The effectiveness of laser treatments depends on factors like the type of ink used and the technician’s expertise. Laser treatments can effectively reduce the appearance of the microblading, but multiple sessions are often necessary for complete removal.
- Chemical Peels: Chemical peels employ chemical solutions to exfoliate the skin, potentially reducing the visibility of the microblading. The depth of the peel and the strength of the chemical solution determine the level of skin resurfacing and pigment removal. Chemical peels are typically less aggressive than laser treatments, but they may not be as effective in completely removing deeply ingrained pigment.
These treatments often require multiple sessions for satisfactory results.
- Dermabrasion: Dermabrasion involves mechanically removing the top layers of skin using a rotating brush or abrasive material. This method can potentially remove some pigment, but it can also cause significant skin irritation and scarring. Dermabrasion is often reserved for more severe cases or when other methods have proven ineffective. Recovery times are significantly longer compared to laser or chemical peels.
Effectiveness and Potential Risks of Each Method, How to get rid of microblading
The effectiveness and potential risks associated with each method differ significantly. A comprehensive evaluation of these factors is critical for patients considering microblading removal.
| Method Name | Effectiveness | Risks | Recovery Time |
|---|---|---|---|
| Laser Treatments | Generally effective, but multiple sessions may be needed. Effectiveness depends on the type of ink used and technician expertise. | Possible skin irritation, redness, bruising, and scarring. Potential for uneven results or incomplete removal. Rarely, burns or infections can occur. | Typically, several weeks to several months, depending on the number of sessions and individual healing. |
| Chemical Peels | Less effective for deep pigment than laser treatments. May require multiple sessions. | Possible skin irritation, redness, and temporary discoloration. Risk of infection is lower compared to dermabrasion. | Typically, a few days to a couple of weeks, depending on the depth of the peel. |
| Dermabrasion | Potentially effective but carries a high risk of scarring and complications. Considered a more aggressive approach. | Significant risk of scarring, infection, prolonged healing, and uneven skin tone. Higher risk of complications compared to laser or chemical peels. | Several weeks to months. Recovery is significantly longer than laser or chemical peels. |
Typical Timeframe for Removal
The timeframe for each removal method varies based on factors like the individual’s skin type, the depth of the microblading, and the chosen treatment approach. A realistic assessment of the recovery process is crucial for patient expectations.
Home Remedies and Aftercare Procedures
Seeking natural methods to gently fade microblading while safeguarding the healing process is a common desire. Understanding the potential benefits and limitations of home remedies, along with crucial aftercare steps, is paramount to minimizing complications and maximizing the outcome. The journey towards a successful microblading removal involves patience and adherence to the prescribed aftercare regimen.
Natural Methods for Fading Microblading
Various natural ingredients are believed to possess properties that can help fade microblading. However, their effectiveness can vary significantly depending on individual skin types and the depth of the pigmentation. Careful consideration and consultation with a professional are essential before employing any home remedies.
- Aloe Vera: Aloe vera gel is known for its soothing and moisturizing properties. Applying a thin layer of fresh aloe vera gel directly to the treated area can help reduce inflammation and promote healing. Its anti-inflammatory effects can minimize redness and irritation. A soft cotton ball or clean finger can be used to gently apply the gel.
- Honey: Honey possesses antibacterial and moisturizing properties. Applying a thin layer of raw honey to the treated area can help in healing. It’s important to note that honey can sometimes cause allergic reactions in certain individuals. A small patch test before full application is recommended.
- Tea Tree Oil: Tea tree oil has antimicrobial properties. Diluting tea tree oil with a carrier oil like coconut or jojoba oil before application is crucial to avoid skin irritation. Its antimicrobial properties may assist in preventing infection. A tiny amount is recommended to start.
- Lemon Juice: Lemon juice is a natural bleaching agent. However, it can be too harsh for sensitive skin and can cause irritation. Lemon juice should be diluted with water before application. It is crucial to note that lemon juice may lighten the skin tone, which may not be desirable in all cases.
Importance of Proper Aftercare
Maintaining proper aftercare is critical for successful microblading removal. Following these precautions can minimize complications and facilitate the healing process. Avoiding certain activities and maintaining hygiene are crucial aspects of aftercare.
- Avoiding Harsh Products: Refrain from using harsh soaps, scrubs, or exfoliants on the treated area. These can irritate the skin and hinder the healing process. Gentle cleansers and moisturizers are preferred.
- Protecting from Sun Exposure: Sun exposure can increase the risk of scarring and hyperpigmentation. Applying a broad-spectrum sunscreen with an SPF of 30 or higher is essential. The use of sunscreen is highly recommended to protect the treated area.
- Maintaining Hygiene: Maintaining cleanliness is crucial to prevent infection. Gently clean the treated area with a mild cleanser twice a day and avoid touching the area excessively.
- Avoiding Picking or Scratching: Avoid picking or scratching the treated area, as this can disrupt the healing process and potentially lead to scarring or infection. This precaution is vital for preventing complications.
Step-by-Step Guide for Applying Home Remedies
This step-by-step guide Artikels the application of natural remedies to promote healing and fade microblading. Remember, individual results may vary, and consulting with a dermatologist or skincare professional is always recommended.
| Step | Action | Image Description |
|---|---|---|
| 1 | Prepare the area. Clean the treated area with a mild cleanser and pat dry gently. | A person gently cleansing the treated area with a soft cloth and a mild cleanser. |
| 2 | Apply the chosen remedy. Apply a small amount of the chosen natural remedy (e.g., aloe vera gel, diluted honey, or diluted tea tree oil) to the affected area. | A person carefully applying a small amount of aloe vera gel to the treated area using a clean fingertip. |
| 3 | Massage gently. Gently massage the area in a circular motion for a few minutes to help the remedy absorb. | A person gently massaging the treated area in a circular motion using a clean fingertip. |
| 4 | Protect the area. Cover the treated area with a thin layer of gauze or a clean bandage. | A person gently covering the treated area with a thin layer of gauze. |
Professional Removal Considerations
Seeking professional guidance for microblading removal is crucial. A qualified professional possesses the expertise and tools to safely and effectively address the desired outcome. Just as a skilled artisan requires proper tools for their craft, a successful microblading removal necessitates the right practitioner.Professional microblading removal is a delicate process, demanding careful consideration and meticulous technique. A qualified professional will not only understand the intricacies of the removal process but also prioritize client safety and well-being, which is essential to avoid complications and achieve satisfactory results.
The selection of a qualified professional hinges on several key factors.
Importance of Professional Consultation
The significance of consulting a qualified professional for microblading removal stems from the potential complications associated with improper techniques. Unskilled practitioners may exacerbate existing issues, leading to prolonged healing times or even permanent scarring. A professional consultation allows for a thorough assessment of the situation, tailored solutions, and a realistic expectation of the removal process. This proactive approach is crucial for achieving the desired outcome.
Experience and Certifications in Microblading Removal
Selecting a professional with significant experience in microblading removal is paramount. Experience translates into a deeper understanding of the various removal techniques and the potential challenges they present. Furthermore, certifications in microblading removal demonstrate a commitment to maintaining high standards of practice and safety protocols. A professional’s experience in handling different pigment types and skin tones also plays a significant role.
It’s essential to ensure that the practitioner has a proven track record of successful removals.
Factors to Consider When Choosing a Professional
Choosing a qualified professional for microblading removal involves evaluating several factors. The professional’s experience with specific removal techniques, such as laser or chemical methods, is crucial. Safety protocols employed by the practitioner, including sterilization procedures and infection control measures, are critical considerations. Their knowledge of potential complications and the ability to address them effectively also needs careful assessment.
The professional’s communication skills and ability to explain the procedure thoroughly are also vital for client understanding and confidence. A reputable professional will provide a detailed aftercare plan. Furthermore, client testimonials and reviews can offer valuable insights into the practitioner’s reputation and service quality.
Questions to Ask During a Microblading Removal Consultation
A thorough consultation with a potential practitioner is essential for making an informed decision. Here are some questions to ask:
- What are your specific techniques for microblading removal, and what is your experience with them?
- What is your approach to ensuring client safety and infection control during the removal process?
- What are the potential risks and complications associated with microblading removal, and how will you address them?
- What are your typical removal timelines, and how many sessions might be necessary?
- Can you provide examples of successful microblading removal cases, and how did you address specific challenges?
- What is your aftercare protocol, and how will you support me throughout the healing process?
- What are your qualifications and certifications in microblading removal?
- What are your fees, and are there any additional costs associated with the removal process?
- Can you show me before and after photos of similar procedures?
These questions provide a framework for understanding the professional’s expertise and commitment to client well-being. Open communication is key to ensuring a positive and successful removal experience.
Risks and Complications Associated with Removal: How To Get Rid Of Microblading
Seeking guidance from a skilled professional is paramount when considering microblading removal. Just as the initial procedure carries inherent risks, so too does the process of reversing it. Understanding the potential pitfalls is crucial for making an informed decision, ensuring a safe and successful outcome. A harmonious balance between personal desire and the well-being of one’s skin is essential.
Potential Risks and Complications
Various methods for microblading removal carry distinct potential risks and complications. These risks are not universally experienced, but they require careful consideration. Each individual’s response to the treatment and their overall health condition play a significant role.
- Infection: Microblading removal procedures, like any invasive treatment, create tiny openings in the skin, making it susceptible to bacterial or fungal infections. Prompt medical attention and proper aftercare are vital to prevent such complications. Antibiotic ointments and careful hygiene can significantly reduce the risk. Signs of infection include redness, swelling, pus, or a foul odor at the treatment site.
Prompt medical intervention is crucial to address any potential infection.
- Scarring: While not always the case, improper removal techniques or excessive irritation can lead to scarring. This can manifest as raised or depressed areas on the skin, impacting its appearance. A skilled technician who employs the right methods and uses suitable products can help minimize this risk. Careful aftercare instructions and adhering to them are essential in preventing potential scarring.
Proper healing time and patience are crucial for avoiding this complication.
- Irritation and Allergic Reactions: The removal process itself, or the solutions used, might trigger an allergic reaction or irritation in some individuals. Reactions range from mild redness and itching to more severe symptoms such as hives or swelling. This highlights the importance of thorough consultation with a professional regarding the suitability of particular removal methods or solutions for an individual’s skin type.
Individuals with a history of allergies should disclose this to the technician.
- Pigmentation Changes: Discoloration of the skin around the treated area is another possible consequence. The removal process can alter the natural pigment, resulting in uneven coloration or discoloration. A skilled technician with experience in removal procedures can reduce the risk of such changes by carefully choosing the right technique and products. Understanding the potential for discoloration and following the aftercare instructions diligently is crucial.
Table of Potential Risks, Symptoms, and Recommended Actions
| Risk | Symptoms | Recommended Actions |
|---|---|---|
| Infection | Redness, swelling, pus, warmth, pain, foul odor | Seek immediate medical attention, follow prescribed antibiotics and aftercare instructions. |
| Scarring | Raised or depressed areas, persistent discoloration, or uneven texture | Consult a dermatologist, follow aftercare instructions meticulously, avoid picking or scratching the area. |
| Irritation/Allergic Reaction | Redness, itching, hives, swelling, burning sensation | Immediately discontinue the procedure, apply a cold compress, and consult a dermatologist for further guidance. |
| Pigmentation Changes | Uneven coloration, discoloration, darkening or lightening of the treated area | Consult a dermatologist for evaluation and potential treatment options. Follow recommended aftercare. |
Proper aftercare, careful selection of removal methods, and open communication with a skilled professional are crucial to minimize risks and ensure a successful outcome.
Recovery Time and Expectations
The journey of removing microblading, like any process of healing, unfolds with a unique tapestry of experiences. Patience and understanding are key components of this process. The path to recovery is often influenced by individual factors, including skin type, the technique used for removal, and the extent of the initial microblading procedure. Understanding the expected recovery timeline and aesthetic outcome is crucial for setting realistic expectations.
This knowledge empowers individuals to navigate the process with informed decisions and a positive outlook.
Typical Recovery Time
The duration of recovery following microblading removal varies considerably. Factors such as the chosen removal method, the depth of the pigment, and the individual’s healing response all contribute to the timeframe. Some individuals may experience a quicker recovery, while others may require a longer period. This is analogous to the diverse experiences in the human journey, where the speed of healing is not always uniform.
Aesthetic Outcome
The aesthetic outcome after microblading removal depends on various factors, including the original pigment density and the individual’s skin’s response to the removal process. Complete eradication of the pigment is not always achievable, and the appearance of the treated area might show subtle residual pigment. This is similar to the way that some experiences leave lasting marks, though not always detrimental.
Impact on Appearance During Healing
The treated area may undergo changes in appearance during the healing period. These changes can include redness, swelling, scabbing, and hyperpigmentation or hypopigmentation. The severity and duration of these changes can differ depending on the individual and the removal method. This is akin to the transformative processes in nature, where visible changes are a part of the natural order.
Recovery Timeline Table
| Removal Method | Initial Healing (Days) | Potential Skin Reactions | Appearance (Initial Stages) | Appearance (Mid-Healing) | Appearance (Late Healing) |
|---|---|---|---|---|---|
| Laser | 3-7 | Redness, slight swelling, potential for crusting | Reddened, possibly slightly swollen area | Reduction in redness, minor scabbing | Minimal redness, fading of discoloration |
| Chemical Peels | 5-14 | Redness, peeling, potential for temporary hyperpigmentation | Red, irritated, peeling skin | Peeling continues, potentially showing underlying skin | Fading redness, potentially slight hypopigmentation |
| Dermabrasion | 7-21 | Redness, swelling, potential for scarring | Significant redness, swelling, scabbing | Reduction in redness and swelling, scab formation | Fading of redness, slight hyperpigmentation, potentially some scarring |
This table provides a general guideline, and individual experiences may differ. Consulting a professional is essential for personalized advice and management of any concerns during the healing process. The table serves as a framework, similar to a map, which should be used in conjunction with personalized guidance.
Long-Term Effects and Maintenance
The journey of microblading removal, though necessary for some, often leaves a lingering question: what are the long-term consequences? Understanding the potential effects on the treated area is crucial for making informed decisions, both in the immediate aftermath and beyond. Careful consideration of maintenance strategies is vital to ensuring the skin’s health and the desired outcome.
Long-Term Effects of Removal
Microblading removal, while aiming to reverse the procedure, can potentially lead to certain long-term effects. These effects stem from the impact of pigment removal on the skin’s structure. In some cases, mild to moderate scarring may occur, particularly if the removal process was aggressive or if the individual has a predisposition to scarring. Pigment changes, such as lighter or uneven skin tone in the treated area, are also possible.
The extent of these effects varies greatly depending on factors like the initial microblading technique, the removal method used, and the individual’s skin characteristics.
Potential Maintenance Procedures
Following microblading removal, maintaining the treated area’s health and appearance may require additional treatments. Touch-up procedures might be necessary to address any remaining pigment or unevenness in the skin’s tone. Further treatments, such as laser resurfacing or specialized skin care, could potentially improve the overall appearance and reduce the visibility of any residual scarring. Individual needs will vary, and consultation with a dermatologist or esthetician is vital for determining the best course of action.
Importance of Consistent Skin Care Routines
A consistent skin care routine is paramount in maintaining the health and appearance of the treated area. Proper cleansing, moisturizing, and sun protection are essential to promote healing, prevent irritation, and minimize the risk of further complications. These routines help maintain the skin’s elasticity, reduce the likelihood of hyperpigmentation, and support a more even skin tone.
Consistent skin care routines are essential for maintaining the treated area’s health and minimizing the risk of long-term complications after microblading removal.
Case Studies and Testimonials (Illustrative)
Understanding the lived experiences of those who have undergone microblading removal is crucial for navigating this process with wisdom and discernment. These accounts provide valuable insights into the journey, highlighting both successes and potential challenges. Patient testimonials, coupled with documented case studies, offer a holistic perspective, empowering individuals to make informed decisions.
Illustrative Case Study: Laser Removal
A patient, Sarah, opted for laser treatment for microblading removal. Initial consultations highlighted the suitability of this method for her specific pigment type and skin tone. The laser targeted the pigment, fragmenting it for natural elimination. Sarah reported mild discomfort during the procedure, consistent with the nature of laser treatments. Post-treatment, she experienced mild swelling and redness, which subsided within a few days.
Careful aftercare, including avoiding sun exposure and applying prescribed ointments, was critical in promoting healing. The removal process took several sessions, as pigment density varied across the brow area. Sarah’s experience demonstrated that laser removal can be effective but requires patience and adherence to post-treatment guidelines.
Patient Testimonials
Numerous individuals have shared their experiences with microblading removal. One patient, David, described a positive experience with chemical peels. He noted that the peels gently exfoliated the skin, gradually fading the pigment over several sessions. The results were gradual but noticeable, allowing him to manage expectations realistically. Another patient, Emily, reported significant improvement after using a combination of chemical peels and microdermabrasion.
Her experience highlighted the importance of a personalized approach to removal, considering individual factors such as skin type and pigment depth. These testimonials underscore the diversity of experiences and the need for customized removal plans.
Impact of Aftercare
Proper aftercare protocols are pivotal in achieving a successful outcome. A patient, Mark, neglecting post-treatment instructions, experienced prolonged inflammation and scarring. This underscores the importance of adhering to professional recommendations, which often include avoiding sun exposure, keeping the treated area clean, and applying prescribed ointments. In contrast, a patient, Jessica, diligently followed aftercare instructions. This resulted in minimal discomfort, a faster healing process, and satisfactory results.
The outcomes showcase the direct correlation between diligent aftercare and a positive removal experience.
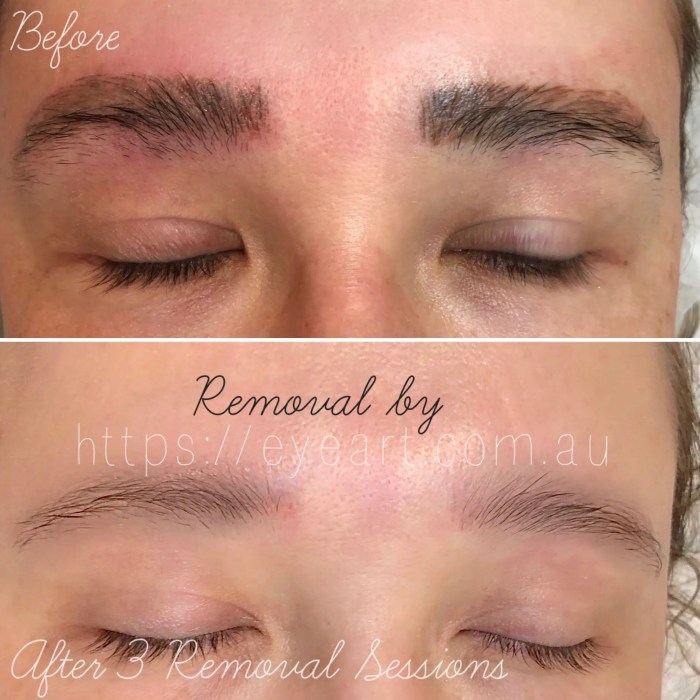
Before and After Results
Illustrative before-and-after examples demonstrate the removal process’s efficacy. A photograph showcasing a patient’s brow before treatment reveals a heavily pigmented microblading design. A subsequent photograph, taken after several removal sessions, illustrates a significant reduction in pigment intensity, with the brow appearing less defined. These visual examples illustrate the gradual nature of the removal process, reinforcing the importance of realistic expectations.
It’s crucial to understand that complete removal might take multiple sessions, and the final outcome may not perfectly match the original state. Patience and open communication with the removal specialist are essential.
Concluding Remarks

In conclusion, removing microblading involves careful consideration of various factors. This guide has provided a comprehensive overview of methods, risks, and recovery expectations. Remember, the path to achieving a desired aesthetic result is personalized, and professional consultation is essential. By understanding the potential risks and advantages of each approach, you can make a well-informed choice aligned with your individual needs and aspirations.
User Queries
What are some common side effects of microblading removal?
Possible side effects include redness, swelling, and temporary discomfort. More severe complications are rare but can include scarring or infection. Always follow aftercare instructions and seek professional medical advice if you experience significant concerns.
How long does it take to see results from microblading removal?
Recovery time varies depending on the chosen removal method and individual factors. Some methods may show noticeable results in a few sessions, while others may require multiple treatments. Be patient and follow professional guidance.
Can I use makeup after microblading removal?
Generally, you should avoid makeup on the treated area for a period specified by your professional. Follow the aftercare instructions to minimize risks and maximize healing.
What are the costs associated with microblading removal?
The cost of microblading removal varies based on the chosen method, location, and the professional’s expertise. It’s wise to get multiple quotes and compare services before making a decision.
