How to install a pressure tank on a well is a crucial task for homeowners with well water systems. This guide provides a step-by-step approach, ensuring a safe and efficient installation. From initial planning and equipment selection to final system testing, we’ll walk you through every stage of the process, helping you understand the nuances of this important project.
Proper pressure tank installation is vital for maintaining consistent water pressure and preventing potential damage to your well pump and plumbing system. This detailed guide will cover all aspects, from assessing your well’s water pressure needs to connecting the pressure tank to the electrical supply. Following these instructions will help you achieve a reliable and long-lasting water system.
Planning and Preparation
Transforming your well water into a reliable and convenient source starts with meticulous planning. A well-executed installation process, guided by precise assessments and careful selection of components, ensures optimal performance and longevity of your pressure tank system. This phase lays the foundation for a seamless integration of your well water into your home’s plumbing system.
Assessing Well Water Pressure Needs
Understanding your well’s water pressure characteristics is crucial for selecting the right pressure tank. This involves careful monitoring of the water pressure throughout the day, accounting for fluctuating demands. Observe pressure variations to determine the optimal operating range for your household. This data is essential for calculating the required pressure tank size. Consider the highest and lowest expected water pressure points, taking into account peak usage times.
Real-world examples show that peak demand periods often necessitate higher water pressure for efficient operation.
Equipment Checklist for Pressure Tank Installation
A comprehensive checklist ensures that all necessary equipment is available before commencing the installation process. This detailed list helps avoid costly delays and potential complications. The equipment required includes the pressure tank itself, appropriate piping and fittings, valves, pressure regulators, a pressure gauge, and a pressure switch. Additionally, consider the need for specialized tools, such as wrenches, pipe cutters, and sealants, ensuring they meet the specific demands of your project.
This meticulous preparation minimizes the chances of encountering unexpected issues during installation.
Importance of Proper Water Pressure Regulation
Proper water pressure regulation is essential for maintaining a consistent water flow throughout your home. Fluctuating pressure can cause discomfort and inefficiency in various fixtures. It also safeguards your plumbing system from damage caused by excessive pressure surges. Optimal pressure regulation ensures a smooth and reliable water supply, preventing potential issues such as leaks or damaged appliances.
A well-regulated system translates to a more comfortable and efficient water use experience.
Selecting a Pressure Tank Size
Selecting the appropriate pressure tank size is critical for maintaining consistent water pressure. Factors such as the average water usage in your household, the number of fixtures, and the distance of the water source to the furthest fixtures play a key role. A pressure tank that is too small will struggle to meet demand, leading to pressure fluctuations, whereas one that is too large may waste energy.
Consider consulting a plumbing professional or water system specialist to determine the ideal tank size based on your specific water usage and household configuration.
Types of Pressure Tanks and Their Suitability
| Type of Pressure Tank | Suitability | Advantages | Disadvantages |
|---|---|---|---|
| Diaphragm Tanks | Ideal for most residential well systems | Reliable, relatively quiet operation, and efficient | More expensive than other types |
| Pressure Vessels | Suitable for higher water demands and larger homes | Durable and capable of handling higher pressure | Can be bulky and heavier |
| Air-Charged Tanks | Versatile option suitable for various well systems | Can handle fluctuations in water pressure effectively | Requires regular air topping and maintenance |
Different types of pressure tanks cater to various needs. The table above Artikels the suitability of each type, highlighting their respective advantages and disadvantages. Carefully evaluate the requirements of your specific well system to determine the most appropriate pressure tank for your needs.
Pressure Tank Selection
Choosing the right pressure tank is paramount for a reliable and efficient well water system. A poorly selected tank can lead to inconsistent water pressure, frequent pressure fluctuations, and even premature system failure. Careful consideration of tank specifications is key to ensuring years of trouble-free service.Pressure tanks are the heart of your well system, balancing water flow from the well pump with the demand from your household fixtures.
Proper sizing and selection ensures a consistent supply of water, preventing pressure spikes and dips that can damage your plumbing and waste energy.
Crucial Specifications for Pressure Tanks
Selecting the right pressure tank involves considering several crucial specifications. These factors directly impact the performance and longevity of your system. Tank size, pressure rating, and material all contribute to the overall efficiency and reliability of the well system.
- Tank Capacity: This dictates the volume of water the tank can hold. A larger capacity tank can handle higher demands, but a smaller one is sufficient for lower flow needs. A 20-gallon tank, for instance, is suitable for a small home with modest water usage, while a 50-gallon tank is better suited for a larger household or one with multiple simultaneous water users.
- Working Pressure: This is the pressure the tank can maintain. It must exceed the maximum pressure in your plumbing system. For example, if your plumbing system is designed for 70 PSI, choose a tank with a working pressure above 70 PSI, such as 80 PSI, to provide a safety margin and accommodate pressure surges.
- Maximum Pressure: This is the absolute maximum pressure the tank can withstand without failure. It’s crucial to ensure it’s significantly higher than the working pressure to prevent damage and maintain system safety. For example, if your working pressure is 70 PSI, a maximum pressure rating of 100 PSI or more is highly recommended to allow for pressure fluctuations and surges.
Calculating Appropriate Pressure Tank Capacity
Accurate calculation is essential for selecting the right tank size. Insufficient capacity can lead to pressure drops, while excessive capacity can waste energy. The calculation involves understanding your household’s water usage and the well’s output.
Capacity (gallons) = (Water Demand (gallons/minute)
Time to fill (minutes) ) / (Efficiency Factor)
For instance, if your household uses 10 gallons per minute and the time to fill the tank is 2 minutes, and your system’s efficiency is 80%, then the tank capacity should be (10 gallons/minute2 minutes) / 0.80 = 25 gallons. This example demonstrates how water demand and time to fill directly impact the tank capacity requirement.
Pressure Tank Materials
Different materials offer varying characteristics, influencing cost, durability, and maintenance.
- Steel: Steel pressure tanks are robust and affordable, making them a popular choice. However, they require regular maintenance to prevent corrosion. They are suitable for standard well systems and offer excellent durability, though they might need more frequent maintenance compared to other options.
- Fiberglass Reinforced Plastic (FRP): FRP tanks are known for their corrosion resistance and longevity. They require minimal maintenance, making them ideal for harsh environments. They are a great alternative for steel, especially in areas with high moisture levels, or where regular maintenance is a concern.
- Polyethylene (PE): PE tanks are lightweight, chemically resistant, and extremely durable, offering superior longevity. Their low maintenance requirements make them an excellent choice for homeowners prioritizing long-term reliability. They are well-suited for a wide range of well systems, offering the best durability in the long term.
Pressure Tank Safety Features
Essential safety features safeguard your system and protect it from potential hazards.
- Pressure Relief Valve: This critical component releases excess pressure, preventing tank damage or explosions. Its function is to maintain pressure within a safe range, ensuring system integrity.
- Pressure Switch: This device controls the well pump’s operation, turning it on when the water pressure drops below the desired level and off when the pressure reaches the setpoint. This safeguards against excessive pump running and protects the system from damage.
Pressure Tank Brand Comparison
The table below provides a comparative analysis of various pressure tank brands, including their performance ratings.
| Brand | Material | Typical Capacity (gallons) | Maximum Pressure (PSI) | Performance Rating (1-5, 5 being best) |
|---|---|---|---|---|
| Hydro-Matic | Steel | 20-100 | 100-150 | 4 |
| Aqua-Tech | FRP | 25-75 | 125-175 | 4.5 |
| Dura-Well | PE | 30-80 | 150-200 | 5 |
Installation Process
Transforming your well into a reliable water source begins with meticulous installation of the pressure tank. This crucial step ensures consistent water pressure and prevents potential damage to your plumbing system. Thoroughness and adherence to the manufacturer’s instructions are paramount for a successful installation.
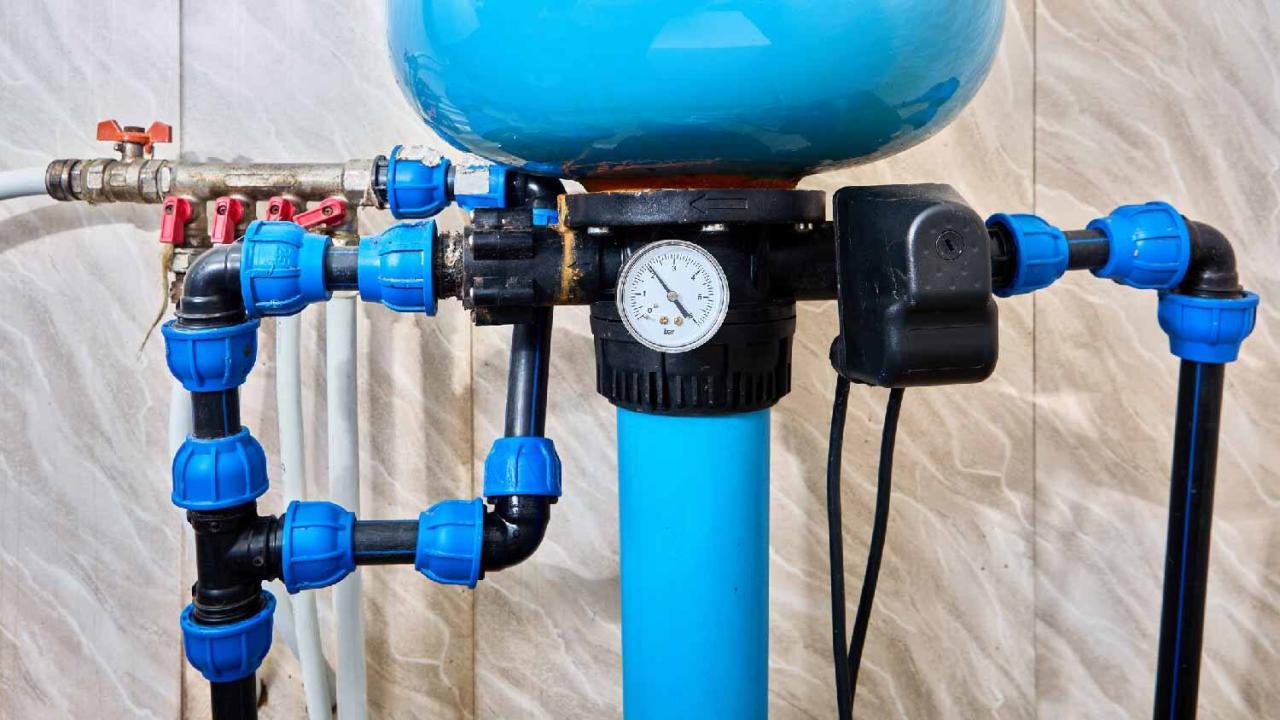
Connecting the Pressure Tank to the Well Pump
The pressure tank’s connection to the well pump is critical for a functional system. Ensure the pump’s discharge port is correctly matched to the tank’s inlet. Properly securing the connections with the appropriate fittings is essential to avoid leaks and maintain pressure. This step directly impacts the system’s efficiency and longevity.
Installing the Pressure Switch
The pressure switch acts as the intelligent brain of the system, regulating water flow. Accurate installation is vital. First, ensure the switch’s electrical connections align with the pump’s wiring. Then, position the switch’s pressure settings to match your desired water pressure range. This careful adjustment ensures the pump cycles on and off at the correct pressure levels, optimizing water usage.
Connecting the Pressure Tank to the Water Supply Lines
Connecting the pressure tank to the water supply lines is a precise operation. Using appropriate fittings, ensure a secure connection to the water supply lines, and prevent leaks. The tank’s outlet port is connected to the plumbing system, ensuring water availability to fixtures. This connection is crucial for seamless water distribution throughout your home.
Testing the Pressure Tank System
Thorough testing is critical after installation. Start by checking for leaks around all connections. Next, turn the pump on and monitor the pressure gauge. The gauge should accurately reflect the pre-set pressure levels. If the pressure is within the specified range, the system is operating correctly.
Adjusting the pressure switch settings is crucial for accurate readings.
Connecting the Pressure Tank to the Plumbing System
Connecting the pressure tank to the plumbing system involves careful plumbing techniques. The tank’s outlet port is connected to the main water supply line. Ensure the correct fittings are used for a secure connection, preventing leaks. This connection delivers water to your fixtures, ensuring consistent pressure. The appropriate valve connections ensure a secure and leak-free system.
Pressure Tank System Troubleshooting
Troubleshooting a pressure tank system can often be resolved with careful inspection. First, check for any leaks at connections. If leaks are present, seal them promptly. Next, inspect the pressure switch settings to ensure they align with your desired water pressure. If the pressure remains inconsistent, check the electrical connections and the well pump for potential issues.
Finally, if problems persist, consult a qualified technician.
Electrical Connections
Powering your pressure tank is crucial for its functionality. Proper electrical connections ensure reliable water delivery and prevent potential hazards. This section meticulously details the steps involved, emphasizing safety procedures and best practices.
Connecting the Electrical Components
Ensuring the electrical components are correctly connected is paramount for the pressure tank’s safe and efficient operation. This section provides a step-by-step guide for connecting the electrical components, from the control valve to the power supply. Following these instructions precisely minimizes the risk of damage and ensures long-term reliability.
- First, carefully identify all the electrical components, including the pressure switch, the motor, and the wiring harness. Ensure you have all the necessary components before beginning the installation process. Proper identification prevents misconnections.
- Next, connect the wires from the pressure switch to the corresponding terminals on the pressure tank. The correct polarity must be observed for reliable operation. Incorrect polarity can damage the system.
- Carefully connect the motor wires to their designated terminals on the pressure tank. Ensure the motor wires are securely fastened and the connections are tight. Loose connections can cause overheating and malfunction.
- After connecting all the electrical components, meticulously check all connections to ensure they are secure and properly insulated. A visual inspection is crucial.
Grounding the Pressure Tank System
Grounding the pressure tank system is an essential safety measure that protects against electrical shock. It creates a pathway for excess current to flow to the ground, preventing it from accumulating and causing injury. A properly grounded system is crucial for preventing electrical hazards.
- Locate a suitable grounding point, typically a metal pipe connected to the earth. This point should be readily accessible and reliably grounded.
- Use a properly sized grounding wire, typically copper, and securely connect it to the pressure tank’s grounding terminal. This connection must be firm and reliable to prevent electrical shock.
- Ensure the grounding wire is securely attached to the grounding point. A loose or improperly connected grounding wire is a safety hazard. Proper grounding is critical.
Checking Wiring and Connections
Thorough verification of the wiring and connections is essential to identify any potential issues before the system is energized. This preventative step minimizes the risk of unexpected failures and ensures a reliable water system.
- Visually inspect all connections for tightness and proper insulation. Look for any signs of damage or looseness.
- Use a multimeter to check the continuity of each wire to ensure there are no breaks in the circuit. This simple test guarantees a complete circuit.
- Verify the polarity of all connections, especially on the pressure switch and the motor. Incorrect polarity can lead to malfunction and damage.
Connecting the Pressure Tank to the Electrical Supply
Connecting the pressure tank to the electrical supply requires careful attention to the voltage and amperage requirements. Matching the pressure tank’s specifications with the power supply is crucial to avoid damage and ensure safe operation.
- Ensure the power supply meets the pressure tank’s voltage and amperage requirements. Refer to the pressure tank’s specifications for accurate information.
- Turn off the power supply at the breaker box before connecting any wires. This safety precaution prevents electrical shocks and accidental activation.
- Connect the wires from the electrical supply to the appropriate terminals on the pressure tank. Adhere to the wiring diagram provided with the pressure tank.
- Turn the power back on at the breaker box and carefully observe the pressure tank’s operation. This ensures the system is working correctly.
Potential Electrical Hazards
Recognizing potential electrical hazards is vital during pressure tank installation. Awareness of these hazards allows for proactive measures to prevent accidents.
- Improper grounding can lead to electrical shocks. Ensure the grounding connection is secure and compliant with local electrical codes.
- Overloading the electrical circuit can cause overheating and fire hazards. Use appropriate circuit breakers and fuses to protect the system.
- Damaged wiring or loose connections can cause electrical shocks and malfunctions. Thoroughly inspect all connections and replace any damaged parts.
- Working with electrical components requires proper safety precautions, including the use of insulated tools and appropriate personal protective equipment (PPE). These safeguards minimize the risk of injury.
Electrical Connections Diagram
The following table provides diagrams for common electrical connections. These diagrams illustrate the connections for the pressure tank components and help guide the installation process.
| Component | Diagram | Description |
|---|---|---|
| Pressure Switch | [Diagram of Pressure Switch Connections – Show connections to pressure tank and power supply] | Connects the pressure tank to the power supply and controls the operation based on pressure levels. |
| Motor | [Diagram of Motor Connections – Show connections to pressure tank and power supply] | Provides the power for the water pump to operate. |
| Grounding | [Diagram of Grounding Connection – Show connection to a metal pipe] | Provides a path for excess current to flow to the earth. |
System Testing and Commissioning
Unleash the full potential of your well water system by meticulously performing system testing and commissioning. This crucial step ensures your pressure tank operates flawlessly, delivering consistent water pressure and preventing costly issues down the line. A well-executed commissioning process guarantees smooth water flow, avoiding potential problems that could arise from improper installation or unforeseen circumstances.This phase involves verifying the pressure tank’s performance, evaluating water pressure regulation, and identifying any potential problems.
Thorough testing and commissioning are essential to ensuring the system operates optimally and provides reliable water service for years to come.
Water Pressure Testing Procedures
Precise water pressure measurement is paramount for ensuring your system functions correctly. Utilize a reliable pressure gauge, strategically positioned to capture accurate readings. Begin by turning on the water pump and allowing the system to stabilize. Monitor the pressure gauge readings over time. This allows you to identify pressure fluctuations or anomalies that might indicate a problem.
Pressure Tank Performance Evaluation
Assessing the pressure tank’s performance involves observing its response to pump cycles. A well-performing pressure tank will quickly build pressure upon pump activation and maintain consistent pressure throughout operation. Note any delays in pressure buildup, erratic pressure fluctuations, or unusually high pressure readings. These indicators might signal issues requiring attention.
Importance of Proper Water Pressure Regulation
Maintaining consistent water pressure is critical for both comfort and efficient appliance operation. A properly regulated system ensures sufficient pressure for all your needs, while avoiding excessive pressure that could strain plumbing fixtures or damage appliances. Optimal pressure regulation will also enhance the lifespan of your water system components.
Troubleshooting Common Pressure Tank Issues
Addressing potential pressure tank problems promptly can prevent more significant issues. Common problems include insufficient pressure, erratic pressure, or pressure spikes. Insufficient pressure may result from low water levels, insufficient pump capacity, or air pockets within the pressure tank. Erratic pressure could indicate a malfunctioning pressure switch, pump issues, or faulty plumbing connections. Pressure spikes can be caused by a clogged water filter, a faulty pressure relief valve, or a pump running at too high a speed.
Final Inspection Procedure
A comprehensive final inspection of the entire system is essential. Thoroughly examine all connections, valves, and fittings for leaks or damage. Inspect the pressure tank for any signs of damage, corrosion, or leaks. Verify that all electrical connections are secure and properly insulated. This proactive inspection guarantees the system’s longevity and reliability.
Common Pressure Tank Problems and Solutions
- Insufficient Water Pressure: Check water levels, pump capacity, and pressure tank air volume. Ensure the pump is running efficiently and the water supply lines are unobstructed. A low water table could require a deeper well or a larger capacity pump.
- Erratic Water Pressure: Inspect the pressure switch, the pump, and the plumbing connections. Faulty wiring or electrical issues could also cause fluctuations. Addressing any potential leaks can also stabilize pressure.
- Pressure Spikes: Inspect the pressure relief valve and the water filter for clogs. Faulty plumbing connections, an over-pressurized system, or an excessively high pump speed can lead to these spikes. Ensure all plumbing connections are properly sealed to prevent leakage and water loss.
- Noisy Pressure Tank: Listen for unusual noises, such as banging or rattling. This could indicate air pockets within the tank, loose components, or faulty valves. Proper air release and maintenance can mitigate these issues.
- Pressure Tank Leaks: Inspect the pressure tank for leaks, especially at the fittings and connections. If leaks are present, repair or replace the damaged components. Consider professional assistance for complex repairs.
Safety Precautions: How To Install A Pressure Tank On A Well
Ensuring a safe installation of your pressure tank is paramount. Ignoring safety protocols can lead to serious injury or property damage. This section Artikels critical safety measures, from proper handling of materials to the importance of correct water pressure management. Understanding these precautions will not only protect you but also ensure the longevity and efficient operation of your well system.
Essential Safety Gear
A well-equipped toolkit is crucial for a safe installation. This includes safety glasses, gloves, hearing protection, and sturdy work boots. These items safeguard against potential hazards during the installation process. Proper personal protective equipment (PPE) prevents injuries from flying debris, sharp edges, or loud noises.
Water Pressure Safety Measures
Maintaining safe water pressure is critical. Incorrect pressure settings can lead to pipe bursts or system malfunctions. Always adhere to the manufacturer’s specifications for pressure limits and follow local plumbing codes. Incorrect pressure can create dangerous situations. For instance, a pressure exceeding the system’s capacity can lead to a catastrophic failure, damaging property and endangering lives.
Potential Hazards of Improper Installation
Improper pressure tank installation can result in significant risks. Leaks, malfunctions, and dangerous pressure surges are all possible outcomes. These issues can lead to costly repairs, damage to property, and even personal injury. Thorough planning and adherence to installation guidelines minimize these risks. For example, a poorly installed pressure tank may leak water, causing damage to surrounding structures and posing a health risk.
Potential Risks and Safety Measures
| Potential Risk | Safety Measure ||—|—|| Electrical shock | Disconnect power supply before any electrical work. Use insulated tools and ensure proper grounding. || Water damage | Use appropriate shutoff valves to control water flow. Protect electrical components from water ingress. || Material handling injuries | Use appropriate lifting equipment for heavy materials.
Ensure proper stacking and storage to prevent accidents. || Pipe damage | Use appropriate tools and techniques to avoid damaging pipes. Protect pipes from sharp objects. || Pressure surges | Carefully monitor pressure levels during the system testing phase. Ensure all connections are secure and leak-free.
|| Equipment malfunction | Regularly inspect and maintain all equipment to prevent breakdowns. Replace worn parts promptly. |
Safe Handling and Disposal of Materials
Proper handling and disposal of materials are crucial for environmental protection and worker safety. Dispose of hazardous materials (if any) according to local regulations. Recycle materials wherever possible. Always follow instructions for handling materials to prevent accidents and environmental contamination. For instance, ensure proper disposal of any old plumbing materials or hazardous substances, such as chemicals used for cleaning.
Emergency Procedures
Develop a comprehensive emergency plan, including contact information for local emergency services. Be aware of the location of emergency shutoff valves. This ensures rapid response in case of accidents or emergencies. A well-prepared emergency response plan saves time and potentially saves lives in unexpected situations.
Maintenance and Troubleshooting
Ensuring the longevity and reliable operation of your well pressure tank requires proactive maintenance and a keen eye for potential issues. Proper maintenance not only extends the lifespan of your system but also prevents costly repairs and disruptions in water supply. This section provides a comprehensive guide to maintaining your pressure tank, identifying common problems, and performing troubleshooting steps.Proactive maintenance is key to avoiding costly repairs and ensuring your well pressure tank provides consistent water service.
By understanding the signs of potential problems and performing regular maintenance checks, you can significantly extend the operational life of your pressure tank and keep your water system running smoothly.
Pressure Tank Maintenance Schedule
A well-defined maintenance schedule is crucial for maintaining optimal pressure tank performance. Regular checks and servicing can help prevent minor issues from escalating into major problems. This schedule helps maintain the integrity of the system components and prevents costly repairs down the road.
- Monthly Checkup: Visually inspect the tank for any signs of leaks, corrosion, or unusual noises. Listen for any unusual noises, like a hissing sound, which could indicate a leak or a problem with the internal components.
- Quarterly Inspection: Check the pressure switch settings and ensure they are calibrated correctly. This involves carefully verifying the pressure switch settings, ensuring they align with the desired pressure range for optimal water system performance. Verify the accuracy of the pressure relief valve setting and its proper functionality.
- Annual Deep Clean: Thoroughly clean the entire pressure tank system, paying special attention to the pressure switch, valve, and piping. A thorough cleaning helps prevent the buildup of sediment and debris that can hinder the efficiency of the system. This could involve replacing any worn or damaged components.
Identifying Common Pressure Tank Problems
Recognizing the early signs of pressure tank issues is essential for timely intervention and preventing further damage. Prompt identification allows for efficient troubleshooting and cost-effective repairs.
- Low Water Pressure: Low water pressure could indicate a clogged filter, a faulty pressure switch, or a problem with the well pump itself. This is often accompanied by a decrease in the overall water flow.
- High Water Pressure: Excessive water pressure can strain the system and damage components over time. It may also signal a problem with the pressure switch or the well pump.
- No Water Pressure: This could be due to a faulty well pump, a blocked water line, or a malfunctioning pressure switch. Ensure all relevant connections are tight and that there are no obstructions in the water supply line.
- Unusual Noises: Unusual noises like banging, grinding, or hissing sounds could indicate problems with the pressure tank’s internal components, or a leak.
Routine Maintenance Checks
Routine maintenance checks help prevent significant issues. Regular checks are a crucial part of preventative maintenance.
- Visual Inspection: Inspect the pressure tank for any visible signs of damage, corrosion, or leaks. Look for rust, dents, or any abnormalities on the tank’s exterior. Inspect the connections and plumbing for any signs of leakage or damage.
- Pressure Switch Calibration: Verify that the pressure switch settings are correct for the desired water pressure range. This step is crucial for ensuring the system operates effectively and safely.
- Pressure Relief Valve Check: Ensure the pressure relief valve is functioning correctly by checking its operation. Proper functionality prevents dangerous pressure buildup. Ensure it releases pressure as expected.
Troubleshooting Pressure Tank Issues
Troubleshooting pressure tank issues requires a systematic approach. Understanding the common causes of various problems will streamline the resolution process.
| Problem | Possible Causes | Troubleshooting Steps |
|---|---|---|
| Low Water Pressure | Clogged filter, faulty pressure switch, well pump problems | Check filter, calibrate pressure switch, check well pump operation. |
| High Water Pressure | Faulty pressure switch, well pump problems | Calibrate pressure switch, check well pump settings. |
| No Water Pressure | Faulty well pump, blocked water line, malfunctioning pressure switch | Check well pump operation, check water lines for blockages, calibrate pressure switch. |
| Unusual Noises | Internal component issues, leaks | Listen carefully to identify the source, inspect for leaks, contact a professional. |
Signs of a Failing Pressure Tank
Recognizing the signs of a failing pressure tank is critical for timely repairs. Early detection allows for proactive action to prevent major system failures.
- Persistent Leaks: Regular leaks around the tank or connections signal potential internal damage or wear.
- Reduced Water Pressure: A gradual decrease in water pressure, even after maintenance, suggests a problem with the tank’s ability to store or regulate pressure.
- Excessive Noise: Constant or unusual banging, rumbling, or hissing noises indicate internal component issues or leaks.
- Visible Damage: Rust, corrosion, dents, or bulging on the pressure tank suggest structural issues requiring immediate attention.
Illustrative Examples
Unveiling the practical aspects of pressure tank installation, this section delves into real-world scenarios, showcasing the diverse approaches and considerations involved. From straightforward installations to complex configurations, understanding these examples will equip you with the practical knowledge needed to confidently tackle any pressure tank installation project.
Simple Pressure Tank Installation
A basic installation involves a relatively straightforward setup, ideal for smaller residential wells with minimal complexity. The process typically begins with the proper preparation of the installation site, ensuring a stable and level location for the pressure tank. Precise measurements are crucial to guarantee a well-fitted installation.
A well-prepared installation site minimizes potential issues during the installation process.
- Excavation and Preparation: Carefully excavate a trench of appropriate size to accommodate the pressure tank and connecting pipes. Ensure the trench’s alignment with the wellhead and the chosen installation location is accurate. Level the trench floor to guarantee stability. The trench should allow for proper pipe routing and connections.
- Pipe Connection: Connect the pressure tank inlet and outlet pipes to the wellhead, ensuring secure and leak-proof connections. Use appropriate fittings and sealing materials. Thoroughly check all connections for any potential leaks.
- Tank Placement and Support: Carefully place the pressure tank in the trench, ensuring it sits level and is securely supported by the trench walls. If necessary, use suitable supports to ensure the tank’s stability and prevent any movement.
- Electrical Connections: Execute the electrical connections to the pressure switch, submersible pump, and pressure tank, ensuring compliance with all safety regulations. Utilize appropriate wiring methods and connectors to prevent short circuits and other electrical hazards.
- Backfilling and Testing: Carefully backfill the trench, ensuring no obstructions or impediments to the proper functioning of the system. Perform a thorough system test to verify the functionality of the entire installation. Listen for any unusual noises and check for leaks.
Complex Pressure Tank Installation, How to install a pressure tank on a well
Complex installations often arise in situations involving multiple pumps, extensive piping networks, or specialized well configurations. These installations demand a meticulous approach, meticulous attention to detail, and specialized expertise.
Thorough planning and precise execution are critical in complex pressure tank installations.
- Multiple Wellheads: In scenarios with multiple wellheads, the installation must carefully account for the specific requirements of each well. This may involve intricate piping layouts and pressure regulation strategies to ensure proper water flow to different points in the system.
- Specialized Pumps: Installation with high-flow or high-pressure pumps might necessitate specialized support structures or piping configurations. Carefully consider the pump’s specifications and potential limitations.
- Elevated Tanks: Installing a pressure tank at a height requires particular attention to plumbing and support systems. Proper support and anchoring are critical to prevent movement or instability.
- Advanced Control Systems: Advanced control systems may necessitate specialized electrical connections and software configuration to manage different operating parameters. A qualified electrician or technician is highly recommended.
Adapting Installation Methods to Different Well Types
The installation process should be tailored to the specific characteristics of the well. Different well types necessitate distinct installation methods and considerations.
| Well Type | Installation Considerations |
|---|---|
| Dug Well | Careful excavation and trenching are crucial to avoid compromising the well’s stability. The depth and diameter of the trench should align with the pressure tank’s dimensions and the wellhead. |
| Driven Well | The installation should carefully consider the well’s construction and stability. Care must be taken during pipe connections to avoid damaging the well casing. |
| Bored Well | The installation should consider the well’s casing and any specialized requirements from the well’s constructor. Ensuring proper support for the pressure tank and pipes is critical. |
Well Type-Specific Installation Steps
Different well types demand unique installation strategies. This section provides step-by-step guidance for each.
- Dug Wells:
- Excavate the trench, considering the well’s depth and the pressure tank’s size.
- Position the pressure tank securely within the trench.
- Connect the pipes to the wellhead and pressure tank, ensuring leak-proof connections.
- Perform system checks and ensure the system functions correctly.
- Driven Wells:
- Carefully assess the well’s structural integrity before installation.
- Connect the pipes to the wellhead and pressure tank.
- Verify the integrity of the system and connections.
Ending Remarks

In conclusion, installing a pressure tank on a well is a significant undertaking. This comprehensive guide has walked you through the entire process, from planning and selection to installation, testing, and safety precautions. By carefully following these steps and considering the potential challenges, you can successfully install a pressure tank and enjoy reliable well water pressure for years to come.
Remember to prioritize safety throughout the entire process.
Commonly Asked Questions
What are the common problems encountered during pressure tank installation?
Common problems include incorrect sizing of the pressure tank, faulty electrical connections, leaks in the plumbing system, and improper pressure switch settings. Troubleshooting these issues requires careful examination of the system and adherence to the instructions.
How can I determine the appropriate size for my pressure tank?
The appropriate size depends on factors like your water usage, the well’s output, and the desired pressure range. Consult with a professional or refer to the pressure tank manufacturer’s guidelines for accurate sizing calculations.
What safety precautions should I take during the installation process?
Always disconnect the power supply to the well pump before starting any electrical work. Wear appropriate safety gear, such as gloves and eye protection, and be mindful of potential hazards associated with water and electricity. Never work alone.
What are the essential tools needed for the installation?
Essential tools include plumbing tools (pipe wrenches, pipe cutters, Teflon tape), electrical tools (wire strippers, screwdrivers), and measuring tools (tape measure, level). Specific tools may vary depending on the complexity of the installation.
