How to mill with a drill press and cross vise presents a practical approach to precision machining. This method leverages the stability of a drill press and the clamping capabilities of a cross vise, offering a versatile solution for various milling tasks. Understanding the advantages and disadvantages of this approach, compared to other milling methods, is crucial. The historical context of drill presses and cross vises in woodworking and metalworking provides valuable insight into their evolution and suitability for specific applications.
Proper setup and preparation are paramount for successful milling. The selection of appropriate drill press types and clamping techniques directly impacts the accuracy and efficiency of the milling process. Safety precautions are paramount and must be rigorously adhered to throughout the entire operation. The choice of vise type is critical, influencing the suitability of the setup for diverse milling tasks.
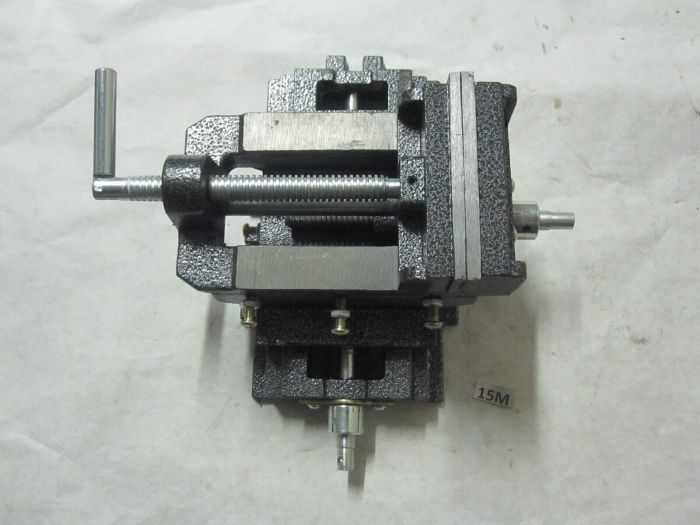
Introduction to Milling with a Drill Press and Cross Vise
Milling, a fundamental machining process, involves shaping materials to precise dimensions. Utilizing a drill press and cross vise presents a viable, albeit less versatile, approach compared to dedicated milling machines. This method excels in smaller-scale projects, offering a cost-effective solution for hobbyists and small workshops. Understanding the process, its limitations, and historical context is crucial for effective application.The process of milling with a drill press and cross vise involves clamping the workpiece securely in the cross vise, which is then mounted on the drill press table.
A milling cutter, often a simple end mill or a specially designed cutter, is attached to the drill press spindle. Precise movements of the drill press table, coupled with the controlled rotation of the cutter, shape the workpiece to the desired specifications. This method’s simplicity often outweighs its inherent limitations in terms of complex shapes or high-volume production.
Advantages of Drill Press and Cross Vise Milling
This method offers accessibility and affordability, particularly for hobbyists and small businesses. Its setup is often straightforward, requiring minimal specialized equipment. The drill press’s inherent stability contributes to consistent results in smaller-scale operations. Further, the cross vise provides a secure clamping mechanism for the workpiece.
Disadvantages of Drill Press and Cross Vise Milling
The primary limitation is its reduced capacity for complex shapes and large-scale operations. Precise and repeatable movements are often more challenging than with dedicated milling machines, especially for intricate contours. Additionally, the power limitations of a typical drill press can limit the depth of cut and material type that can be effectively milled.
History of Drill Press and Cross Vise in Woodworking and Metalworking
The drill press, with its precise rotational and translational movements, has roots in early mechanical engineering. Its evolution from rudimentary hand-powered devices to the sophisticated models of today reflects advancements in industrial machinery. The cross vise, an essential clamping device, evolved alongside the drill press, facilitating secure workholding for a variety of materials. Early applications often involved woodworking, where the drill press’s ability to create holes and the cross vise’s ability to hold the workpiece proved invaluable.
The transition to metalworking highlighted the versatility of these tools.
Comparison of Drill Press Types for Milling
| Drill Press Type | Suitable for Milling | Advantages | Disadvantages |
|---|---|---|---|
| Benchtop Drill Press | Ideal for small parts and hobby projects | Affordable, compact, easy setup | Limited table size and power |
| Heavy-duty Floor-standing Drill Press | Suitable for medium-sized projects and metal | Increased table size, greater power | Larger footprint, higher cost |
| Variable Speed Drill Press | Provides greater control over cutting speed and depth of cut | Adaptability to diverse materials and tasks | Potentially higher price point |
This table provides a succinct overview of different drill press types. Choosing the appropriate drill press depends heavily on the anticipated workload, budget, and project requirements. For example, a hobbyist might prioritize a benchtop model, while a small workshop might opt for a heavier-duty floor-standing model.
Setup and Preparation
Preparing your drill press and cross vise for milling tasks is paramount to achieving precise and safe results. Careful setup and proper clamping techniques ensure the workpiece remains stable and the cutting tools function effectively. A thorough understanding of safety precautions is equally critical to preventing accidents and injuries.Proper setup and preparation are foundational to successful milling. By diligently following the steps Artikeld here, you’ll establish a robust and reliable work environment that maximizes your milling efficiency and minimizes potential hazards.
Crucial Steps in Preparing the Drill Press
Careful preparation of the drill press is essential for consistent and safe milling operations. This includes ensuring the press’s stability, verifying the appropriate spindle speed, and confirming the correct mounting of the milling cutter. A well-prepared drill press contributes to a smooth and efficient milling process.
- Verify the drill press’s stability by checking the base for any wobble or instability. Ensure the press is firmly secured to the workbench or floor to avoid movement during the milling process.
- Select the appropriate spindle speed for the milling cutter. Consult the manufacturer’s specifications for the recommended speed to prevent damage to the cutter or the drill press itself. A suitable speed is crucial for efficient material removal and minimal tool wear.
- Thoroughly inspect the milling cutter for any damage or signs of wear. Replace damaged cutters to maintain precision and prevent unexpected failures during milling operations.
Proper Clamping Techniques for the Workpiece
Secure clamping of the workpiece is vital for accurate milling. Improper clamping can lead to workpiece movement, resulting in inaccurate cuts and potential accidents. Employing the right clamping techniques ensures the workpiece remains firmly in place during the milling process.
- Use appropriate clamps and clamping strategies based on the workpiece’s size, shape, and material. Consider the workpiece’s material characteristics to choose the best clamping methods.
- Ensure that clamps are positioned strategically to distribute clamping pressure evenly across the workpiece, preventing warping or deformation. Even clamping pressure ensures accurate cuts and prevents unintended stress on the workpiece.
- Double-check the workpiece’s securement to prevent slippage or movement during the milling process. This precaution minimizes the risk of accidents and inaccuracies.
Essential Safety Precautions
Adherence to safety precautions is paramount when operating a drill press and cross vise. Understanding and implementing these precautions can prevent accidents and injuries. Prioritizing safety is crucial for a productive and accident-free milling session.
- Always wear appropriate personal protective equipment (PPE), including safety glasses, gloves, and ear protection. PPE protects against flying debris, sharp edges, and loud noises generated by the milling process.
- Ensure the work area is clean and organized, clearing away any potential obstructions or hazards. A clutter-free workspace reduces the risk of accidents.
- Familiarize yourself with the emergency stop procedures and location of safety features on the drill press and cross vise before starting any milling operations. Knowledge of emergency procedures is critical in case of unexpected events.
Mounting the Workpiece Securely in the Cross Vise
Proper mounting of the workpiece in the cross vise is crucial for precise milling. This involves aligning the workpiece accurately and ensuring a firm grip to prevent movement. A properly mounted workpiece ensures consistent cuts and prevents accidents.
- Carefully position the workpiece within the cross vise jaws, aligning it precisely with the desired cutting path. Accurate alignment ensures precise cuts and prevents inaccuracies.
- Tighten the vise’s clamping mechanism securely to maintain a firm grip on the workpiece without damaging the material. Secure clamping prevents workpiece movement during milling.
- Verify the workpiece’s stability and securement before initiating the milling process. This precaution minimizes the risk of accidents and ensures accurate results.
Different Types of Vises and Their Suitability
Choosing the right vise depends on the milling task and the workpiece characteristics. Different vise types offer varying clamping capacities and capabilities. Selecting the appropriate vise ensures a secure and efficient milling process.
| Vise Type | Suitability |
|---|---|
| Drill Chuck | Suitable for smaller workpieces and round materials; ideal for drilling and smaller milling tasks. |
| Clamping Vises | Versatile, capable of clamping a wide range of workpieces, particularly those with irregular shapes. Suitable for a variety of milling jobs. |
| Cross Vises | Designed for milling tasks requiring precise alignment and stability. Well-suited for larger or complex workpieces requiring rigid support during milling operations. |
Milling Techniques
Mastering milling techniques is crucial for achieving precise and efficient results using a drill press and cross vise setup. Understanding the interplay of cutting speeds, feeds, and cutter types allows for optimal material removal and part quality. This section delves into various milling methods and their practical applications.
Cutting Speeds and Feeds
The choice of cutting speed and feed directly impacts the efficiency and quality of the milling process. Optimizing these parameters for specific materials is paramount to avoid excessive tool wear, chatter, and poor surface finish. Different materials react differently to varying speeds and feeds.
High cutting speeds generally lead to faster material removal, but excessive speeds can cause tool failure or undesirable vibrations. Conversely, lower speeds may prolong tool life, but slow down the overall milling process.
Feed rates, the rate at which the cutter travels across the workpiece, also play a critical role. Higher feeds can increase material removal, but excessive feeds may lead to poor surface finish or tool breakage.
Experimentation is key to finding the optimal cutting speed and feed for a particular material and cutter combination. Referencing material specifications and tool manufacturer recommendations is crucial for ensuring safe and effective milling operations.
Milling Cutters and Applications
A diverse range of milling cutters cater to different milling needs. The selection of the appropriate cutter is essential for achieving the desired results.
- End Mills: These cutters are widely used for various milling operations, including slotting, contouring, and creating slots and pockets. Their shape allows for effective material removal in a variety of directions. End mills come in various diameters and shapes, enabling them to be used for a wide range of applications. For example, a small-diameter end mill is suitable for intricate details, while a larger one can handle broader surfaces.
- Face Mills: These cutters are ideal for machining flat surfaces or large areas. They provide a high material removal rate, which makes them suitable for large-scale milling operations.
- Shell End Mills: These cutters are useful for creating complex shapes and intricate features. Their design allows for effective material removal in a controlled manner, particularly when working with tight radii or contours.
- Ball Nose End Mills: These cutters are designed for contouring and creating rounded edges. Their rounded tip ensures a smooth transition between different surfaces, making them suitable for creating curved or free-form shapes. They are often employed in the creation of sculpted or organic forms.
Milling Cuts and Cutter Types
The following table demonstrates common milling cuts and their corresponding cutter types:
| Milling Cut | Cutter Type | Description |
|---|---|---|
| Slot Milling | End Mill | Creating a groove or slot in the material. |
| Contour Milling | End Mill/Ball Nose End Mill | Following a specific shape or contour. |
| Pocket Milling | End Mill/Face Mill | Creating a recessed area or pocket. |
| Face Milling | Face Mill | Creating a flat surface. |
Jigs and Fixtures for Complex Operations
For more complex milling operations, the use of jigs and fixtures is essential. These tools provide accurate and repeatable positioning of the workpiece relative to the milling cutter. This is particularly critical for maintaining precision in multi-step processes or when working with intricate shapes.
Jigs and fixtures typically consist of precision-machined components designed to hold the workpiece securely in a specific orientation. These components often incorporate clamping mechanisms to ensure that the workpiece does not shift during the milling process.
Employing jigs and fixtures can drastically improve the accuracy and efficiency of milling operations, especially for more complicated shapes or multiple passes. This reduces errors and ensures consistent results, especially in high-volume manufacturing settings.
Tooling and Materials
Proper tooling and selection of materials are crucial for successful milling operations. Choosing the right tools and materials ensures precision, efficiency, and safety during the milling process. This section will detail the essential tools, diverse milling cutters, recommended materials, and the importance of maintaining sharp cutters for optimal results.
Essential Milling Tools
The success of any milling operation relies on having the right tools. Beyond the drill press and cross vise, essential tools include various types of milling cutters, a tool holder for secure attachment, and a measuring tool for precise work. A reliable set of calipers or micrometers, along with a ruler, is necessary for accurate measurements and adjustments during the process.
The selection of these tools directly impacts the accuracy and speed of the milling operation.
Milling Cutters
A wide array of milling cutters caters to different materials and applications. The choice of cutter directly impacts the quality and efficiency of the milling process. Solid carbide cutters are generally preferred for their hardness and durability, while high-speed steel (HSS) cutters are more affordable and suitable for softer materials. For specific materials, specialized cutters with specific geometries are required.
These specialized cutters can be made of various materials like carbide or diamond. Examples include end mills, face mills, and slot cutters, each designed for different tasks.
Recommended Materials for Milling
Various materials can be effectively milled using a drill press and cross vise. Hardwoods, softwoods, plastics, and some metals are common candidates. The material’s hardness, grain structure, and density influence the milling process and required cutting parameters. Consider the material’s composition and structural characteristics before starting any milling operation.
- Wood: Hardwoods like maple and oak require more aggressive cuts than softwoods like pine or fir. The grain direction of the wood should be considered to minimize tear-out and ensure a smooth finish.
- Plastics: Certain plastics can be milled, but the milling process must be carefully controlled to avoid melting or warping. The selection of cutters and cutting speeds is essential for maintaining the integrity of the material.
- Metals: Aluminum and other soft metals can be milled, but the appropriate cutters and cutting speeds are essential to prevent overheating or material deformation. Tool steel and other harder metals require specialized tooling and a more precise approach.
Maintaining Sharp Milling Cutters
Maintaining the sharpness of milling cutters is paramount for efficient and precise milling. Sharp cutters minimize material deformation, reduce the risk of tool breakage, and result in cleaner cuts. Proper sharpening techniques and regular inspection of cutter edges are essential to ensure optimal performance. Regularly checking and maintaining the sharpness of milling cutters is vital for the long-term effectiveness of the tools.
Recommended Cutting Parameters
Optimal cutting parameters depend on the material being milled.
| Material | Cutting Speed (RPM) | Feed Rate (mm/rev) | Depth of Cut (mm) |
|---|---|---|---|
| Hardwood | 1000-1500 | 0.1-0.2 | 1-2 |
| Softwood | 1500-2000 | 0.2-0.3 | 2-3 |
| Aluminum | 2000-3000 | 0.05-0.1 | 0.5-1 |
| Plastic (ABS) | 500-1000 | 0.05-0.1 | 0.5-1 |
The table above provides a general guideline for cutting parameters. Adjustments based on the specific material, cutter type, and desired outcome are necessary. Always prioritize safety and refer to the manufacturer’s recommendations for detailed instructions.
Troubleshooting and Maintenance
Milling operations, even with precision tools like a drill press and cross vise, can encounter problems. Effective troubleshooting and proactive maintenance are crucial to ensuring consistent quality and preventing costly downtime. Addressing issues promptly and understanding the reasons behind them is key to maximizing the lifespan of your equipment and achieving optimal results.
Common Milling Problems and Solutions, How to mill with a drill press and cross vise
Identifying and resolving milling problems directly impacts the quality and efficiency of the work. Recognizing potential issues early on allows for timely intervention, preventing further damage and costly repairs.
- Vibrations: Excessive vibrations during milling can result in inconsistent cuts and damaged workpiece. Causes include loose components, misaligned tooling, or imbalances in the machine itself. Thorough checks for tightness of all parts, proper vise alignment, and even the weight distribution of the workpiece are essential. Proper clamping techniques for the workpiece also help prevent vibrations.
For example, using multiple clamping points or soft clamping materials can reduce vibration.
- Tool Breakage: Tool breakage is a common issue in milling. This can be due to improper tool selection, incorrect cutting speeds and feeds, dull or damaged tools, or material hardness exceeding the tool’s capacity. Using the correct tool for the material, adhering to recommended speeds and feeds, and regularly checking the tool’s condition for sharpness and damage is vital to mitigate this issue.
For instance, using a carbide tool for machining hardened steel is more suitable than a high-speed steel tool.
- Inconsistent Cuts: Inconsistencies in the milling process often indicate issues with the cutting tool, machine setup, or material. This includes inaccuracies in the workpiece alignment, improper cutting parameters, or even the material’s hardness or grain structure. Ensuring the correct tooling, precise clamping, and adherence to the manufacturer’s recommended cutting parameters is crucial.
Importance of Regular Maintenance
Proactive maintenance significantly reduces the likelihood of unexpected breakdowns and improves the longevity of your milling setup. Consistent care ensures optimal performance, reduces the risk of costly repairs, and maximizes the return on investment for your equipment.
- Cleaning: Regular cleaning of the drill press and cross vise, especially removing chips and debris, is essential. Accumulated debris can lead to friction, overheating, and decreased accuracy. Regularly cleaning the machine and removing any excess material prevents premature wear and tear and reduces the risk of potential issues.
- Lubrication: Proper lubrication of moving parts is vital for reducing friction and wear, preventing corrosion, and prolonging the life of the drill press and cross vise. Lubrication reduces the chances of equipment damage due to excessive friction, preventing premature breakdown. Proper application of lubricants to moving parts ensures smooth operation and prevents overheating.
- Alignment Checks: Regular alignment checks are crucial for maintaining the precision of the machine. Misalignment can lead to vibrations and inaccuracies in the milling process. Alignment checks help ensure the consistent performance of the equipment and the quality of the milling process.
Troubleshooting Guide
A structured approach to troubleshooting can save time and resources. The following table provides a quick reference for common issues.
| Issue | Possible Causes | Solutions |
|---|---|---|
| Vibrations | Loose components, misaligned vise, unbalanced workpiece | Tighten loose components, realign vise, rebalance workpiece |
| Tool Breakage | Improper tool selection, incorrect cutting speeds/feeds, dull or damaged tool, material hardness | Use appropriate tool, adjust speeds/feeds, sharpen or replace tool, use suitable material |
| Inconsistent Cuts | Misaligned workpiece, improper cutting parameters, material inconsistencies | Realign workpiece, adjust speeds/feeds, consider material properties |
Safety Considerations
Safe operation is paramount when working with a drill press and cross vise. Proper safety procedures minimize the risk of injury and equipment damage. This section Artikels critical safety measures to follow during milling operations.Careful adherence to safety protocols is not just a matter of compliance; it’s a fundamental element of responsible and efficient work. A proactive approach to safety reduces the likelihood of accidents and promotes a healthy and productive work environment.
Essential Safety Equipment
Safe milling requires appropriate personal protective equipment (PPE). This equipment safeguards against various hazards, including flying debris and potential injuries.
- Safety glasses or goggles are crucial for protecting the eyes from chips, metal fragments, and other debris that may be expelled during milling operations. Impact-resistant safety glasses or goggles with side shields are highly recommended for maximum protection.
- Hearing protection, such as earplugs or earmuffs, is essential to safeguard against the potentially harmful noise generated by the drill press and other milling tools. Noise-induced hearing loss is a significant concern in such environments.
- Gloves provide protection to the hands from potential cuts, abrasions, or contact with sharp tools or materials.
- Long sleeves and pants help to prevent cuts and scrapes on the skin. Closed-toe shoes are equally vital to protect the feet from falling objects or debris.
Ventilation and Workspace Organization
Maintaining proper ventilation and a well-organized workspace significantly contributes to a safe milling environment. Poor ventilation can lead to the buildup of harmful dust and fumes, posing health risks to the operator.
- Adequate ventilation systems are essential for removing dust and debris generated during milling. Local exhaust ventilation (LEV) systems are particularly effective in removing hazardous dust and fumes directly at the source. Consider using a dust collection system.
- A clean and organized workspace minimizes tripping hazards and allows for easy access to tools and materials. Ensure proper storage of tools and materials to avoid clutter.
- Clear pathways and unobstructed areas around the drill press and cross vise are critical to prevent accidents caused by collisions or slips.
Accident Handling Procedures
A proactive approach to handling potential accidents during milling is crucial. Prompt and appropriate action can minimize the severity of injuries and prevent further complications.
- Know the location of first aid supplies and emergency exits.
- If an accident occurs, immediately stop the milling machine and isolate the area.
- Assess the situation and render immediate first aid if necessary. Be aware of the limitations of your first aid training. Seek professional medical help promptly if necessary.
- Report all accidents to the appropriate authorities.
Safety Guidelines for Drill Press and Cross Vise
Adherence to safety guidelines for the drill press and cross vise ensures a safe and controlled milling process.
- Drill Press Operation: Ensure the drill press is properly secured to the floor and all safety guards are in place. Never operate the drill press with damaged or missing guards. Always use the correct size and type of drill bit for the material being worked.
- Cross Vise Operation: Ensure the cross vise is firmly clamped and securely positioned on the drill press table. Use appropriate clamping mechanisms to hold work pieces securely during milling operations. Avoid over-tightening clamps that may cause damage or injury.
- Material Handling: Carefully handle materials to prevent dropping or slipping. Use appropriate lifting techniques and equipment when handling heavy materials. Use clamps or other holding devices to secure workpieces during milling.
- Personal Protective Measures: Strictly adhere to the recommended personal protective equipment guidelines.
Examples and Case Studies
Milling with a drill press and cross vise, though seemingly a compact setup, offers a surprising array of applications. This method excels in situations demanding precision and controlled material removal, particularly for smaller projects or intricate shapes. Understanding its capabilities opens doors to a wide range of creative and practical endeavors.
Practical Applications
This method is ideally suited for tasks requiring controlled material removal in a relatively small workspace. Its precision and repeatability make it a valuable tool for prototyping, small-batch production, and repair work. Furthermore, its adaptability to various materials and shapes allows for diverse project possibilities.
Project Examples
A variety of projects can leverage this method effectively. From creating intricate decorative elements to crafting specialized tools, the applications are diverse.
- Prototyping: The ability to quickly and precisely create small prototypes of intricate designs is a key advantage. For instance, a mechanical engineer could rapidly produce a prototype of a complex gear or component, enabling quick assessment and modification before committing to larger-scale production. This is especially valuable in situations where rapid iteration is essential.
- Jewelry Design: The intricate detail work achievable with this setup makes it an excellent choice for crafting intricate jewelry components, like finely detailed clasps, pendants, or decorative elements. The controlled cuts allow for precise shaping and consistent results.
- Model Making: Creating detailed architectural models or miniature figurines benefits greatly from the precision and control offered by this milling method. The ability to create small, intricate features is crucial in these applications.
Shape and Size Capabilities
The drill press and cross vise system is surprisingly versatile in terms of the shapes and sizes that can be milled. The precision of the drill press and the clamping capabilities of the cross vise allow for the creation of various geometric forms, from simple rectangles and squares to more complex, free-form shapes. The limitations are primarily determined by the size of the vise and the material being worked with.
Table of Project Examples and Steps
The table below provides a concise overview of various project examples and their corresponding milling steps.
| Project Example | Milling Steps |
|---|---|
| Creating a decorative wooden box with intricate inlay | 1. Mark and cut the main box pieces. 2. Prepare the inlay materials. 3. Precisely mill the inlay recesses. 4. Glue and secure the inlay pieces. 5. Finish the box with a protective coat. |
| Producing a custom-fit tool holder | 1. Measure and mark the tool holder’s dimensions. 2. Cut the material to size. 3. Mill the precise slots and recesses for the tools. 4. Drill pilot holes for screws or fasteners. 5. Assemble and test the tool holder. |
| Crafting a small, decorative metal sculpture | 1. Secure the metal workpiece in the cross vise. 2. Mark the desired design. 3. Carefully mill the Artikels of the sculpture. 4. Create details by milling small cuts and recesses. 5. Finish the sculpture with appropriate polishing and protective coating. |
Advanced Techniques: How To Mill With A Drill Press And Cross Vise
Pushing beyond basic milling operations, advanced techniques unlock the potential of a drill press and cross vise for intricate and precise work. These methods, while demanding more skill and practice, allow for the creation of complex parts and intricate geometries, pushing the boundaries of what’s achievable with these tools. Mastery of these techniques often involves a deeper understanding of material properties and tool geometry.Advanced milling goes beyond straightforward cuts, demanding a nuanced approach to achieving exceptional precision and surface finish.
Strategies for intricate cuts, complex geometries, and high-quality finishes are crucial in this realm. Understanding the interplay between tool selection, feed rate, and cutting parameters is vital for success.
Intricate and Precise Cuts
Achieving precise cuts on a drill press and cross vise necessitates meticulous setup and control. Using a high-quality, sharp tool bit is paramount. A keen eye for alignment and consistent feed rates is equally crucial. Micro-adjustments and fine-tuning are necessary for achieving the desired accuracy.
High-Quality Finishes
Several strategies contribute to attaining a superior surface finish. Proper tool selection and sharpening techniques play a significant role. Consistent feed rates and minimal vibration are key elements. The choice of cutting fluid or lubricant can significantly impact the final surface finish. Careful attention to the milling parameters, including cutting speed, feed rate, and depth of cut, contributes to a smoother, more polished surface.
Handling Complex Geometries and Contours
Complex shapes and contours require a combination of precision and planning. The use of templates or jigs can greatly enhance the accuracy of the milling process. Proper understanding of the part’s geometry is critical for successful milling. Strategic use of multiple passes and different cutting angles can effectively shape complex features. Utilizing CAD software for design and generating toolpaths is an invaluable asset in achieving intricate shapes.
Recommended Resources for Further Learning
- Machine Shop Handbooks: These comprehensive guides offer in-depth explanations of various milling techniques, including advanced strategies for achieving precise cuts, high-quality finishes, and intricate geometries. They often include detailed illustrations and diagrams to aid understanding. Numerous machine shop handbooks are available online and in print, providing practical insights into the nuances of milling.
- Online Forums and Communities: Engaging with online communities dedicated to metalworking and machining provides access to a wealth of practical knowledge and experience. Members often share tips, tricks, and troubleshooting strategies for various milling operations. These communities allow for direct interaction with experts and experienced enthusiasts, fostering a supportive learning environment.
- Workshops and Seminars: Hands-on workshops and seminars offered by vocational schools, technical colleges, and professional organizations provide valuable opportunities for practical learning. Workshops often feature expert instructors who demonstrate advanced milling techniques and offer guidance in real-world applications.
Outcome Summary
In conclusion, milling with a drill press and cross vise offers a viable approach to various milling applications. Understanding the setup, techniques, tooling, and safety considerations is essential for achieving optimal results. The versatility of this method, coupled with the potential for precision and control, makes it a valuable asset for a wide range of projects. This comprehensive guide provides a robust foundation for mastering this machining technique.
FAQ Summary
What are the common material types suitable for milling with a drill press and cross vise?
Common materials include wood, plastics, aluminum, and mild steel. The selection depends on the specific milling application and the capabilities of the drill press and cross vise.
What are some typical safety precautions for milling operations?
Essential safety precautions include wearing appropriate personal protective equipment (PPE), ensuring proper ventilation, and maintaining a clean and organized workspace. Regularly inspecting tools for damage and adhering to safety guidelines is critical.
How does the cutting speed and feed affect the milling process?
Choosing appropriate cutting speeds and feeds is critical for achieving optimal results and preventing tool damage. These parameters depend on the material being milled and the desired finish.
What are some common troubleshooting issues when milling with a drill press and cross vise?
Common issues include vibrations, tool breakage, and inaccurate cuts. Proper setup, clamping, and tool maintenance can mitigate these issues. Understanding the cause of the problem is critical for successful resolution.
