How to read AC gauges R134a is crucial for any HVAC technician. Understanding these gauges is essential for diagnosing and fixing AC system problems, from simple leaks to complex malfunctions. This guide dives deep into the world of AC gauge readings, providing a clear and concise approach to mastering this vital skill.
This comprehensive guide will take you through the basics of AC gauge setups, explaining the different types of gauges and their functions. We’ll explore the specific pressure ranges for R134a in various system conditions, and how to interpret pressure readings accurately. The guide also covers common AC system issues and their corresponding gauge readings, enabling you to troubleshoot problems effectively.
Introduction to AC Gauges and R134a Refrigerant

Air conditioning (AC) systems rely on precise measurements and the correct refrigerant to function optimally. Understanding how AC gauges work and the characteristics of the refrigerant, like R134a, is crucial for proper maintenance and efficient operation. Incorrect readings or improper refrigerant handling can lead to system failure and costly repairs. This section delves into the fundamentals of AC gauges and R134a, emphasizing the importance of accurate measurements for effective AC system diagnosis.
Function of AC Gauges
AC gauges are essential tools for monitoring the pressure and flow of refrigerant within an AC system. These gauges provide critical information about the system’s operating conditions, enabling technicians to identify potential issues and make informed decisions for repair or maintenance. Different gauges measure different aspects of the system’s state. A manifold gauge set, for instance, typically includes two gauges, one for high-side pressure and another for low-side pressure, crucial for diagnosing leaks, refrigerant charge levels, and other issues.
Proper gauge readings are a key indicator of a system’s health.
Properties and Characteristics of R134a Refrigerant
R134a is a commonly used refrigerant in modern AC systems. It possesses specific properties that influence its performance and safety in the system. R134a is a colorless, odorless, and non-toxic gas at normal temperatures and pressures. Its low global warming potential (GWP) compared to some older refrigerants makes it a more environmentally friendly choice. Understanding R134a’s thermodynamic properties, including its boiling and condensing points at different pressures, is vital for accurate system diagnosis.
Importance of Understanding R134a for Proper AC System Maintenance
Correctly identifying and addressing refrigerant issues is critical for maintaining an AC system’s efficiency and longevity. R134a, due to its specific properties, requires particular handling and maintenance. For instance, leaks in the system can lead to a drop in the refrigerant charge, impacting the cooling capacity and efficiency of the AC system. Understanding the properties of R134a allows technicians to determine the proper amount of refrigerant needed to maintain the desired cooling capacity.
Significance of Proper Gauge Readings for AC System Diagnosis
Accurate gauge readings are paramount for diagnosing and resolving AC system problems. By observing the pressure readings on the high and low sides of the AC system, technicians can quickly identify problems like leaks, improper refrigerant charge, or issues with the compressor or condenser. For example, a consistently low high-side pressure could indicate a leak, while a high low-side pressure might suggest a blockage.
Precise readings provide the foundation for accurate troubleshooting and efficient repairs.
Comparison of R134a to Other Refrigerants
| Property | R134a | R22 (Older Refrigerant) | Ammonia (NH3) |
|---|---|---|---|
| Global Warming Potential (GWP) | 1,430 | 1,810 | 0 |
| Toxicity | Non-toxic | Non-toxic | Toxic |
| Ozone Depletion Potential (ODP) | 0 | 0.05 | 0 |
| Flammability | Non-flammable | Non-flammable | Flammable |
This table provides a concise comparison of R134a to other refrigerants, highlighting differences in environmental impact, safety, and other characteristics. Understanding these distinctions is crucial for making informed decisions about refrigerant selection and maintenance procedures.
Understanding the AC Gauge Setups
Knowing how to interpret AC gauge readings is crucial for accurate and efficient air conditioning system maintenance and repair. Proper gauge use helps diagnose issues quickly, minimizing downtime and repair costs. This section details different types of gauges, their functions, typical pressure ranges, and how to connect them to your system.
Types of AC Gauges
Various types of gauges are used for AC systems, each with specific advantages. Manifold gauges are commonly used for their dual-port design, allowing simultaneous measurement of high and low-side pressures. Digital gauges offer precise measurements and often include features like data logging, making them valuable for technicians.
Functions of AC Gauges in a Setup
In a typical AC gauge setup, two gauges are essential: a high-pressure gauge and a low-pressure gauge. The high-pressure gauge measures the pressure in the system’s high-pressure side, which is typically associated with the compressor. The low-pressure gauge measures the pressure on the low-side of the system, often connected to the evaporator. These readings are vital for understanding the overall pressure balance and refrigerant flow within the system.
Typical Pressure Ranges for R134a
The pressure ranges for R134a in different system conditions vary significantly. In a properly functioning system, the low-side pressure will typically fall between 20-50 PSI (pounds per square inch) and the high-side pressure will generally be between 150-300 PSI, though these values can change based on the ambient temperature and system load. A significant deviation from these ranges can indicate a problem.
For example, excessively high pressure could signify a blockage or a compressor issue. Conversely, low pressure may indicate a leak or insufficient refrigerant.
Comparison of Gauge Readings
Comparing readings on different types of gauges, such as analog and digital, is important. Analog gauges often offer a visual representation of pressure fluctuations, which can help in quickly identifying trends. Digital gauges, on the other hand, provide precise numerical values, allowing for more detailed analysis. While both types are useful, the choice depends on the specific needs of the technician and the complexity of the task.
Connecting AC Gauges to a System
Connecting AC gauges to a system involves several crucial steps. First, ensure the system is properly shut off and isolated. Then, the gauges are connected to the appropriate ports on the manifold, ensuring the correct high-side and low-side connections. Finally, the gauges should be calibrated to zero before taking any readings. This process is crucial for accurate measurements.
Gauge Readings in Various System States
The following table provides examples of gauge readings in different system states, including low pressure and high pressure.
| System State | Low-Side Pressure (PSI) | High-Side Pressure (PSI) |
|---|---|---|
| Low Pressure | Below 20 PSI | Below 150 PSI |
| Normal | 20-50 PSI | 150-300 PSI |
| High Pressure | Above 50 PSI | Above 300 PSI |
Reading the Gauges: How To Read Ac Gauges R134a
Mastering AC gauge readings is crucial for diagnosing and troubleshooting air conditioning systems. Accurate pressure measurements are vital for proper refrigerant charging, leak detection, and overall system performance. Understanding the nuances of high-side and low-side pressures, coupled with vacuum gauge readings, empowers technicians to address issues effectively and efficiently.
Interpreting Pressure Readings
Accurate pressure readings are essential for effective AC system maintenance. Pressure gauges, typically dual-port units, display pressure in pounds per square inch (psi). The high-side gauge measures pressure in the condenser, while the low-side gauge measures pressure in the evaporator. These pressures fluctuate based on system operating conditions.
Determining Accurate Pressure Values
Precise pressure readings are obtained by ensuring the gauge is correctly connected to the AC system ports. Verify the gauge’s accuracy by comparing it to a known standard pressure. Any discrepancy requires recalibration. A properly functioning gauge, in conjunction with a standardized procedure, provides reliable data.
Differentiating High-Side and Low-Side Pressures
Identifying high-side and low-side pressures is fundamental to diagnosing AC issues. The high-side pressure, typically higher, reflects the condenser’s operation. The low-side pressure, lower, indicates the evaporator’s performance. Misinterpreting these readings can lead to improper repairs and potentially further damage. Knowing the typical pressure ranges for various operating conditions aids in this differentiation.
Using a Vacuum Gauge with AC Gauges
A vacuum gauge, often used in conjunction with AC gauges, measures the level of vacuum in the AC system. A vacuum test helps detect leaks, assess the condition of the system’s seals, and ensures proper refrigerant evacuation. This step is vital before adding refrigerant to the system.
Typical Gauge Readings for Various Conditions
| Operating Condition | High-Side Pressure (psi) | Low-Side Pressure (psi) | Vacuum Gauge Reading (inHg) |
|---|---|---|---|
| Charging (R134a) | 75-100 | 20-40 | 28-30 |
| Leak Detection | Significantly lower than normal | Significantly lower than normal | Low or no vacuum |
| System Overcharge | Excessively high | Excessively high | N/A |
| System Undercharge | Excessively low | Excessively low | N/A |
| System Malfunction (e.g., compressor failure) | Unusually high or low | Unusually high or low | N/A |
The table above provides a general guideline. Actual readings can vary based on ambient temperature, system type, and other factors. Always consult the specific specifications for the vehicle or equipment being serviced.
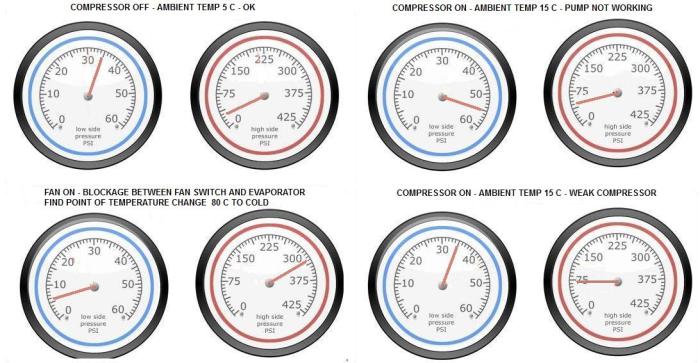
Common AC System Issues and Gauge Readings
Troubleshooting air conditioning (AC) systems often involves understanding the readings on your AC gauges. Knowing how to interpret these readings can help you pinpoint the source of a problem, whether it’s a simple refrigerant leak or a more complex issue. This section delves into common AC system problems and their associated gauge reading patterns, enabling you to effectively diagnose and address AC malfunctions.Understanding the relationship between gauge readings and the underlying issues within your AC system is crucial for effective troubleshooting.
By correlating the pressure and temperature readings on the gauges with potential system problems, you can quickly identify the root cause and implement the necessary repairs.
Refrigerant Leaks
Refrigerant leaks are a frequent cause of AC system failures. Leaks lead to a reduction in the refrigerant charge, impacting the system’s ability to cool effectively. Gauge readings are vital in detecting these leaks. A significant drop in the system’s pressure, often accompanied by a decrease in the refrigerant level, suggests a leak. The readings on the low-side gauge will be significantly lower than expected, while the high-side gauge may show a low pressure as well.
This discrepancy indicates a loss of refrigerant. Diagnosing a leak involves meticulously checking all connections and components for signs of damage or leaks.
Undercharged AC System
An undercharged AC system is another common problem. An insufficient refrigerant charge results in the system not functioning optimally. The low-side gauge pressure will be significantly lower than the expected range for the given temperature, indicating a shortfall in the refrigerant charge. This undercharging will result in reduced cooling capacity and potentially lead to other issues.
Overcharged AC System
Conversely, an overcharged AC system is also problematic. An excessive refrigerant charge can create pressure buildup in the system, hindering proper functionality. High-side gauge pressure will consistently be higher than the normal range for the given temperature. This overcharging can cause the compressor to overheat and potentially fail.
Importance of Proper Refrigerant Charge Levels
Maintaining the correct refrigerant charge is paramount for optimal AC performance. A well-balanced charge ensures efficient heat transfer, maximizing cooling capacity. Inadequate or excessive refrigerant levels compromise the system’s effectiveness, resulting in reduced cooling, increased energy consumption, and potential damage to components. Understanding and maintaining the correct charge levels is essential for the long-term health and efficiency of your AC system.
Examples of Common AC System Problems and Corresponding Gauge Readings
| AC System Problem | Low-Side Gauge Reading | High-Side Gauge Reading | Explanation |
|---|---|---|---|
| Refrigerant Leak | Substantially lower than expected | Potentially low, or may show pressure fluctuation | The lower pressure indicates a loss of refrigerant due to a leak. |
| Undercharged System | Significantly lower than expected range | Lower than expected | Insufficient refrigerant charge, reducing cooling capacity. |
| Overcharged System | Within expected range, but high-side pressure is unusually high | Significantly higher than expected range | Excessive refrigerant charge, potentially causing compressor overheating. |
| Blocked Condenser | Low | High | Reduced airflow leads to higher pressure on the high-side, and lower pressure on the low-side. |
Troubleshooting AC Systems Based on Gauge Readings
Mastering AC system troubleshooting hinges on understanding gauge readings. Accurate interpretation of pressure differentials and refrigerant flow provides valuable insights into potential issues, allowing for efficient and effective repairs. This crucial skill can save time and money by pinpointing the root cause of problems, preventing unnecessary replacements, and ensuring optimal AC performance.Troubleshooting AC systems requires a systematic approach, starting with a thorough understanding of the gauge readings.
By analyzing the pressure readings on the manifold gauges, technicians can quickly identify various problems, such as leaks, refrigerant depletion, or compressor malfunctions. This knowledge empowers them to perform targeted repairs, minimizing downtime and maximizing system efficiency.
Identifying Low-Pressure/High-Pressure Issues
Low-pressure/high-pressure issues are common in AC systems. Low-pressure conditions often indicate insufficient refrigerant, a leak, or a malfunctioning compressor. High-pressure conditions, on the other hand, suggest refrigerant overcharge, blocked condenser coils, or a compressor malfunction. Proper gauge readings help differentiate between these scenarios.
Troubleshooting Scenarios and Solutions
A systematic approach to troubleshooting involves carefully examining the gauge readings. The following examples highlight common scenarios and their corresponding solutions.
- Low-pressure/high-pressure readings: This often indicates a leak. A thorough visual inspection of the system, including the lines and components, is essential to locate the leak. Once the leak is identified, repair it using appropriate tools and techniques. After the repair, recharge the system with the correct amount of refrigerant, ensuring proper gauge readings.
- High-pressure/high-pressure readings: This suggests an overcharge of refrigerant. To address this, carefully evacuate the excess refrigerant to achieve optimal pressure readings. Also, inspect the condenser coils for any obstructions or blockages. Cleaning the coils will improve heat dissipation and pressure levels.
- Low-pressure/low-pressure readings: This situation could indicate insufficient refrigerant, a leak, or a compressor malfunction. A refrigerant leak should be identified and repaired immediately. If a leak is not present, check the compressor’s functionality and refrigerant charge level.
Safety Precautions
Safety precautions are paramount during AC system maintenance. Working with refrigerants requires adherence to strict safety protocols. Always wear appropriate personal protective equipment (PPE), such as safety glasses, gloves, and a respirator. Ensure the area is well-ventilated to prevent refrigerant inhalation. Never work on a system that is under pressure without proper safety measures.
Repairing a Leak, How to read ac gauges r134a
- Identify the leak: Using a leak detector, pinpoint the exact location of the leak. Visual inspection is often helpful in conjunction with the leak detector.
- Isolate the system: Shut off the power to the compressor and isolate the AC system from the rest of the system to prevent any accidental start-up.
- Repair the leak: Employ the appropriate repair method, such as soldering, brazing, or using sealant, depending on the type of leak and component involved. Ensure the repair is secure and leak-free.
- Recharge the system: Carefully add the correct amount of refrigerant to the system to restore optimal pressure readings. Use a gauge to monitor the charge level.
- Test the system: After recharging, run the system and monitor its performance. Check the gauge readings to ensure the system is operating within the proper pressure range.
Troubleshooting Table
| AC System Issue | Low-Pressure Gauge Reading | High-Pressure Gauge Reading | Troubleshooting Steps |
|---|---|---|---|
| Refrigerant Leak | Low | High or Low | Locate and repair the leak; recharge the system. |
| Refrigerant Overcharge | High | High | Evacuate excess refrigerant; adjust charge to proper level. |
| Blocked Condenser Coils | Low | High | Clean the condenser coils; check for obstructions. |
| Compressor Malfunction | Low or High | High or Low | Check compressor functionality; replace if necessary. |
Maintaining AC System Performance with Gauge Readings
Keeping your air conditioning system running smoothly and efficiently hinges on consistent maintenance, and gauge readings play a crucial role in this process. Regular checks allow you to identify potential problems early, preventing costly repairs and extending the system’s lifespan. Understanding how to interpret these readings empowers you to optimize performance and ensure your comfort.
Optimizing AC System Efficiency Through Gauge Readings
Proper gauge readings provide valuable insights into the condition of your AC system. Low refrigerant levels, for example, often manifest as a lower-than-normal pressure reading on the low-side gauge. Similarly, high pressure readings can indicate a blockage or other issues in the system. By consistently monitoring these readings, you can proactively address problems before they escalate.
Best Practices for Preventing AC System Problems
Proactive maintenance is key to preventing costly repairs and ensuring optimal AC system performance. Regular servicing, including checking refrigerant levels and ensuring proper airflow, are vital steps. A well-maintained system will operate more efficiently, leading to lower energy consumption and a longer lifespan. A common issue, for instance, is refrigerant leaks. Detecting them early through regular gauge readings can save you a significant amount of money in the long run.
Importance of Regular AC System Maintenance
Regular maintenance is not just a recommendation; it’s essential for maintaining a functional and efficient AC system. Routine checks and servicing, guided by gauge readings, can prevent breakdowns, minimize energy consumption, and extend the overall lifespan of your equipment. Ignoring routine maintenance can lead to more serious, expensive repairs down the line.
Connection Between Gauge Readings and AC System Lifespan
The correlation between consistent gauge readings and the longevity of your AC system is undeniable. Regular monitoring of pressures and temperatures, as indicated by the gauges, allows you to catch subtle issues early, like leaks or blockages. This early intervention can prevent significant damage and extend the lifespan of the compressor, condenser, and other crucial components. A well-maintained system, monitored with gauge readings, will often have a much longer operational life.
Regular AC System Maintenance Checklist
This checklist provides a structured approach to maintaining your AC system, incorporating gauge reading checks.
- Visual Inspection: Inspect the system for any visible damage or leaks. Look for signs of corrosion or loose connections.
- Refrigerant Level Check: Use the low-side gauge to determine the refrigerant level. Low levels necessitate a recharge. Note the readings and compare them with manufacturer specifications.
- Pressure Readings: Check high-side and low-side pressures. Ensure these readings fall within the recommended range for your system type. High or low pressure readings might indicate a blockage, leak, or other issue.
- Temperature Readings: Check the temperatures at various points in the system. Anomalies in temperature readings can indicate a malfunction. Compare readings with the expected values for your specific AC unit.
- Airflow Check: Verify proper airflow through the condenser coils. Any blockages will affect cooling efficiency and should be addressed immediately. Observe the fan operation and the overall airflow pattern.
- Component Lubrication: Lubricate moving parts, such as the compressor and fan motor, as recommended by the manufacturer. This will maintain smooth operation.
- Electrical Connections: Inspect all electrical connections for any signs of damage or corrosion. Loose connections can lead to electrical issues and damage. Verify all connections are secure and in good condition.
By following this checklist and consistently monitoring your AC system’s gauge readings, you can maintain optimal performance, extend its lifespan, and minimize costly repairs.
Outcome Summary
In conclusion, mastering how to read AC gauges for R134a refrigerant is a fundamental skill for HVAC professionals. This guide has provided a thorough understanding of gauge setups, reading techniques, common issues, and troubleshooting methods. By following the steps Artikeld, you’ll be equipped to diagnose and repair AC systems efficiently and safely. Remember to prioritize safety precautions throughout the process.
Key Questions Answered
What are the typical pressure ranges for R134a in a low-pressure/high-pressure system?
Low-side pressure typically ranges from 20-40 PSI, while high-side pressure is around 200-300 PSI. However, exact ranges depend on the specific system and operating conditions.
How can I tell if my AC system is undercharged or overcharged by looking at the gauge readings?
Undercharged systems often show low pressure on both high-side and low-side gauges. Overcharging results in high pressure on both sides, potentially exceeding the safe operating range.
What are some common safety precautions when working with AC gauges and refrigerant?
Always wear appropriate safety gear, like safety glasses and gloves. Ensure proper ventilation, and work in a well-lit area. Never work alone, and be aware of potential refrigerant leaks.
What is the difference between high-side and low-side pressures on AC gauges?
High-side pressure relates to the condenser, while low-side pressure refers to the evaporator. Understanding the difference in readings is vital for accurate diagnosis.
