Unleash the hidden potential of your 2019 E350 with our definitive guide on how to remove 2019 e350 front bumper cover forum. This comprehensive walkthrough will guide you through every crucial step, from initial preparation to final checks, ensuring a safe and successful disassembly and reassembly. Master the art of bumper removal and reclaim your vehicle’s aesthetic prowess.
Prepare to embark on a journey that delves into the specifics of the 2019 E350 front bumper cover removal process. We’ll navigate the complexities, from understanding the various models and trims to mastering the precise sequence of steps. This detailed approach ensures a smooth and secure operation.
Introduction to Removing 2019 E350 Front Bumper Cover
Unveiling the undercarriage of your 2019 E350 is like uncovering a hidden treasure map. Removing the front bumper cover is a crucial step in various maintenance tasks, from simple cleaning to more complex repairs. This guide will equip you with the knowledge and confidence to tackle this automotive adventure safely and effectively.Proper preparation is paramount to a smooth and successful removal.
A well-prepared environment and a well-stocked toolbox minimize potential problems and maximize your chances of a trouble-free experience. A clear understanding of the steps involved and the tools needed is essential to prevent any unnecessary stress or frustration.
Essential Tools and Materials
Gathering the necessary tools and materials before starting is critical. A well-equipped toolkit is your best friend during this procedure. Improper tools can lead to damage and wasted time.
- Torx screwdrivers (various sizes): Essential for removing the numerous fasteners securing the bumper cover. Mismatched sizes will cause headaches. You need the correct tools to avoid damaging the cover or your vehicle.
- Plastic trim removal tool or pry bar: These tools gently separate clips and fasteners without causing damage. A gentle hand and the right tools are your allies.
- Gloves: Protecting your hands from sharp edges and potential debris is crucial. Dirt and grime are your enemy.
- Wrench sets (various sizes): For removing any other fasteners not covered by Torx screws. Wrenches that fit precisely will help avoid potential issues.
- Under-bumper access: A small flashlight or headlamp will allow you to see the areas behind the bumper cover. Good visibility is crucial for safe work.
- Automotive lubricant (optional): Some clips might require a bit of lubrication to facilitate their removal. Lubricant is an excellent tool in this situation.
Step-by-Step Removal Guide
This detailed guide will help you safely and efficiently remove the 2019 E350 front bumper cover. A methodical approach is crucial to avoid any accidents.
| Step | Action | Image Description |
|---|---|---|
| 1 | Locate and disconnect any electrical connections or sensors behind the bumper. | Inspect the area behind the bumper for any connectors. Carefully disconnect them, noting their positions for reconnection. Use care to avoid breaking or damaging the connections. |
| 2 | Remove any visible fasteners, starting with the Torx screws. | Use a Torx screwdriver to remove the Torx screws, working systematically. Pay close attention to the location and type of each fastener. |
| 3 | Gently pry the bumper cover away from the vehicle, starting at a corner or edge. | Employ a plastic trim tool or pry bar to carefully release clips that hold the bumper cover in place. Use a gentle rocking motion to free the clips. Avoid excessive force, as this could damage the plastic. |
| 4 | Work systematically, releasing clips and fasteners. | Continue the process, working around the entire bumper cover. Be sure to keep track of the order in which you removed the fasteners. |
| 5 | Once all fasteners are removed, carefully lift the bumper cover off the vehicle. | With all clips released, lift the bumper cover upward. Avoid pulling or twisting, which could damage the bumper or its mounting points. |
Common Issues and Troubleshooting
Ah, the dreaded front bumper removal. It’s like a delicate dance with automotive orthodontia, where a single wrong step can lead to a mangled masterpiece. Let’s navigate the potential pitfalls and emerge victorious, leaving your bumper intact (and your sanity mostly).This section delves into the common hiccups that can occur during the removal process, providing solutions and preventative measures to keep your 2019 E350 bumper looking pristine.
We’ll cover everything from stubborn bolts to mysteriously snapping clips, arming you with the knowledge to tackle these challenges head-on.
Potential Bolt and Clip Issues
The 2019 E350 bumper is held together by a symphony of bolts and clips. These fasteners, though seemingly insignificant, can become surprisingly tenacious. Sometimes, a bolt might stubbornly refuse to budge, while other times, a clip might unexpectedly succumb to the pressure. Understanding these potential snags is key to a smooth removal.
Diagnosing Damage
Visual inspection is your first line of defense. Look closely for any signs of stress on the bolts or clips. Bent, stripped, or broken bolts are obvious red flags. Likewise, if you see any signs of cracking or deformation in the clips, it’s a clear indication that they’ve been compromised. A little bit of detective work can save you a lot of frustration.
Preventing Damage
Proactive measures are crucial in this delicate dance. Apply gentle pressure when removing bolts and clips. Using the right tools is also paramount. A damaged or worn socket wrench can easily strip a bolt head. If you encounter any resistance, don’t force it.
Take a break, re-evaluate, and consult resources if needed. Remember, patience is a virtue, especially when dealing with automotive components.
Handling Damaged Parts
If a bolt or clip does break, don’t panic. The first step is to carefully assess the damage. If the damage is minor, you might be able to salvage the situation by using epoxy or other suitable adhesives. However, if the damage is extensive, it’s time to visit the parts store for replacements. Always consult the manufacturer’s guidelines for the appropriate replacement parts.
Table of Troubleshooting Solutions
| Issue | Solution | Potential Risks |
|---|---|---|
| Stripped Bolt Head | Use a new bolt, possibly with thread locker. | Potential for further damage if forced. |
| Broken Clip | Replace the clip with a new one. | Incorrect replacement might compromise bumper alignment. |
| Bent Bolt | Use pliers to carefully straighten the bolt. | Potential for further damage if not handled correctly. |
| Difficult to Remove Bolt | Apply penetrating oil or lubricant. Heat (carefully). | Overheating can damage the surrounding components. |
Variations in Procedure
Ah, the 2019 E350 front bumper cover. A seemingly straightforward removal, but like a mischievous gremlin, it can sometimes have a few tricks up its sleeve. Different trims and models might have subtle, yet crucial, variations in their fastener configurations, making a blanket removal guide a bit… well, inadequate. Let’s dive into these potential differences and equip you with the knowledge to tackle any 2019 E350 bumper cover with confidence!
Model-Specific Variations
Different trims and packages of the 2019 E350 might feature unique front bumper designs. These variations can affect the removal process. For example, some might have added accessories like fog lights or unique grille designs, which could impact the placement of fasteners or the need for additional tools. Knowing these differences is crucial to avoid unnecessary frustration and potential damage.
Fastener Type Differences
The types of fasteners used in the front bumper cover can vary between models. Some might use standard Torx screws, while others might utilize unique, potentially harder-to-locate, fasteners. A quick visual inspection of the existing fasteners is key. Knowing the specific fastener type will prevent you from using the wrong tool and potentially damaging the bumper or surrounding components.
Mounting System Differences
The mounting systems can also differ between trims. For instance, some models might utilize clips, while others might have more complex latching mechanisms. Understanding these subtle differences will ensure you remove the bumper cover carefully and avoid unnecessary force, which could lead to damage. Careful attention to these details will make the removal process smoother.
Tools and Materials
A well-stocked toolbox is a necessity. While a basic set of screwdrivers and pliers might suffice for most models, some trims might require specialty tools. For example, a trim-specific removal tool might be needed for certain clips or latches. A few examples of the tools that may be needed include: Torx screwdrivers, various sized flathead and Phillips head screwdrivers, pliers, and a plastic trim removal tool (for gently releasing clips).
Visual Inspection Guide
Visual inspection can provide clues to the specific removal procedure. Look closely at the fasteners, their location, and the mounting system. If there are unique or unusual fasteners, or if the bumper cover has a noticeably different design compared to other models, it’s a sign that a specialized approach might be required. Look for any signs of previous repair work, as this could indicate variations from the standard procedure.
Table of Variations
| Model/Trim | Fastener Type | Mounting System | Removal Procedure |
|---|---|---|---|
| E350 XLT | Torx T25 | Clips and Screws | Remove screws, gently release clips |
| E350 Limited | Torx T30, unique clips | Combined screw and clip system | Remove screws, carefully disengage clips, possibly use a plastic trim tool |
| E350 Platinum | Torx T25, specialized clips | Combination of clips and screws with a unique latching mechanism | Remove screws, release clips, disengage latching mechanism |
Detailed Steps and Procedures
Alright, gearheads! Let’s get this 2019 E350 front bumper removal party started. This isn’t rocket science, but it does require a bit of finesse to avoid turning your bumper into a crumpled paper airplane. Follow these steps meticulously, and you’ll be back on the road in no time, looking as sharp as a freshly-waxed sports car.
Disconnecting Electrical Connections
Before you start yanking on anything, safety first! Disconnect the electrical connections. This prevents any nasty surprises, like a sudden jolt of power that could fry your circuits or leave you with a less-than-ideal surprise. Improperly handled electrical connections can lead to frustrating issues that are far more costly to fix.
- Locate all the electrical connectors on the bumper area, usually hidden behind clips or screws.
- Carefully unclip or unscrew the connectors, noting their positions for reconnection.
- Label the connectors if necessary, using masking tape or a pen to ensure you put them back in the right places.
- Once disconnected, set the connectors aside in a safe place.
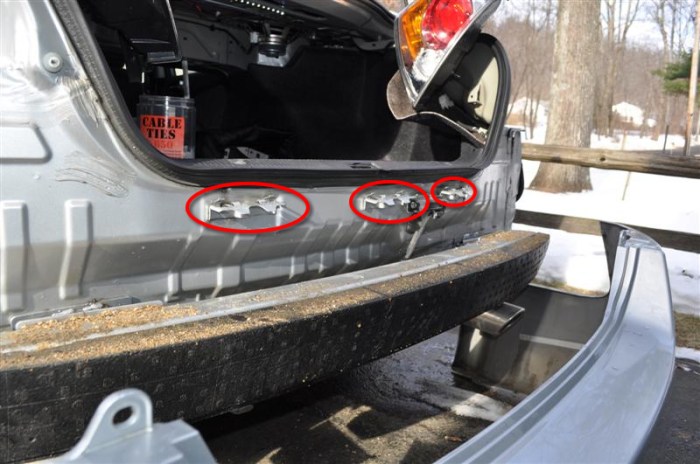
Removing Clips and Fasteners
These little plastic clips are like tiny, tenacious security guards, protecting your bumper. Handle them with the respect they deserve – gentle pressure is key. If you use excessive force, you’ll risk snapping them, leading to a frustrating hunt for replacements and potentially damaging other parts of the car.
- Begin by carefully identifying all the clips and fasteners holding the bumper to the vehicle. Pay close attention to the types of clips. Some may require a specific tool, or a slight twist and pull.
- Use the right tools to remove the clips. If a clip is stubborn, don’t force it. Try a different approach or consult the vehicle’s manual for specific instructions.
- Record the location and order of the clips for reassembly. If you have multiple clips that look similar, take a picture or write down the order. You can use a diagram or a list.
- Set the removed clips and fasteners aside in a designated area, keeping them organized by their location on the bumper.
Removing and Replacing the Bumper Cover
This is the meat and potatoes of the operation. Treat the bumper cover with kid gloves, or, better yet, use protective gloves. It’s made of plastic, and plastic can be fragile. A little care goes a long way.
- Once all the clips and fasteners are removed, gently lift the bumper cover away from the vehicle. There might be a few spots where it’s a bit tricky to get started, but persistence pays off.
- Inspect the bumper cover for any damage or loose components. If you find any damage, repair it before reattaching the bumper.
- Carefully reattach the bumper cover, ensuring that all clips and fasteners are properly aligned and seated. Pay particular attention to any unusual clicks or sounds during reassembly.
- If there’s any wiggle or gap, adjust it and make sure it’s firmly in place.
Ensuring Proper Alignment and Securement, How to remove 2019 e350 front bumper cover forum
Alignment is crucial for a perfect fit. Think of it as a puzzle – every piece needs to be in the right spot for it to work. Misalignment can lead to rattling noises, gaps, and potentially a less-than-stellar appearance.
- Double-check the alignment of the bumper cover against the vehicle’s frame and other components.
- Verify that all clips and fasteners are secure and properly engaged.
- Use a mirror or assistant to check for any gaps or misalignments from different angles.
- Once you’re satisfied with the alignment, proceed with the final steps of reassembly.
Handling Plastic Components with Care
Plastic parts are delicate. They can crack or warp under stress. Gentle hands are your best friends in this process.
- Avoid excessive force when handling plastic components. Take it slow and steady.
- Use soft cloth or gloves to protect the plastic surface from scratches.
- If you encounter any issues, consult the vehicle’s manual for specific guidance or seek professional help.
Reassembly and Final Checks
Alright, intrepid bumper-remover! You’ve bravely navigated the treacherous terrain of disassembly, now it’s time to put the pieces back together like a master mechanic (or at least, a reasonably competent one). This final stage ensures your 2019 E350 front bumper cover is not just back on, but back
functioning* and ready to face the elements (and your judgmental neighbors).
Reassembling the bumper is like solving a complex puzzle, but with the added bonus of knowing that if you mess up, you get to take it all apart again! So, let’s do this right. Precision and care are your best tools here.
Reconnecting Electrical Components
Properly reconnecting electrical components is paramount for ensuring functionality. Incorrect connections can lead to a variety of problems, from intermittent issues to outright malfunctions. You must ensure a secure and stable connection at every point.
- Verify that all wiring harnesses are properly seated in their respective connectors. Double-check that the clips are fully engaged to avoid loose connections. A loose wire is like a bad penny; it keeps coming back to bite you!
- Inspect each connector for any signs of damage, such as frayed wires or bent pins. If damage is found, replace the affected connector or wiring to prevent future problems. A damaged connector is like a leaky faucet; it’s going to drip problems.
- Carefully route the wiring harnesses to avoid kinks or tangles. A tangled wire is like a tangled ball of yarn; it just causes headaches.
Ensuring Proper Alignment and Securement, How to remove 2019 e350 front bumper cover forum
Accurate alignment and securement are crucial for the bumper cover’s structural integrity and aesthetic appeal. Misalignment can lead to a wonky bumper, like a misplaced smile.
- Carefully position the bumper cover in its designated location, ensuring all mounting points align correctly. Refer to your repair manual or diagram if needed. Misalignment is like a poorly fitting suit; it looks bad and doesn’t feel right.
- Double-check all fasteners (bolts, clips, etc.) to ensure they are tightened to the manufacturer’s specifications. Over-tightening can damage the plastic or metal parts, under-tightening can result in a wobbly bumper, like a poorly constructed tower.
- Examine the alignment of the bumper cover with the surrounding body panels. Ensure that there are no gaps or mismatches. A misaligned bumper cover is like a misplaced photograph; it’s out of place and doesn’t tell the full story.
Inspecting for Damage or Misalignment
Thoroughly inspect the bumper cover for any damage or misalignment during the reassembly process.
- Look for any cracks, dents, or other imperfections that might have occurred during the removal process. Any damage should be addressed before proceeding. A cracked bumper cover is like a broken promise; it’s not what you expected.
- Ensure that the bumper cover is flush with the body panels. Any misalignment must be corrected before proceeding to the next step. A misaligned bumper cover is like a crooked picture; it just doesn’t look right.
Testing Functionality
After reassembling the bumper cover, test all components to ensure they are functioning correctly.
- Power on the vehicle and test all electrical components, such as fog lights, turn signals, etc., to ensure they operate as expected. A faulty light is like a missing piece of a puzzle; it creates a gap in the whole.
- Carefully drive the vehicle to test for any signs of misalignment or looseness in the bumper cover. Listen for any unusual noises. A rattling bumper is like a nagging roommate; it’s not fun.
Potential Problems from Improper Reassembly
Improper reassembly can lead to a variety of issues.
- Loose or damaged fasteners can cause the bumper cover to detach, potentially leading to an accident. A detached bumper cover is like a loose tooth; it’s not good for the whole mouth.
- Misaligned bumper cover can cause paint damage or other issues, impacting the aesthetic of your vehicle. A misaligned bumper cover is like a crooked smile; it doesn’t make a good impression.
Specific Tools and Materials: How To Remove 2019 E350 Front Bumper Cover Forum
Alright, gearheads! Let’s talk about the essential tools for tackling this bumper removal like a seasoned pro (or at least a mildly competent enthusiast). Choosing the right tools is crucial; using the wrong ones can be more frustrating than a stubborn bolt, and potentially more dangerous than a rogue spring. Proper tools make the job smoother, safer, and ultimately, more satisfying.
Essential Tool Kit
This isn’t a “grab whatever’s lying around” operation. You need the right tools for the right job, and for this particular project, a well-stocked toolkit is a must. The right tools prevent unnecessary damage to your car and allow for a more efficient and safer process.
- Torx Screwdrivers: These aren’t your average flatheads. Torx bits have specialized star-shaped heads, essential for specific fasteners. Using the wrong type of screwdriver can strip the head or break the fastener, resulting in a frustrating and potentially expensive fix. Different Torx sizes are required for various fasteners, so make sure you have the right size on hand.
- Sockets and Wrenches: You’ll need a good selection of sockets and wrenches to handle the various nuts and bolts holding the bumper. Having the correct socket size is vital to avoid stripping the fastener, or even worse, rounding off the nut or bolt head. Consider a ratcheting wrench for repetitive tasks; they save time and effort. Compare the sizes carefully before you start.
Don’t just grab a socket because it looks close—it needs to be a perfect fit.
- Pry Bar/Plastic Pry Tool: Sometimes, stubborn clips or fasteners need a little persuasion. A sturdy pry bar or a plastic pry tool will gently dislodge those fasteners without damaging the bumper or surrounding plastic parts. Plastic pry tools are preferable for their gentler approach, avoiding scratches or dents. Carefully apply pressure to avoid unnecessary force, and work in a slow and steady manner.
- Gloves: Protecting your hands is paramount. Gloves prevent cuts and scrapes, keeping your hands clean and safe. Using appropriate gloves is essential for your safety and the overall process.
- Vehicle Lift (Optional but Recommended): Elevating the vehicle provides ample workspace underneath and prevents potential damage to the car’s undercarriage. A vehicle lift is recommended for easier access and maneuverability.
Importance of Appropriate Tools
Using the right tools isn’t just about getting the job done; it’s about doing it safely and efficiently. Improper tools can lead to damaged parts, wasted time, and even injuries. Imagine trying to remove a stubborn bolt with a flimsy screwdriver—it’s not going to end well. Proper tools make the entire process significantly easier and less stressful.
Comparison of Different Tools
There are various types of screwdrivers, sockets, and pry tools available. The choice often depends on the specific fastener type and the desired level of precision. Consider the material of the tool—some are made from stronger materials to handle higher torque, while others are designed for precision work. Always select the tool that’s appropriate for the job at hand.
It’s a critical factor for success.
Safe and Effective Tool Usage
Proper technique is just as important as the tool itself. Always consult the vehicle’s repair manual for specific torque specifications to prevent damage. Avoid excessive force, and always use appropriate safety gear, such as gloves. Never force a tool into a tight space—it’s better to try a different tool or adjust the position. Check the fit of your tools before starting the job to avoid unnecessary damage.
Tool Comparison Table
| Tool | Use | Safety Precautions |
|---|---|---|
| Torx Screwdrivers | Removing Torx-head fasteners | Ensure the correct size is used to avoid stripping. |
| Sockets and Wrenches | Removing nuts and bolts | Use the correct size to prevent damage to the fastener or the tool. |
| Pry Bar/Plastic Pry Tool | Dislodging clips and fasteners | Use gentle pressure to avoid damage to the bumper. |
| Gloves | Protecting hands from cuts and scrapes | Wear appropriate gloves for the task. |
| Vehicle Lift | Elevating the vehicle | Follow the lift’s instructions carefully to avoid injury. |
Safety Precautions and Considerations

Alright, wrench-wielding wizards and bumper-bashing brainiacs! Before you unleash your inner automotive surgeon, let’s talk about the crucial, and often overlooked, aspect of safety. Removing a front bumper isn’t rocket science, but it’s a delicate dance with potential hazards. Treat it with respect, and your 2019 E350 will thank you with a flawless, unblemished return.Proper safety procedures are paramount.
Neglecting these precautions can lead to painful injuries, costly repairs, and a whole lot of frustration. Think of it like this: a well-executed DIY project is a testament to your skills and a source of pride. A poorly executed one, well, that’s a different story.
Potential Safety Hazards
Removing a bumper cover involves several potential hazards. Unexpectedly loose parts, sharp edges, and even the risk of dropping tools can lead to injuries. Furthermore, working under a vehicle exposes you to potential hazards, including restricted visibility and potential falling objects. Always prioritize safety.
Necessary Precautions
To mitigate these risks, meticulous preparation is key. Always wear safety glasses to protect your eyes from flying debris or sharp edges. Gloves are essential to prevent cuts and scrapes, and sturdy work boots will safeguard your feet. Having adequate lighting is critical. Dim lighting can lead to accidents, so ensure the work area is well-lit.
Importance of a Safe and Well-Lit Environment
A well-lit workspace is a safer workspace. Poor visibility can lead to misjudgments and mistakes. Adequate lighting minimizes the risk of tripping, dropping tools, or overlooking potential hazards. If possible, consider using a work light or a well-placed flashlight. In addition, a clear workspace is crucial for maneuverability and safety.
A cluttered area can easily lead to accidents.
Safety Checklist
Before starting the bumper removal process, complete a thorough safety checklist.
- Verify the vehicle is securely parked and supported on jack stands.
- Ensure all power sources are disconnected.
- Inspect the area for any potential hazards or obstacles.
- Gather all necessary tools and materials, placing them in an easily accessible location.
- Confirm you have the appropriate safety gear, including gloves, safety glasses, and work boots.
Comparing Safety Procedures Across Stages
Different stages of the bumper removal process require different safety measures. For example, when disconnecting electrical components, be sure to use the correct procedures to prevent short circuits or electric shocks. When working with potentially loose parts, be mindful of their potential to fall or shift. Each stage should be approached with the same diligence.
Importance of Protective Gear
Appropriate protective gear is crucial for preventing injuries. Safety glasses, gloves, and sturdy work boots can prevent cuts, scrapes, and other potential injuries. The use of protective gear isn’t just a precaution; it’s an investment in your well-being. Think of it as a safeguard against unexpected mishaps.
Visual Aids and Illustrations
Unleashing the inner mechanic within you? Fear not, intrepid DIYer! Visual aids are your trusty companions in this bumper-removal escapade. Clear diagrams and detailed images will guide you through each step, transforming the potentially daunting task into a satisfying triumph. We’ll equip you with the knowledge to confidently tackle this project, ensuring your 2019 E350 front bumper is looking spiffy in no time.Visual aids are crucial for a successful bumper removal.
They act as a roadmap, showing the exact location of fasteners, clips, and crucial components. By understanding these visual representations, you’ll be able to confidently navigate the process, avoiding common pitfalls and ensuring a smooth reassembly.
Fastener Identification
Visual representations of different fastener types are essential. A quick visual guide can save you hours of frustration. These illustrations should clearly depict various fastener types, including screws, bolts, clips, and even those elusive, tiny plastic retainers. Knowing the specific type of fastener for each component will ensure proper removal and reinstallation.
Component Marking for Reassembly
Properly marking components for reassembly is paramount. Imagine trying to put a puzzle back together without knowing which piece goes where. Chaos ensues! Visual aids will highlight how to label and identify specific components for easy reassembly. This could involve numbering, color-coding, or even simple sketches on the components themselves. Detailed diagrams, like a treasure map, will show the exact location of each component.
Step-by-Step Illustrated Guide
A detailed, step-by-step illustrated guide is your secret weapon. Each step should be accompanied by a clear, labeled diagram showing the exact actions required. This will prevent any confusion or errors during the process. For example, one diagram might show the precise angle to apply pressure to a specific clip.
Close-up Images of Components
Close-up images of components, including fasteners and clips, are essential. A close-up shot allows you to see the details and identify the exact shape, size, and type of component. This helps ensure you’re using the right tools and techniques. For example, you’ll be able to distinguish between various types of clips, each needing a specific removal technique.
Diagrams Demonstrating Fastener Locations
Visual representations of fastener locations are critical. Think of it like finding the hidden compartments in a treasure chest. Diagrams clearly showing the location of fasteners, their type, and their orientation will streamline the process. A diagram showing the precise location of a specific bolt under a plastic cover, for instance, is invaluable.
Using Illustrations to Understand Steps
Illustrations serve as a visual guide to help you understand the steps involved in removing and reinstalling the front bumper. They act as a visual checklist, guiding you through each procedure. Each illustration should clearly show the relevant tools and techniques to avoid common mistakes. For instance, an illustration showing the precise angle for inserting a plastic clip would ensure correct placement.
Final Review
In conclusion, removing your 2019 E350 front bumper cover is now within your grasp. This comprehensive guide has armed you with the knowledge and tools to execute this task with confidence and precision. Remember to prioritize safety and follow the detailed procedures Artikeld in this guide for a flawless outcome. From the initial preparation to the meticulous reassembly, we’ve covered every facet of this project, empowering you to achieve a perfect result.
FAQ Section
What are the most common tools needed for this process?
Typically, you’ll need a set of screwdrivers (Phillips and flathead), a torque wrench (if possible), pliers, and potentially a plastic trim removal tool to avoid damage to clips. Using the right tools for the job is crucial to avoid potential damage.
What if a bolt or clip breaks during removal?
If a bolt or clip breaks, carefully assess the damage. If possible, repair the broken part with a suitable adhesive or replacement. If it’s too damaged, you may need to replace the entire component.
Are there any specific safety precautions to keep in mind?
Always work in a well-lit area. Wear safety glasses and gloves to protect yourself from potential hazards. Ensure the vehicle is securely supported to prevent accidental movement during the process.
