How to replace coil packs on 2004 mean streakj – How to replace coil packs on 2004 Mean Streak? This guide dives into the meticulous process of replacing worn-out coil packs on your 2004 Mean Streak, ensuring optimal engine performance and preventing potential issues. We’ll walk you through the necessary steps, from preparation and safety precautions to testing and reassembly. Get ready for a comprehensive and detailed walkthrough, focusing on a safe and effective repair.
Understanding the importance of proper coil pack function is crucial for motorcycle reliability. Faulty coil packs can lead to misfires, reduced power, and even engine damage. This detailed guide helps you navigate the process safely and efficiently.
Introduction to Coil Pack Replacement on a 2004 Mean Streak
Coil packs are crucial components in a 2004 Mean Streak’s ignition system. They transform the battery’s low voltage into the high voltage needed to ignite the air-fuel mixture in each cylinder. Essentially, they act as the spark plug’s power source. Faulty or worn coil packs can lead to misfires, rough idling, decreased performance, and even engine stalling.
Proactive replacement is key to preventing more significant engine damage.Ignoring a failing coil pack can lead to a cascade of issues. Misfires can strain the catalytic converter, potentially damaging it. Repeated misfires can also cause uneven wear on the engine components, leading to premature failure. A failing coil pack can also make your engine run erratically and unpredictably, posing safety risks during operation.
Replacing worn coil packs is a preventative maintenance measure that protects your investment and ensures reliable performance.
Coil Pack Function and Importance
Coil packs are the high-voltage spark generators in the ignition system. They convert the low voltage from the battery into the high voltage needed to ignite the fuel-air mixture in each cylinder. This ignition process is critical for proper engine operation. Worn or faulty coil packs can result in misfires, reduced power, and potential engine damage. Consistent, reliable spark is essential for a smooth, efficient engine.
Tools and Materials Required
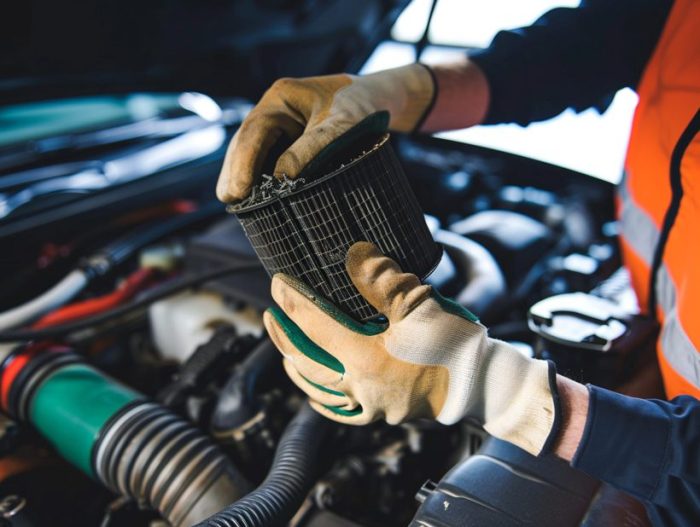
To successfully replace coil packs, gather the necessary tools and materials. This includes a socket set (with appropriate sizes), a ratchet, a wrench (for the spark plug wire removal), and needle-nose pliers. A set of quality mechanic gloves, a flashlight, and a clean work area are also recommended. You’ll also need new coil packs, spark plug wires (if necessary), and any necessary lubricants.
A detailed checklist ensures you have everything before starting.
Replacement Procedure
This table Artikels the steps for replacing the coil packs on a 2004 Mean Streak. Proper procedure ensures a safe and efficient replacement.
| Step | Preparation | Removal | Installation |
|---|---|---|---|
| 1 | Gather tools, new coil packs, and protective gear. Ensure a clean and well-lit work area. | Disconnect the negative battery terminal. Carefully remove the spark plug wires from the coil packs. | Install the new coil packs into their respective locations. |
| 2 | Verify the correct part numbers for your specific coil packs. Reference your vehicle’s owner’s manual for detailed specifications. | Using the appropriate socket and ratchet, loosen and remove the old coil packs from the engine. | Carefully reconnect the spark plug wires to the new coil packs. |
| 3 | Ensure all tools are in good condition and ready for use. Have a replacement part ready in case of unforeseen damage. | Inspect the spark plug wires for damage. Replace any damaged wires. | Reconnect the negative battery terminal. |
| 4 | Confirm the engine compartment is properly ventilated to prevent overheating. | Carefully disconnect the coil pack connector. | Thoroughly check for any misalignment or loose connections. |
Vehicle Specifics
Knowing your 2004 Mean Streak’s exact engine model is crucial for a successful coil pack replacement. Different models might have slight variations in their engine layouts, impacting the coil pack’s location and accessibility. This section dives deep into the specifics, helping you pinpoint the exact procedure for your bike.
Engine Model Identification
2004 Mean Streaks came equipped with a variety of engine configurations. Crucially, the engine model impacts the coil pack placement and associated components. Confirming your specific engine model is essential for accurate diagnosis and replacement.
Engine Layout and Coil Pack Placement
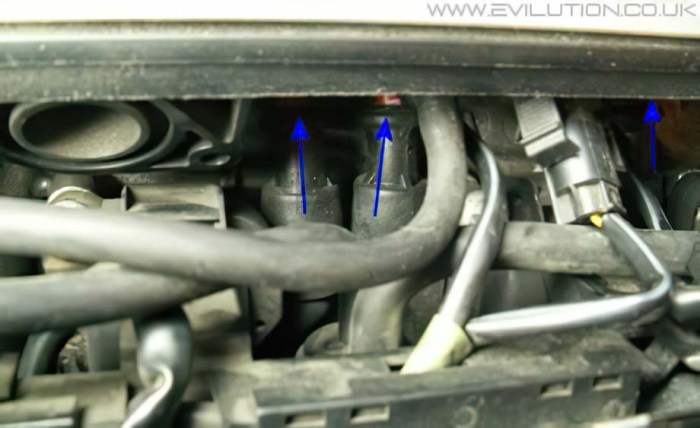
Understanding the engine’s layout is vital. Most 2004 Mean Streaks feature an inline configuration, with the coil packs situated strategically along the engine’s length. The precise location and accessibility of the coil packs will differ based on the engine model. Note the connections to the ignition module and the spark plug wires.
Diagram of Engine Compartment
Visualizing the engine compartment is helpful. A detailed diagram showcasing the coil pack location and its connection points would show the coil pack’s position relative to other components, like the ignition module and spark plug wires. This diagram would clearly indicate the steps involved in the replacement process.
Variations in Replacement Procedure
Some 2004 Mean Streak models may have variations in the coil pack replacement procedure, depending on the specific engine model and any modifications made to the vehicle. Factors like engine cover design or accessibility of the coil packs might lead to subtle differences in the process. Consult your owner’s manual or a reputable online resource for specifics.
Preparation and Safety Precautions
Before diving into coil pack replacement on your 2004 Mean Streak, safety is paramount. Ignoring these precautions could lead to serious injury or damage to your bike. A well-prepared workspace and adherence to safety procedures are crucial for a smooth and safe repair.Proper preparation minimizes risks and maximizes the chances of a successful repair. Knowing what to do before you start, and what to avoid, will make the entire process much easier and safer.
Motorcycle Engine Safety
Safe motorcycle engine work requires specific safety precautions. Personal protective equipment (PPE) is essential. Always wear safety glasses, sturdy work gloves, and long sleeves to protect your eyes, hands, and skin from flying debris, chemicals, or hot surfaces. Closed-toe shoes are also crucial. A helmet, though not directly related to the coil pack replacement itself, is strongly recommended for any motorcycle work, to protect your head in case of unforeseen events.
Motorcycle Preparation
Thorough preparation of your motorcycle is vital before starting any repair. Secure the motorcycle using a sturdy stand and ensure it’s level and stable. This prevents accidental movement during the repair process.
- Securing the Motorcycle: Place the motorcycle on a sturdy, stable stand. Verify the stand is capable of supporting the weight of the bike and is securely fastened. Ensure the motorcycle is level to prevent any unexpected movement during the repair. This prevents accidents and ensures a safe working environment.
- Battery Disconnection: Locate the battery terminals and disconnect the negative (-) terminal first. This precaution prevents accidental electrical discharge, which could damage components or injure you. Then disconnect the positive (+) terminal. Properly label the terminals for easy reconnection.
Safety Procedures Before Starting
Before starting any repair, follow these crucial safety procedures:
- Environmental Considerations: Ensure the work area is well-lit and ventilated. A well-lit area reduces the risk of accidents, while proper ventilation minimizes exposure to potentially harmful fumes.
- Tools Check: Verify all tools needed for the repair are accessible and in good working condition. A complete set of tools, including wrenches, sockets, screwdrivers, and any other specialized tools needed, will make the repair go much smoother.
- Gather Supplies: Ensure all necessary materials, such as new coil packs, and any additional parts required, are readily available. This reduces potential delays and keeps the repair process focused and efficient.
- Visual Inspection: Perform a thorough visual inspection of the motorcycle’s components before starting the repair. This helps to identify any potential issues or areas that might need attention before starting the coil pack replacement.
Securing the Motorcycle
Properly securing the motorcycle is crucial to avoid accidents. A sturdy, adjustable motorcycle stand is recommended. Always check the stand’s stability before placing the motorcycle on it.
- Choosing a Stand: Select a motorcycle stand that can support the weight of the motorcycle and is appropriate for the motorcycle’s type and design. Use a sturdy stand capable of holding the bike’s weight securely, and check the stability before placing the bike on it.
- Placement and Leveling: Position the motorcycle on the stand, ensuring it’s level and stable. Use appropriate leveling tools if needed.
Safe Battery Disconnection
Disconnecting the motorcycle’s battery is essential for safety during any repair. Always disconnect the negative (-) terminal first, then the positive (+).
- Negative Terminal First: Disconnect the negative (-) terminal first. This minimizes the risk of accidental electrical discharge. Always label the terminals for easy reconnection.
- Positive Terminal Last: Disconnect the positive (+) terminal last. This completes the battery disconnection process.
Removing the Old Coil Packs
Careful coil pack removal is crucial for a successful replacement. Improper technique can damage wiring, hoses, or other components. This section details the safe and efficient steps for disconnecting the old coil packs on your 2004 Mean Streak.Coil packs are essential ignition components. Each pack ignites a specific cylinder. Removing them correctly prevents accidental damage to other parts.
Following these steps ensures a smooth and safe replacement process.
Disconnecting the Electrical Connections
Before physically removing the coil packs, disconnecting the electrical connections is paramount. This prevents accidental short circuits and ensures a clean removal process. Use insulated screwdrivers to disconnect the spark plug wires. Carefully route the wires to avoid snagging or damaging them. Note the exact placement of each wire for reconnection.
Removing the Coil Packs
Proper tools and techniques are essential for removing the coil packs without causing damage. A socket wrench set with appropriate sizes is recommended. Torque specifications must be adhered to during removal.
| Coil Pack | Removal Steps | Potential Challenges |
|---|---|---|
| Front Left | 1. Loosen the clamp securing the coil pack to the engine. 2. Carefully remove the coil pack, taking care not to pull on the wiring. | The clamp might be rusted or corroded, requiring extra effort. |
| Front Right | 1. Loosen the clamp securing the coil pack to the engine. 2. Carefully remove the coil pack, taking care not to pull on the wiring. | Similar to the front left, corrosion can hinder removal. |
| Rear Left | 1. Loosen the clamp securing the coil pack to the engine. 2. Carefully remove the coil pack, taking care not to pull on the wiring. | Potential interference from exhaust components or other engine parts. A slight adjustment might be needed. |
| Rear Right | 1. Loosen the clamp securing the coil pack to the engine. 2. Carefully remove the coil pack, taking care not to pull on the wiring. | Similar to the rear left, potential interference might require adjustments. |
Ensure all clamps and fasteners are properly loosened before attempting to remove the coil packs. This will prevent damage to the engine components and ensure easy removal.
Removal Order
Removing the coil packs in a specific order is essential to prevent potential interference with other components. A systematic approach minimizes the risk of damaging other parts. Begin with the front left, followed by the front right, then the rear left, and finally the rear right. This order prevents any potential entanglement or strain on adjacent components.
Inspecting and Evaluating the Coil Packs: How To Replace Coil Packs On 2004 Mean Streakj
Replacing your 2004 Mean Streak’s coil packs is a crucial step in restoring engine performance. A thorough inspection of the existing packs is essential to pinpoint any potential issues and ensure a successful replacement. Ignoring signs of damage can lead to further problems and unnecessary costs down the road.
Visual Inspection for Damage
Properly inspecting the coil packs for signs of damage is a critical first step. Visual examination can reveal critical problems that might otherwise go unnoticed. This involves scrutinizing the coil packs for any abnormalities.
- Check for Cracks and Fractures: Carefully examine each coil pack for any visible cracks, fractures, or splits in the housing or insulator. A crack, no matter how small, can compromise the coil’s integrity and its ability to deliver the necessary spark. A healthy coil pack will show no visible cracks or fractures. A damaged coil pack will display clear cracks or splits along the housing or insulators.
- Assess Discoloration and Overheating: Look for signs of discoloration, such as a burnt or charred appearance. This indicates excessive heat and potential internal damage. Healthy coil packs will exhibit a uniform color. Damaged ones will show discoloration or signs of charring, particularly around the terminals or on the housing.
- Examine Terminal Integrity: Carefully inspect the terminals on each coil pack for any signs of damage or corrosion. Loose or damaged terminals can lead to electrical problems. A healthy coil pack will have firm, clean terminals with no signs of corrosion or damage. A damaged coil pack will display loose terminals, corrosion, or broken wires.
Electrical Connection Assessment
Evaluating the electrical connections is equally important to ensure proper functionality. A faulty electrical connection can cause intermittent or complete spark issues.
- Inspect Wire Connections: Check all wire connections for any signs of fraying, breakage, or corrosion. Secure connections are essential for reliable spark generation. A healthy coil pack will have firm and secure wire connections with no signs of damage. A damaged coil pack will display frayed, broken, or corroded wire connections. A good practice is to check for any evidence of burnt or melted insulation around the wire terminals.
- Examine Terminal Corrosion: Look for signs of corrosion or oxidation on the terminals. Corrosion can disrupt the electrical flow and lead to malfunction. A healthy coil pack will have clean and corrosion-free terminals. A damaged coil pack will show signs of corrosion or oxidation on the terminals. Consider using a cleaning solution to remove any corrosion to aid in the diagnosis.
Installing the New Coil Packs
Installing the new coil packs is a crucial step in the Mean Streak repair process. Proper installation ensures optimal engine performance and prevents potential future problems. Carefully following the steps and torque specifications is vital for a successful outcome.The correct installation of the new coil packs is paramount for restoring the engine’s functionality. Precise placement and secure connections are essential to avoid any mishaps or performance issues.
Installing the New Coil Packs – Procedure
Careful handling of the new coil packs is essential to prevent damage. Ensure the components are positioned correctly and aligned before tightening any mounting bolts. Improper installation can lead to engine misfires or reduced power.
- Position the Coil Pack: Align the coil pack with the corresponding mounting bracket. Confirm the proper orientation based on the manufacturer’s instructions. Misalignment can lead to electrical issues or mechanical strain.
- Secure the Mounting Bolts: Tighten the mounting bolts in a star pattern, ensuring an even distribution of force. This technique avoids warping the mounting bracket and ensures a firm hold. Tighten each bolt to the specified torque, which is crucial for optimal performance and longevity. Excessive tightening can lead to stripped threads or component damage. Insufficient tightening may result in loose connections and potential misfires.
Electrical Connections
Correctly connecting the electrical wiring is critical for the coil packs to function correctly. Incorrect connections can lead to electrical problems, misfires, and reduced engine power.
- Connect the Wires: Carefully reconnect the electrical connectors to the new coil packs. Ensure each wire is securely seated in its corresponding terminal. Verify the correct polarity (positive and negative) of the connections. A wiring error can result in a non-functional coil pack or even damage to the wiring harness.
- Double-Check Connections: After connecting the electrical wires, visually inspect each connection for any signs of damage or looseness. This ensures proper contact and reliable operation.
Torque Specifications and Secure Installation
Adhering to the manufacturer’s torque specifications is critical for a reliable and durable installation. Incorrect torque can lead to damage or improper functionality.
| Step | Action | Notes |
|---|---|---|
| 1 | Verify torque specifications | Consult the repair manual or the manufacturer’s specifications. |
| 2 | Tighten mounting bolts in a star pattern | Ensures even pressure distribution. |
| 3 | Inspect electrical connections | Ensure secure connections and correct polarity. |
| 4 | Test the system | Start the engine and check for any misfires or unusual noises. |
Proper torque specifications are essential for a safe and effective installation. Incorrect torque can lead to component failure or damage.
Testing and Verification
Now that your new coil packs are installed, it’s crucial to verify their proper functioning. Skipping this step could lead to misdiagnosis of other engine issues later on, or even cause further damage. This section details the process for ensuring everything works as intended.Proper testing and verification after coil pack replacement is essential to confirm the successful resolution of the initial problem and prevent potential future issues.
This includes checking electrical connections, engine performance, and identifying any anomalies.
Engine Start-up and Initial Checks
After installing the new coil packs, start the engine and let it idle for a few minutes. Listen carefully for any unusual noises or rough running. A smooth idle indicates that the coil packs are likely functioning correctly. If the engine sputters, stalls, or makes strange noises, further investigation is necessary.
Electrical Connection Verification
Visual inspection of the electrical connections is important. Ensure all wires are securely attached and free of corrosion. This will prevent intermittent issues and ensure proper power delivery. Check the wiring diagrams specific to your 2004 Mean Streak for the proper connections and polarity. Using a multimeter, measure the resistance across each coil pack connection to confirm proper electrical continuity.
This should match the specifications in the wiring diagram.
Load Test and Performance Evaluation
A load test is a crucial step in verifying coil pack performance. This involves increasing the engine load, for example, by accelerating to different speeds and maintaining those speeds for a few minutes. Observe the engine’s response and look for any issues such as misfires, hesitation, or loss of power. If issues persist, proceed to the troubleshooting steps below.
These performance tests are critical for identifying any hidden problems related to the coil pack replacements.
Troubleshooting Common Issues
- Misfires or Stalling: If the engine misfires or stalls, check the spark plug condition. Faulty spark plugs can cause issues similar to faulty coil packs. If the spark plugs are in good condition, check the coil pack connections, ensuring they are securely attached and free of corrosion. Also, verify the correct firing order and proper ignition timing. If these steps do not resolve the problem, consult a qualified mechanic for further diagnostics.
- Rough Idle: A rough idle might indicate a problem with the fuel delivery system or air intake. If the coil packs are properly connected, the problem may lie elsewhere. Verify fuel pressure and air intake to pinpoint the issue.
- Loss of Power: Loss of power can stem from various sources. Ensure the new coil packs are correctly installed and connected, as well as the other components of the ignition system. Check for any other related issues with the vehicle’s performance, such as low fuel levels, air filter condition, or other issues with the engine.
Diagnostic Methods
A multimeter, a diagnostic scanner (if available), and a good understanding of the vehicle’s electrical system are crucial tools for diagnosing problems. Use the multimeter to measure voltage and resistance at various points in the ignition system to identify any circuit problems. A diagnostic scanner can help pinpoint specific codes related to the ignition system. A systematic approach to troubleshooting is essential for identifying the exact cause of any issues.
Reassembly and Final Steps
Now that the new coil packs are installed, meticulous reassembly is key to restoring your 2004 Mean Streak’s functionality. Careful attention to detail during this phase ensures everything functions correctly and safely.Reassembling the motorcycle components involves precisely placing each part back into its original position, ensuring proper alignment and secure connections. This careful process is crucial for optimal performance and longevity.
Reconnecting Components
Thorough reconnection of all electrical components is paramount. Incorrect wiring connections can lead to malfunctions or even damage to the motorcycle’s electrical system. Double-check every wire to guarantee proper placement. Ensure all connectors are firmly snapped into place, avoiding any potential short circuits or loose connections.
Securing the Motorcycle Frame, How to replace coil packs on 2004 mean streakj
Ensuring all fasteners are properly tightened is critical. Loose fasteners can lead to component movement and potentially serious issues during operation. Use the appropriate torque specifications for each fastener to avoid damage to the motorcycle’s frame or components. Refer to your motorcycle’s service manual for specific torque values.
Final Electrical Checks
Double-checking the battery connections and ensuring the battery is securely fastened is essential. A loose or improperly connected battery can lead to electrical issues and compromise the motorcycle’s overall functionality. Tighten all connections to guarantee a secure and reliable power source.
Reassembly Procedure
| Step | Action | Notes |
|---|---|---|
| 1 | Reconnect all wiring harnesses | Ensure all connectors are fully seated and secure. |
| 2 | Tighten all fasteners | Use appropriate torque specifications. |
| 3 | Secure the battery | Double-check all battery connections. |
| 4 | Inspect all components | Verify proper alignment and function. |
| 5 | Test the system | Start the motorcycle and verify all functions. |
Final Verification
A final visual inspection is vital to confirm everything is in its proper place and that no components have been damaged during the replacement process. Check for any signs of leaks, loose connections, or misalignment.
- Verify all connections are secure.
- Check for any leaks or damage.
- Ensure all fasteners are tightened according to specifications.
- Inspect the motorcycle’s frame for any signs of damage or misalignment.
Conclusive Thoughts
In conclusion, replacing coil packs on your 2004 Mean Streak is a manageable task with the right approach. By following the detailed steps and safety precautions Artikeld in this guide, you can restore your motorcycle’s power and reliability. Remember to prioritize safety throughout the entire process. Thorough preparation and meticulous execution are key to a successful repair.
Helpful Answers
Q: What are the typical signs that my coil packs need replacing?
A: Common signs include misfires, reduced power, rough idling, or a sputtering engine. Visual inspection of the coil packs for damage like cracks or discoloration is also important.
Q: What kind of tools are needed for this job?
A: You’ll need various tools depending on the specific model, but commonly required tools include wrenches, sockets, screwdrivers, and possibly a torque wrench. Always double-check the specific tools required for your bike’s model.
Q: What safety precautions should I take before starting the repair?
A: Always wear appropriate safety gear (gloves, eye protection, etc.). Ensure the motorcycle is securely supported, and disconnect the battery to prevent electrical hazards. Follow all safety procedures Artikeld in the guide.
Q: How do I know if the new coil packs are installed correctly?
A: After installation, carefully test the electrical connections and verify the engine runs smoothly. Check for any unusual noises or performance issues. Consult the guide for specific testing procedures and troubleshooting tips.
