How to replace lamp socket? This isn’t just a DIY project; it’s a crucial skill for anyone who wants to maintain their home’s lighting. From flickering bulbs to burnt-out sockets, knowing how to swap them out saves you money and headaches. This guide dives deep into the process, covering everything from safety precautions to troubleshooting common issues, ensuring a smooth and safe replacement for various lamp types.
This comprehensive guide will walk you through the entire process, from assessing your existing socket to safely installing the new one. We’ll tackle different socket types, including Edison, GU10, and more, providing detailed steps for each. You’ll also learn about essential tools and materials, plus critical safety considerations to prevent accidents.
Introduction to Lamp Socket Replacement
Replacing a lamp socket is a crucial maintenance task for ensuring the safe and efficient operation of lighting fixtures. A faulty or damaged socket can lead to electrical hazards, premature bulb failure, and potentially costly repairs. This process is frequently required due to burned-out bulbs, loose connections, or damaged wiring. Correctly replacing a lamp socket safeguards against electrical shocks and fire risks.Understanding the intricacies of different lamp socket types, proper tool usage, and adherence to safety protocols are vital for successful and safe replacements.
A thorough understanding of these factors enables a more confident and efficient approach to the task.
Tools Required for Lamp Socket Replacement
Proper tools are essential for safe and effective lamp socket replacement. The specific tools needed may vary depending on the type of socket being replaced, but some common and essential tools include a voltage tester, screwdrivers (Phillips and flathead), wire strippers, pliers, and a new lamp socket. A voltage tester is paramount to ensure the power is off before any work is initiated, mitigating the risk of electrical shock.
Screwdrivers are essential for disassembling the fixture. Wire strippers are used for preparing the wires for connection. Pliers provide additional gripping power and aid in the removal of components. The new socket ensures proper functionality and safety.
Safety Precautions Before Commencing Replacement
Prioritizing safety is paramount in any electrical work. Before initiating any lamp socket replacement, it is absolutely critical to turn off the power to the circuit supplying the fixture. This is achieved by locating the circuit breaker or fuse box corresponding to the light fixture and switching it off. Using a voltage tester to confirm the circuit is indeed de-energized is an indispensable step in the process, reducing the risk of electrical shock.
Ensure the work area is well-lit and free from obstructions to maintain a clear line of sight. Always wear appropriate safety glasses to protect the eyes from debris or potential hazards. Using insulated tools is also a critical precaution, providing an additional layer of protection.
Types of Lamp Sockets
Different types of lamp sockets cater to various bulb types and fixture designs. The most common types include Edison base sockets, GU10, MR16, and candelabra sockets. Understanding the unique characteristics of each socket type is vital for appropriate tool selection and successful replacement.
Lamp Socket Replacement Table
| Socket Type | Tool Requirements | Safety Precautions |
|---|---|---|
| Edison Base | Voltage tester, Phillips screwdriver, wire strippers, pliers, new Edison base socket | Turn off power, confirm with voltage tester, wear safety glasses, use insulated tools. |
| GU10 | Voltage tester, small flathead screwdriver, wire strippers, pliers, new GU10 socket | Turn off power, confirm with voltage tester, wear safety glasses, use insulated tools. |
| MR16 | Voltage tester, small flathead screwdriver, wire strippers, pliers, new MR16 socket | Turn off power, confirm with voltage tester, wear safety glasses, use insulated tools. |
| Candelabra | Voltage tester, small flathead screwdriver, wire strippers, pliers, new candelabra socket | Turn off power, confirm with voltage tester, wear safety glasses, use insulated tools. |
Step-by-Step Replacement Procedure
Proper lamp socket replacement is crucial for maintaining electrical safety and ensuring the longevity of your lighting fixtures. Incorrect procedures can lead to hazards like electrical shocks or fires. This section details the safe and efficient steps involved in replacing a lamp socket.
Power Supply Disconnection
Safe electrical work always begins with isolating the power source. Failure to do so can lead to serious injury. Ensure the circuit breaker or fuse corresponding to the affected lighting fixture is switched off. Verify the power is completely disconnected by using a non-contact voltage tester to confirm there is no voltage present at the socket terminals.
This crucial step prevents electrical shocks and ensures the safety of the entire process.
Disconnecting the Electrical Connection
Carefully disconnect the electrical wiring from the old lamp socket. Begin by identifying the wires connected to the socket—typically, these are the hot, neutral, and ground wires. Carefully detach the wires from the socket terminals, taking note of the wire colors and their corresponding connections. This prevents accidental shorts or incorrect reconnections later.
Removing the Old Socket
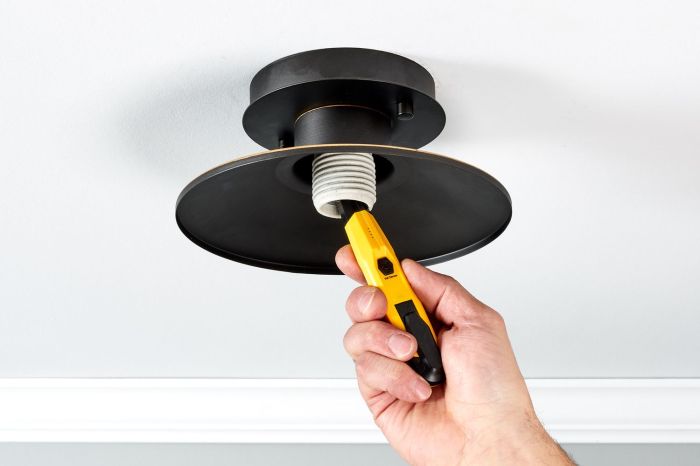
Thoroughly examine the existing lamp socket and identify the mounting mechanism. Some sockets are screwed into the fixture, while others are clipped or have specific retaining clips. Using appropriate tools (e.g., screwdriver, pliers), carefully remove the old socket, ensuring you do not damage the fixture’s housing. This step requires precision to avoid breakage or misalignment of the fixture.
Installing the New Socket
Carefully align the new lamp socket with the fixture’s mounting points. Ensure the socket’s terminals are correctly oriented for the wiring connections. Carefully connect the wires to the corresponding terminals on the new socket, matching the colors of the wires to the socket’s markings. It is essential to maintain the correct polarity of the wires.
Securing the New Socket
After connecting the wires, secure the new lamp socket in the fixture using the appropriate mounting method. Ensure the socket is firmly seated and aligned to prevent any potential issues with the fixture. This ensures the stability of the socket, preventing it from loosening or coming loose over time.
Step-by-Step Table
| Step | Action | Visual Aid Description |
|---|---|---|
| 1 | Turn off the power supply to the circuit controlling the light fixture. Verify using a non-contact voltage tester. | A circuit breaker is flipped off. A non-contact voltage tester is held near the lamp socket terminals, showing no light. |
| 2 | Disconnect the wires from the old socket, noting their colors and positions. | Wires are disconnected from the old socket terminals. A diagram illustrating the wire colors and their corresponding positions on the old socket is displayed. |
| 3 | Remove the old socket. | The old socket is removed from the fixture. The method of removal—screwing, clipping, or other—is clearly demonstrated. |
| 4 | Align the new socket with the fixture’s mounting points. | The new socket is correctly aligned with the fixture’s mounting points. |
| 5 | Connect the wires to the new socket terminals, matching colors and positions. | Wires are securely connected to the new socket terminals. The color-coded wiring scheme is highlighted. |
| 6 | Secure the new socket in the fixture using the appropriate method. | The new socket is firmly secured in the fixture. |
Troubleshooting Common Issues
Proper lamp socket replacement necessitates meticulous attention to detail, including identifying and rectifying potential problems. Failure to diagnose and address these issues can lead to unsatisfactory results, from a flickering light to a complete failure of the fixture. This section details common problems encountered during socket replacement and provides solutions for effective resolution.
Potential Problems and Diagnostics
Lamp socket replacement, while generally straightforward, can present unforeseen challenges. Careful inspection and a methodical approach to problem-solving are crucial for a successful outcome. Incorrect identification of the root cause can lead to ineffective or even dangerous repair attempts.
Loose Connections
Loose connections are a frequent source of difficulty during lamp socket replacement. This issue can manifest as intermittent flickering, dimming, or complete failure of the light. Diagnosing loose connections involves visually inspecting the wire connections at the socket. Look for any signs of movement or looseness. Furthermore, use a multimeter to test the continuity of the wiring.
If a connection is loose, carefully tighten the wires using appropriate tools and ensure they are securely fastened to the socket terminals. Avoid over-tightening, which can damage the wires.
Damaged Wires, How to replace lamp socket
Damaged wires are another common problem. Symptoms may include flickering lights, a burning smell, or a complete loss of power to the fixture. Visual inspection is crucial to detect frayed, exposed, or broken wires. Use a multimeter to test for continuity. If damage is found, the damaged section must be carefully isolated and replaced with new, appropriately sized wire.
Employing proper electrical safety procedures is paramount in this step.
Incorrect Socket Type
A critical issue to avoid is using an incompatible lamp socket. Using the wrong socket type can lead to improper wiring, electrical shock hazards, or fixture damage. Accurate identification of the existing socket type is critical. This ensures the correct replacement socket is purchased and installed. Use a screwdriver or similar tool to verify the existing socket type and ensure the replacement socket is identical.
Table of Common Issues
| Problem | Cause | Solution |
|---|---|---|
| Flickering Light | Loose connections, damaged wires, or a faulty switch | Inspect wire connections, test for continuity, and replace damaged wires. Check the switch for proper operation. |
| Dim Light | Loose connections, high resistance in wiring, or insufficient voltage | Tighten connections, check for any kinks or obstructions in wiring, and ensure the voltage supply is adequate. |
| No Light | Open circuit in wiring, blown fuse, or a tripped breaker | Check for continuity in wiring, replace a blown fuse, and ensure the breaker is reset. |
| Burning Smell | Overheating, damaged wires, or short circuit | Check for signs of overheating, replace damaged wires, and ensure proper insulation and circuit protection. |
Different Lamp Socket Types and Their Replacement
Lamp socket replacement requires careful attention to the specific type of socket. Variations in socket design dictate the appropriate tools and procedures for safe and effective replacement. Understanding the differences between common socket types is crucial for successful execution.
Socket Type Comparison
Different lamp socket types exhibit varying physical configurations, impacting the replacement process. This section presents a comparative analysis of common socket types, highlighting their unique characteristics and replacement procedures.
| Socket Type | Replacement Steps | Unique Considerations |
|---|---|---|
| Edison Screw (E26, E27) |
|
These are the most common type, and their replacement follows a straightforward procedure. Ensure the new socket’s dimensions are identical to the old one. |
| GU10 |
|
GU10 sockets utilize a bayonet-style mounting mechanism. The retaining mechanism should be engaged completely. Incorrect installation can lead to poor electrical contact and potential safety issues. |
| MR16 |
|
MR16 sockets typically feature a bayonet or spring-loaded clip for mounting. Ensure the new socket is securely seated in the fixture. Incorrect installation may result in poor light output or fixture damage. |
Specific Replacement Procedures
This section details specific steps for replacing each socket type, including unique considerations for proper installation.
Safety Considerations and Precautions
Lamp socket replacement, while often a straightforward task, necessitates meticulous adherence to safety protocols. Neglecting these precautions can lead to serious consequences, including electrical shocks, burns, and even fatalities. This section Artikels crucial safety measures to ensure a secure and risk-free replacement process.Proper safety procedures are paramount when working with electrical systems. Ignoring these guidelines can result in potentially dangerous situations.
A comprehensive understanding of electrical hazards and preventive measures is essential for safe lamp socket replacement.
Importance of Safety During Lamp Socket Replacement
Ensuring the safety of the individual and the surrounding environment is of utmost importance during lamp socket replacement. Improper handling of electrical components can lead to unforeseen hazards. Failure to prioritize safety can have severe repercussions, ranging from minor injuries to catastrophic accidents. Therefore, comprehensive safety measures should be implemented throughout the entire replacement process.
Risks of Working with Electricity
Working with electricity inherently involves risks. Electrical shocks, burns, and fire hazards are significant concerns. Electricity can pass through the body causing severe physiological damage. The potential for electrocution, particularly when working with exposed wiring or faulty components, necessitates stringent safety precautions. High voltage systems pose an even greater risk.
Preventing Electrical Shocks
Electrical shocks are a major concern during lamp socket replacement. Ensuring the circuit is de-energized before any work is commenced is critical. This involves switching off the power supply at the circuit breaker or fuse box. Testing the circuit with a non-contact voltage tester is also an essential step. Further, using insulated tools and wearing appropriate safety gear such as rubber-soled shoes, is vital.
The importance of maintaining a safe distance from exposed wires cannot be overstated.
Proper Handling of Tools and Materials
The safe handling of tools and materials is crucial. Using tools in their intended manner, ensuring they are in good condition, and maintaining a clean and organized workspace are vital steps. Using damaged or faulty tools can lead to accidents and injuries. Tools should be inspected before each use. Materials should be stored properly to prevent accidents and ensure easy access to the necessary components.
Safety Guidelines
- Always disconnect the power supply to the fixture before any work is undertaken. This step is non-negotiable and forms the foundation of all other safety procedures.
- Use insulated tools and gloves to prevent electrical shocks.
- Ensure the work area is well-lit and free from obstructions to prevent accidents.
- Keep children and pets away from the work area.
- Never work alone when dealing with electrical components. Having a second pair of eyes is critical to safety.
- Inspect all tools and materials for any damage before use. This is a critical preventative measure.
- If any part of the fixture is damaged, do not attempt to repair it. Seek professional assistance.
- Follow the manufacturer’s instructions carefully during the entire replacement process.
Safety Procedures and Their Importance
| Safety Procedure | Importance |
|---|---|
| Disconnect power supply | Prevents electrical shock and ensures safe work environment. |
| Use insulated tools | Reduces the risk of electrical shocks and injuries. |
| Inspect tools and materials | Ensures the safety and reliability of tools and components. |
| Wear appropriate safety gear | Protects against electrical shocks and other hazards. |
| Maintain a safe workspace | Reduces the risk of falls, slips, and other accidents. |
Tools and Materials Required
Proper preparation is crucial for a successful lamp socket replacement. Selecting the correct tools and materials ensures a safe and efficient process, minimizing the risk of damage to the fixture and preventing potential injury. This section details the necessary tools, their functions, and the importance of choosing appropriate ones.
Essential Tools
Careful selection of tools is paramount for a successful and safe lamp socket replacement. Using the wrong tools can lead to damage, injury, or an ineffective repair. The following tools are commonly required and play specific roles in the process.
- Screwdrivers: Flathead and Phillips head screwdrivers are frequently needed for disassembling the fixture. Flathead screwdrivers are useful for prying or removing components, while Phillips head screwdrivers are designed for securing screws with Phillips head designs. The correct size and type of screwdriver is critical to avoid stripping screws or damaging the fixture. A set of screwdrivers with various sizes and types ensures flexibility in dealing with different screw types and sizes commonly encountered.
- Wire Strippers/Cutters: These tools are essential for safely cutting and stripping wires. Proper wire stripping prevents exposed wires from causing electrical hazards and ensures a secure connection during reassembly. Using sharp, high-quality wire strippers and cutters ensures a clean cut and proper wire stripping, minimizing the risk of electrical shocks or short circuits.
- Needle-nose Pliers: These pliers are beneficial for handling small components, bending wire, or adjusting connections. Their precision grip allows for delicate work, reducing the risk of damaging components or wires. The fine tip of needle-nose pliers enables precise work in confined spaces.
- Voltage Tester: A non-contact voltage tester is crucial for verifying that the power is off to the circuit before any work begins. This critical step prevents electrical shocks or damage to the fixture or the user. The voltage tester ensures that the electrical circuit is de-energized, providing a safety measure to avoid electrical hazards.
- Gloves: Safety gloves protect hands from cuts or burns during the process. They are particularly important when handling wires, exposed metal components, or other potential hazards. Gloves safeguard the user from contact with potentially harmful materials.
- Flashlight: A flashlight is indispensable for tasks in dimly lit areas or during nighttime work. A well-lit work area reduces the risk of accidents and facilitates precise work. The use of a flashlight provides necessary illumination during the repair process.
Materials
Adequate materials are equally important for a successful lamp socket replacement. Using the right materials ensures a secure and reliable connection, preventing potential issues in the future.
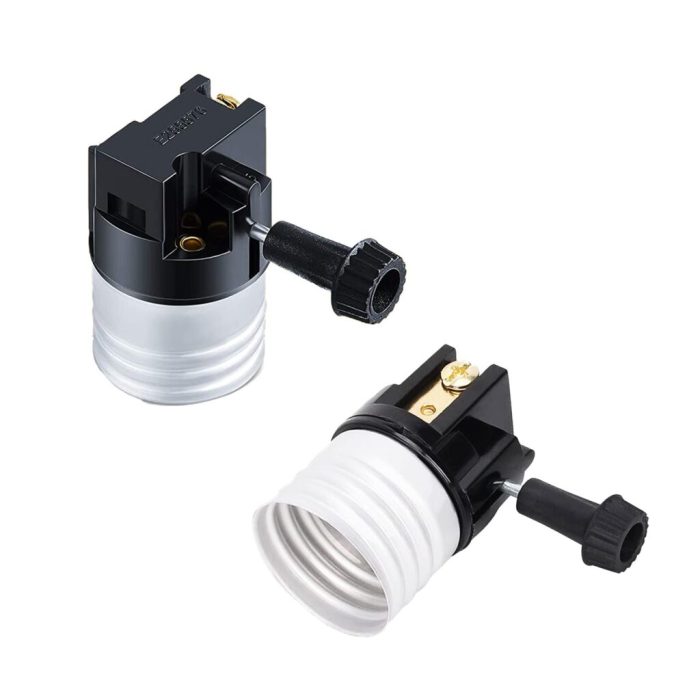
- New Lamp Socket: A new lamp socket ensures proper functionality and avoids potential hazards. Replacing a faulty lamp socket is a crucial step for maintaining safety and reliability. The selection of the correct lamp socket type is important for compatibility with the fixture and the desired light bulb.
- Electrical Tape: Insulating tape is used to secure connections, creating a secure and reliable electrical connection. Proper use of electrical tape is essential to prevent short circuits and ensure safety.
Tool Summary
The table below summarizes the essential tools, their functions, and the importance of selecting appropriate tools for a safe and effective lamp socket replacement.
| Tool | Function | Importance |
|---|---|---|
| Screwdrivers (flathead & Phillips) | Disassembling the fixture and securing components | Proper disassembly and reassembly, avoiding damage |
| Wire Strippers/Cutters | Cutting and stripping wires | Ensuring safe and secure wire connections, preventing electrical hazards |
| Needle-nose Pliers | Handling small components and adjusting connections | Precise handling of small parts, reducing damage risk |
| Voltage Tester | Verifying the power is off to the circuit | Preventing electrical shocks and damage |
| Gloves | Protecting hands from cuts or burns | Protecting the user from potential hazards |
| Flashlight | Providing illumination in dimly lit areas | Improving visibility and reducing accident risk |
| New Lamp Socket | Replacing the faulty socket | Ensuring proper functionality and safety |
| Electrical Tape | Securing connections and preventing short circuits | Creating a reliable electrical connection |
Variations and Special Cases
Lamp socket replacement in complex fixtures presents unique challenges requiring specialized knowledge and techniques. Understanding these variations is crucial for safe and effective repairs, avoiding damage to the fixture and ensuring proper functionality. This section details specific considerations for various fixture types, highlighting the unique steps and precautions required.Chandeliers and recessed lighting fixtures, for instance, often present obstacles such as limited access, intricate wiring configurations, and the potential for damage to delicate components.
This section addresses these challenges, offering step-by-step guidance for safe and effective replacements.
Chandelier Lamp Socket Replacement
Chandeliers often feature multiple lamp sockets, interconnected wiring, and potentially fragile decorative elements. Carefully assessing the chandelier’s structure and wiring is paramount to avoid damage during the replacement process. Disconnect the power supply to the fixture before any work. Identify the specific socket requiring replacement, noting its connection points and surrounding components. Use appropriate tools and techniques to carefully remove the old socket, ensuring not to damage any wires or decorative parts.
Install the new socket, ensuring a secure connection, and reconnect the wires meticulously. Reconnect the power supply after all connections are confirmed.
Recessed Lighting Fixture Lamp Socket Replacement
Recessed lighting fixtures often involve accessing the socket from within the ceiling cavity, requiring specialized tools and techniques. The accessibility of the socket may be limited by the fixture’s design and the surrounding drywall or insulation. Proper identification of the wiring connections and securing the new socket within the confined space are crucial. First, locate the power supply and disconnect the electricity.
Identify the socket’s connections and carefully remove the old socket, being mindful of potential damage to the fixture’s housing. Install the new socket, ensuring the connections are secure and correctly positioned. Reinstall the fixture housing, ensuring proper alignment and sealing. Finally, restore the power supply.
Table of Fixture Variations
| Fixture Type | Steps | Considerations |
|---|---|---|
| Chandeliers |
|
|
| Recessed Lighting |
|
|
Conclusive Thoughts
Replacing a lamp socket might seem daunting, but with this guide, you’re equipped to tackle the task with confidence. Remember, safety is paramount. By following the detailed steps, troubleshooting tips, and safety precautions, you’ll be well-prepared to swap out any lamp socket with ease. So, grab your tools, and let’s get this lighting fix done right!
Question & Answer Hub: How To Replace Lamp Socket
Q: What tools do I need for replacing a lamp socket?
A: You’ll need a screwdriver (Phillips and/or flathead), wire strippers, pliers, and a voltage tester. Safety glasses and gloves are also highly recommended.
Q: How do I know if the power is completely off?
A: Always use a voltage tester to confirm the circuit is dead before starting any electrical work. Double-check the breaker box to ensure the corresponding circuit is switched off.
Q: What if the wires are damaged during the removal process?
A: If you encounter damaged wires, replace them immediately with appropriate gauge wire. Don’t try to repair damaged wires; this could lead to a fire hazard.
Q: Can I replace a lamp socket in a fixture with multiple sockets?
A: Yes, but approach each socket individually, turning off the power and ensuring it’s completely off for each socket before working on it. This is especially important for safety and avoiding electrical shock.
