How to separate embroidery floss? Embroidery floss, a vibrant thread of creativity, can sometimes become tangled, knotted, or even damaged. This guide will walk you through the process of separating embroidery floss, whether you’re dealing with a simple tangle or a complex project. From basic techniques to advanced methods, we’ll equip you with the knowledge and tools to unravel any challenge and keep your crafting projects flowing smoothly.
Embroidery floss, a staple in countless crafting projects, can become a tangled nightmare if not handled carefully. Understanding the different types of floss and the appropriate tools for separation is key to maintaining the beauty and integrity of your work. This comprehensive guide provides a step-by-step approach to successfully separating embroidery floss, ensuring you can untangle knots and reclaim your projects with ease.
Introduction to Embroidery Floss

Embroidery floss, a versatile crafting material, is a crucial component in numerous artistic endeavors. Its delicate yet strong nature allows for intricate designs and detailed embellishments. This thread is commonly used in various craft projects, from simple home décor to elaborate artistic creations. Understanding its diverse types, compositions, and applications is key to selecting the right floss for a particular project.Embroidery floss is a six-strand thread typically used for embroidery, needlepoint, and other craft applications.
It’s available in a vast array of colors and varying thicknesses, impacting the overall look and feel of the finished product.
Common Types and Variations
Embroidery floss comes in different sizes and materials. The most common size is the standard 6-strand floss, often marketed as #20 or #30, although other sizes exist. Variations also include floss made from different materials, like cotton, silk, or metallic blends. The material choice influences the thread’s texture, sheen, and durability.
Composition and Structure
Typically, embroidery floss is composed of six individual strands twisted together. These strands can be made from various materials like cotton, silk, or blends. The twisting process creates a sturdy and manageable thread, ideal for intricate stitching and embroidery work. The individual strands can be separated for different techniques, showcasing its flexibility.
Common Uses
Embroidery floss finds extensive use in diverse craft projects. It’s frequently employed for creating intricate patterns and designs on fabric, such as decorative stitches, embellishments, and decorative borders. It’s also used in needlepoint, cross-stitch, and other craft forms that demand detailed work. Further, it is suitable for embellishing clothing, accessories, and home décor items.
Comparison of Embroidery Floss Types
| Floss Type | Material | Strengths | Weaknesses |
|---|---|---|---|
| Cotton Embroidery Floss | Cotton | Affordable, readily available, good for general embroidery, various color options | May fray slightly, less durable than silk floss in some cases |
| Silk Embroidery Floss | Silk | Smooth texture, lustrous sheen, more durable than cotton, great for delicate work | More expensive than cotton, can be prone to tangling |
| Metallic Embroidery Floss | Metallic fibers | Adds a shimmery or reflective effect to projects, creates unique visual appeal | Can be harder to work with than cotton or silk, may require specific needle types for optimal handling |
The table above provides a concise overview of the key characteristics of different floss types. Choosing the right floss depends on the desired outcome and the specific craft project.
Methods for Separating Embroidery Floss: How To Separate Embroidery Floss
Embroidery floss, a versatile crafting material, can become tangled and knotted during use. Efficient separation techniques are crucial for maintaining its usability and preventing frustration. Proper methods ensure the floss remains intact and ready for the next project.
Separating Embroidery Floss with Scissors
A pair of sharp, fabric-suitable scissors is an effective tool for separating embroidery floss, especially when dealing with simple tangles. Carefully cut through the entanglement, ensuring the cut is clean and precise to minimize fraying. Avoid using dull or blunt scissors, as this may lead to uneven cuts and damage the floss. Start by gently holding the floss sections you want to separate, then carefully cut through the knots or tangles.
This method works well for simple, straightforward tangles.
Separating Embroidery Floss with a Seam Ripper
A seam ripper, designed for intricate tasks, is valuable for disentangling complex knots and tangles. Its fine, pointed tip allows for precise separation of tightly interwoven or knotted floss strands. Gently insert the seam ripper’s tip between the knots, then carefully maneuver the tool to work around the entanglement, pulling apart the tangled sections. This method proves particularly helpful when dealing with densely packed tangles.
Separating Embroidery Floss with a Needle
A needle, specifically a tapestry needle or a similar small-eyed needle, can be used for separating knotted or tangled embroidery floss. The needle’s tip is ideal for gently dislodging knots and untangling the strands without causing significant damage. Carefully insert the needle’s tip between the knots or tangles, then gently tug on the strands to separate them. This method is suitable for intricate knots and areas where scissors or seam rippers might be too cumbersome.
Separating Damaged or Knotted Embroidery Floss
Damaged or knotted floss requires a more patient approach. First, identify the damaged or knotted areas. For damaged floss, a seam ripper or needle might be helpful in carefully removing the damaged section. If the floss is knotted, try gently pulling apart the knots using your fingers, or using a seam ripper to carefully untangle the knots.
In cases of severe knotting, consider carefully cutting the knot using scissors, ensuring to avoid damaging the floss strands.
Comparison of Separation Methods
| Tool | Method | Suitability |
|---|---|---|
| Scissors | Cut through tangles | Simple tangles, straightforward separation |
| Seam Ripper | Precisely untangle knots | Complex knots, tightly interwoven sections |
| Needle | Gently dislodge knots | Intricate knots, areas where other tools are less effective |
Tools and Materials Needed
Proper tools are essential for efficient and safe embroidery floss separation. Carefully chosen instruments can significantly reduce frustration and ensure that your floss remains intact. A well-equipped toolkit empowers you to manage various floss types effectively.
Scissors for Floss Separation
Selecting the right scissors is crucial for precise and clean floss separation. Sharp, high-quality scissors are essential for preventing fraying and ensuring a smooth cut.
- Sharp, pointed-tip scissors are ideal for delicate floss types, like silk or mercerized cotton. These scissors offer better control for intricate cuts and reduce the risk of damaging the floss.
- Fabric scissors with a slightly blunt tip are suitable for separating thicker, more robust embroidery floss types. These scissors provide a wider cutting surface and are generally more durable than pointed-tip scissors.
- Avoid using dull or worn-out scissors, as these can cause uneven cuts and fray the floss, leading to potential tangles and a less-than-ideal separation outcome.
Seam Ripper for Floss Separation
A seam ripper is a valuable tool for carefully separating threads and floss from projects. A good seam ripper is characterized by a sturdy, pointed blade that effectively disengages threads from the fabric without damaging the fabric itself.
- A seam ripper with a sharp, durable blade is crucial for gently removing floss without causing unnecessary damage. A dull blade can snag and tear the floss, making the separation process more difficult and time-consuming.
- A sturdy handle is important for providing comfortable and controlled leverage during the separation process. This helps prevent accidental slippage and ensures precise movements.
Needles for Floss Separation
Certain types of needles can aid in separating embroidery floss. They can be used to carefully detach threads or floss without causing damage.
- Embroidery needles, especially those with a fine point, are useful for gently dislodging threads from the fabric. The needle’s shape and size make it easier to grip and manipulate the floss during the separation process.
- Embroidery needles can also be helpful for gently pulling threads from fabric while keeping the surrounding fabric intact. This prevents damage and ensures that the fabric remains in good condition.
Suitability of Tools for Different Floss Types
The following table Artikels the suitability of various tools for separating different types of embroidery floss.
| Floss Type | Scissors | Seam Ripper | Needle |
|---|---|---|---|
| Silk | Sharp, pointed-tip | Sharp, fine-pointed | Fine-pointed embroidery |
| Mercerized Cotton | Sharp, pointed-tip | Sharp, fine-pointed | Fine-pointed embroidery |
| Polyester | Fabric scissors | Sharp, medium-pointed | Fine-pointed embroidery |
| Cotton | Fabric scissors | Sharp, medium-pointed | Fine-pointed embroidery |
Common Problems and Solutions
Separating embroidery floss can sometimes present unexpected challenges. From tangled knots to broken threads, overcoming these hurdles is crucial for efficient work. Understanding the common problems and their solutions empowers embroiderers to maintain a smooth workflow and prevent frustration. This section delves into the pitfalls and provides practical strategies to overcome them.Troubleshooting during the separation process is vital.
Proper handling and a well-defined approach are essential for preventing future tangles and maintaining the integrity of the floss. By recognizing potential issues and implementing the appropriate solutions, you can effectively manage the separation process and maximize the use of your embroidery floss.
Knots and Tangles
Tangled embroidery floss can disrupt the separation process. Careful handling is key to preventing tangles. Holding the floss with a firm but gentle grip minimizes the risk of creating new knots or exacerbating existing ones. Using a disentangling tool, such as a fine-tipped needle or a specialized floss separator, is often effective in addressing minor tangles. Avoid pulling or tugging too hard, as this may cause the floss to break or become further entangled.Stubborn knots may require a more focused approach.
Using a pair of fine-tipped tweezers or a sharp-edged tool, carefully separate the knot, working from the outside in to unravel the entanglement. Patience is key; working slowly and methodically minimizes the risk of further damage to the floss. If the knot remains stubbornly intact, try gently sliding a needle or a thin piece of wire under the knot to carefully loosen its hold.
Broken Strands
Broken strands can disrupt the uniformity of the embroidery floss and impact the overall project. The best approach depends on the severity of the break and the type of floss. For minor breaks, carefully re-tie the strands together using a knot. Ensure the knot is tight but not overly tight to prevent further stress on the floss.
For more substantial breaks, the floss may need to be replaced, especially if the break compromises the desired length. If possible, salvage the broken strands by carefully untangling any remaining knots and re-threading the broken sections into a new length of floss.
Floss Type and Tool Selection
Different embroidery floss types require different handling and separation techniques. The selection of appropriate tools plays a significant role in the efficiency and success of the separation process. For example, silk embroidery floss, with its delicate nature, benefits from gentle handling and the use of fine-tipped tools. Similarly, metallic or specialty embroidery floss might require specialized tools designed to manage the specific characteristics of these types of floss.
The choice of tool will directly influence the ease and safety of the separation process.
| Floss Type | Recommended Tools | Handling Tips |
|---|---|---|
| Silk | Fine-tipped tweezers, needle | Gently pull and separate; avoid harsh tugging |
| Metallic | Specialized floss separator, tweezers | Avoid sharp objects that may damage the metal |
| Cotton | Needle, disentangling tool | Handle with moderate grip; can tolerate some tugging |
Advanced Techniques for Floss Separation
Mastering the art of embroidery floss separation extends beyond basic methods. Intricate designs and projects often require specialized approaches to meticulously extract floss without damage. Understanding these advanced techniques allows for the preservation of intricate patterns and the restoration of damaged work.
Separating Floss from Larger Embroidery Pieces
Successfully separating embroidery floss embedded within a larger piece demands careful consideration and precision. Begin by identifying the floss strands within the project. Using a magnifying glass, tweezers, and a sharp, fine-tipped scissors is crucial for isolating each strand. Cut the thread directly at the point of entry or exit of the floss in the piece to prevent accidental damage to the surrounding stitching.
Work systematically, cutting the floss near its point of entry or exit from the main embroidery to avoid snags or pulling on other threads. This meticulous approach preserves the integrity of the original piece.
Separating Floss from Other Materials
Embroidery floss can intertwine with other materials like fabric or backing. Careful separation is necessary to avoid damaging the supporting elements. Identify the point where the floss interacts with other materials. Using a fine-tipped needle, carefully separate the floss from the other components. Apply minimal pressure, ensuring the material isn’t stretched or torn.
A dampened cloth or fabric softener can help loosen the threads and prevent damage to the surrounding embroidery or fabric. For stubborn threads, try gently pulling the floss, working along the thread path.
Separating Tightly Wound or Compressed Floss, How to separate embroidery floss
Dealing with tightly wound or compressed embroidery floss requires specialized techniques to prevent damage. First, gently unravel the tight clump using a needle or toothpick to ease the tension. Applying a gentle heat, such as using a hairdryer on a low setting, can help loosen the strands without melting the thread. Carefully unwind the floss, applying a gentle and even pull to prevent breaking.
A fine-tipped needle or tweezers can be used to separate the strands as they are loosened. Use a gentle and methodical approach to avoid unnecessary damage.
Separating Floss in Intricate Designs
For complex embroidery patterns, the separation process becomes more nuanced. Begin by examining the design, noting the floss paths and intersections. A magnifying glass and fine-tipped scissors are essential. Carefully cut the floss at strategic points, always maintaining a safe distance from the surrounding stitching. Work systematically, strand by strand, and pay close attention to the pattern.
This method ensures minimal damage to the intricate embroidery work.
Advanced Techniques Summary Table
| Technique | Description | Step-by-Step Procedure |
|---|---|---|
| Separating Floss from Larger Pieces | Preserving the original embroidery piece during floss extraction. | 1. Identify floss strands. 2. Use tweezers and scissors. 3. Cut floss at entry/exit points. |
| Separating Floss from Other Materials | Carefully isolating floss from fabric or backing. | 1. Identify interaction points. 2. Use fine-tipped needle. 3. Gently separate floss. 4. Use damp cloth (optional). |
| Separating Tightly Wound Floss | Unwinding tightly wound floss without damage. | 1. Gently unravel with needle/toothpick. 2. Apply gentle heat (low setting). 3. Unwind slowly. 4. Use tweezers/needle to separate strands. |
| Separating Floss in Intricate Designs | Preserving complex embroidery designs during floss separation. | 1. Examine design carefully. 2. Use magnifying glass and scissors. 3. Strategically cut floss. 4. Work systematically, strand by strand. |
Safety Precautions and Considerations
Embroidery floss, while beautiful and versatile, can pose some minor risks if not handled properly. Understanding these potential hazards and implementing simple safety precautions can ensure a smooth and injury-free separation process. Careful handling and storage techniques are key to preventing tangles and frustration.
Essential Safety Precautions
Proper handling and storage are crucial for preventing tangles and injuries while separating embroidery floss. Adhering to these safety measures will guarantee a more efficient and enjoyable separation process.
- Use a stable work surface: A sturdy table or workspace prevents accidental slips and drops, reducing the risk of injuring yourself or damaging the floss. Ensure the surface is large enough to accommodate your tools and floss without causing clutter or instability.
- Proper lighting: Adequate lighting is essential to see the floss clearly, minimizing the risk of straining your eyes or accidentally cutting yourself with sharp tools. A well-lit workspace allows for precise handling and reduces the chance of errors during separation.
- Wear appropriate clothing: Loose-fitting clothing, especially with long sleeves or dangling parts, can get caught in the floss or tools, leading to potential injury or tangling. Choose clothing that allows for smooth movement and prevents accidental snags.
- Protect your eyes: When using sharp tools like scissors or knives, wear safety glasses or goggles to prevent any particles from entering your eyes. This is particularly important when working with delicate materials or in potentially dusty environments.
- Cut floss with care: When cutting floss, use sharp scissors or a sharp blade and cut in a controlled manner, avoiding any sudden movements. Always ensure that your fingers are out of the way of the cutting edge.
- Avoid excessive force: Using excessive force during the separation process can damage the floss or lead to injury. Gentle handling is key to maintaining the integrity of the floss while separating it effectively.
Handling and Storage of Embroidery Floss
Proper handling and storage of embroidery floss are vital for preventing tangles and ensuring long-term use. Organizing and storing floss correctly can significantly improve efficiency and prevent frustrating tangles during separation and subsequent projects.
- Organized storage: Use spool holders, containers, or dedicated floss organizers to keep your floss neatly separated. Proper organization prevents tangles and ensures easy access to the specific floss colors needed for your project.
- Avoid excessive tension: Avoid placing excessive tension on the floss when storing it. Over-tight wrapping or knots can lead to tangles and breakage when retrieving the floss.
- Store in a cool, dry place: Storing embroidery floss in a cool, dry place away from direct sunlight or extreme temperatures will help prevent damage to the floss’s fibers. Excessive heat or moisture can cause the floss to become brittle or lose its color vibrancy.
Potential Risks and Prevention
Separating embroidery floss, while generally safe, can involve potential risks if not handled properly. Awareness of these potential risks is crucial for preventing accidents and ensuring a smooth separation process.
- Cutting injuries: Using sharp tools like scissors or knives improperly can lead to cuts or punctures. Always use caution and maintain a firm grip when handling sharp objects.
- Eye injuries: Floss fibers or particles can fly into the eyes if not handled carefully. Wearing eye protection is essential to prevent potential eye irritation or damage.
- Tangled floss: Improper handling or storage can lead to tangled floss, which can be frustrating and time-consuming to untangle. Consistent use of organized storage and proper handling techniques prevents tangles.
Visual Aids and Illustrations
Visual aids are crucial for understanding complex processes like separating embroidery floss. Clear images and diagrams can simplify intricate procedures and enhance comprehension. They provide a visual representation of different floss types, tools, and techniques, facilitating faster learning and better retention.
Different Types of Embroidery Floss
Visual representation of various embroidery floss types is essential for beginners. A picture should display a range of floss colors, weights, and compositions. Different strands of floss, like cotton, silk, or metallic floss, should be highlighted to demonstrate the variety available. This image will help learners identify the specific floss they need for their project. Examples include showcasing a skein of bright red cotton floss, a skein of shimmering gold metallic floss, and a skein of smooth, light-brown silk floss.
Each type should be clearly labeled.
Tools for Separating Embroidery Floss
Visualizing tools for separating embroidery floss is key to effective learning. An image should showcase a collection of essential tools, including tweezers, scissors, a small embroidery needle, a sharp knife (for very tangled or thick floss), and a fine-tipped brush (for delicate floss). The image should clearly depict each tool, showing its specific features and purpose.
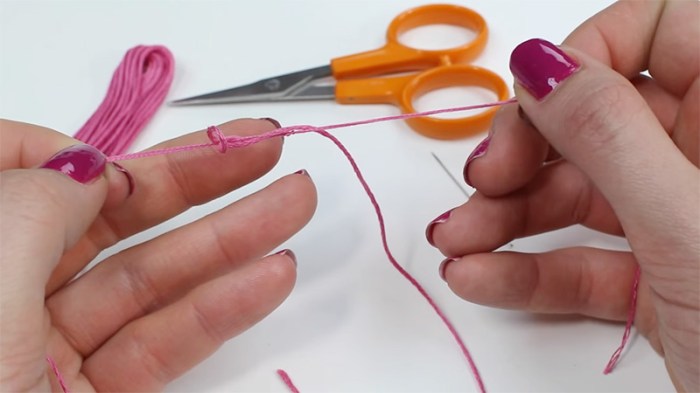
Steps for Separating Knotted Embroidery Floss
Visualizing the steps for separating knotted floss is critical for successful unknotting. A sequence of images or a diagram illustrating the steps would be helpful. The first image should show the entangled floss. The second should display the floss being carefully pulled apart with tweezers. Subsequent images should demonstrate the use of a needle or scissors to gently separate the knot, and finally, the cleanly separated floss.
Separating Floss from a Larger Piece of Embroidery
A detailed image illustrating the separation of floss from a larger embroidery piece would provide practical guidance. The image should depict the process of carefully pulling the floss away from the stitches without damaging the surrounding embroidery. Show the use of tweezers to carefully pull the floss without tearing the fabric. A close-up shot of the needle and floss interaction with the embroidery would help demonstrate the correct technique.
The image should illustrate how to identify and separate the floss without damaging the fabric or threads.
Tools and Their Use in Floss Separation
| Tool | Image | Description of Use |
|---|---|---|
| Tweezers | [Image of tweezers] | Precisely grip and manipulate individual threads, aiding in the separation of tangled or knotted floss. Especially useful for delicate floss types. |
| Scissors | [Image of small embroidery scissors] | Gently cut through knots or tangles, allowing for a cleaner separation of floss. |
| Small Embroidery Needle | [Image of a small embroidery needle] | Carefully separate knotted threads by pushing the needle between the knotted floss sections. |
| Sharp Knife (for thick floss) | [Image of a small, sharp craft knife] | Used for thick or densely tangled floss that resists other separation methods. |
| Fine-tipped Brush | [Image of a fine-tipped brush] | Gently brush away loose threads or debris around the floss, preventing damage to the fabric. |
Last Word
In conclusion, separating embroidery floss is a crucial skill for any crafter. By mastering the techniques Artikeld in this guide, you’ll be able to efficiently and effectively untangle knots, repair damage, and keep your projects on track. Remember to prioritize safety and choose the right tools for the job, and your embroidery floss will always be ready for its next creative adventure.
Essential FAQs
What are the common causes of embroidery floss tangles?
Common causes include improper storage, using too much force when working with the floss, and insufficient care during the project. Always handle your floss carefully and store it properly to prevent tangling.
How can I prevent embroidery floss from breaking during separation?
Using the correct tools for the job, such as sharp scissors or a seam ripper, and working carefully to avoid excessive pressure are key. Choose the right tool based on the type of floss and the complexity of the separation task.
What are some advanced techniques for separating intricate embroidery designs?
Advanced techniques may involve carefully separating threads that are part of a larger piece of embroidery, using a needle to delicately work through the design, or utilizing tweezers to gently manipulate the floss. Patience and precision are crucial in these situations.
What are the potential risks of separating embroidery floss improperly?
Improper separation can lead to damage or breakage of the floss. Using blunt tools or applying excessive force can also result in cuts or injuries. Always use the right tools for the job and be cautious when working with embroidery floss.
