Minolta Maxxum 5000 how to use flash attachment: Mastering flash photography with your Minolta Maxxum 5000 can dramatically improve your photos. This guide provides a comprehensive overview, from basic attachment and operation to advanced techniques and troubleshooting.
Learn how to use different flash modes, adjust settings for various lighting conditions, and troubleshoot common problems. This detailed guide will equip you with the knowledge to take stunning photos, regardless of the environment.
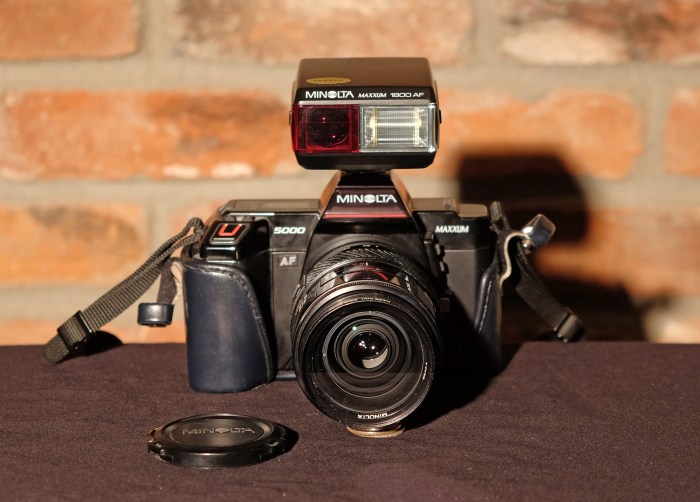
Introduction to the Minolta Maxxum 5000 Flash Attachment
Yo, peeps! The Minolta Maxxum 5000 was a total game-changer back in the day. This bad boy wasn’t just a camera; it was a whole system. And a key part of that system was its flash attachment. It opened up a world of possibilities for capturing those perfect shots, even in low-light situations. Getting the right flash was crucial for getting that killer shot, and this guide will break down the different options available.The Maxxum 5000 flash system allowed for a lot of flexibility.
You could switch up the power, the modes, and even the type of flash to match the scene. This versatility made it a popular choice for photographers of all skill levels.
Available Flash Attachment Types for the Maxxum 5000
The Minolta Maxxum 5000 supported a range of flash attachments, each with its own unique features and benefits. Knowing which one to use depends heavily on what kind of shot you’re going for.
Comparison of Flash Attachment Features
Different flash units offered varying levels of power and functionality. This table summarizes the key features to help you choose the right one for your needs.
| Flash Attachment Type | Flash Mode | Guide Number | Power Output |
|---|---|---|---|
| Minolta Speedlite 5400 | Auto, Manual, Red-Eye Reduction | 40 | High-power, suitable for medium-range shots and outdoor events |
| Minolta Speedlite 3600 | Auto, Manual, Red-Eye Reduction | 32 | Good balance between power and portability, suitable for indoor events and tighter spaces. |
| Minolta Speedlite 2800 | Auto, Manual, Red-Eye Reduction | 28 | Compact and lightweight, ideal for candid shots and everyday use. |
| Minolta Macro Flash | Manual | 16 | Designed for close-up photography, providing precise control over light for intricate details. |
Choosing the right flash for your Minolta Maxxum 5000 depends on your specific needs. Consider the lighting conditions, the distance to your subject, and the desired effect. The table above gives you a solid starting point for comparing different options.
Basic Flash Operation
Yo, fam! Flash photography with the Minolta Maxxum 5000 is a game-changer. It’s all about capturing those killer shots in various lighting situations. This section will walk you through attaching and detaching the flash, setting the modes, and using it in different lighting scenarios. Get ready to level up your photo game!Attaching and detaching the flash is super straightforward.
First, make sure your camera is turned off. Then, carefully align the flash’s mounting bracket with the corresponding slot on the camera. Gentle pressure is key; don’t force it. Once aligned, you’ll hear a click, confirming the connection. Detaching is just the reverse – gently pull the flash away from the camera.
Attaching and Detaching the Flash
The flash attachment securely mounts to the camera’s hot shoe. Ensure the flash is properly aligned with the camera’s hot shoe before applying gentle pressure. To detach, gently pull the flash away from the camera, listening for the release click.
Setting Flash Modes
Setting the flash modes on both the camera and the flash unit is crucial for optimal results. Refer to your camera’s manual for the exact procedures. Generally, you’ll find the flash mode dial on the camera body and the flash unit itself. The flash modes will control whether the flash fires automatically or manually.
Using the Flash in Different Lighting Conditions
Using the flash effectively depends on the ambient light. In low-light situations, the flash will help illuminate the subject. In bright light, you might want to use the flash to fill in shadows or for a more controlled look. Experiment to see what works best for your specific situation. Practice makes perfect, right?
Flash Mode Table
| Flash Mode | Description | Image Example | Settings |
|---|---|---|---|
| Auto Mode | The camera automatically determines whether to use the flash based on the ambient light. | A well-lit scene with the subject clearly visible, but with a slight glow from the flash. | Camera’s flash mode set to Auto, flash unit may have an Auto setting. |
| Fill-in Mode | The flash provides supplemental light to fill in shadows, maintaining the overall ambient light. | A portrait shot where the subject’s face is brightly lit while the background maintains some ambient light. | Camera’s flash mode set to Fill-in, flash unit might have a Fill-in or similar setting. |
| Red-Eye Reduction Mode | The camera uses a pre-flash to reduce the appearance of red-eye in subjects’ eyes, caused by the flash reflecting off the retina. | A portrait shot where the subject’s eyes are a normal color, not red. The background is properly lit. | Camera’s flash mode set to Red-Eye Reduction. |
| Slow Synchro Mode | The flash fires while the shutter remains open for a longer time. Useful for capturing motion in low-light situations, such as nighttime street photography. | A shot of a street scene at night, with the subjects and the background visible, showcasing motion blur of moving objects in the background. | Camera’s flash mode set to Slow Synchro, flash unit may have a similar setting. |
Advanced Flash Techniques

Alright, so you’ve got the basics down, now let’s level up your flash game. These advanced techniques are like secret ninja moves for your Minolta Maxxum 5000 – they’ll take your photos from good toepic*. Ready to unlock the potential of your flash?
Fill Flash
Fill flash is your go-to for situations where you need a little extra light to brighten up shadows. Imagine a sunny day, but the subject is in a shaded area. A fill flash gently illuminates the shadowed parts, making the overall image more balanced and preventing harsh contrast. It’s like adding a soft glow, bringing out the details you might otherwise miss.
This is super helpful for portraits outdoors or in dimly lit rooms. The key is to avoid overpowering the existing light; a subtle touch is the name of the game.
Red-Eye Reduction
Red-eye, that annoying red glow in your subject’s eyes, is a flash photography nemesis. The Minolta Maxxum 5000 has a red-eye reduction feature. This cleverly fires a pre-flash to adjust the subject’s pupils, reducing the likelihood of that dreaded red-eye effect. It’s a simple, yet crucial, trick for taking more natural-looking portraits. You’ll want to use this for any close-up shots, especially portraits.
The result? Your subjects’ eyes will look more natural and less like glowing orbs.
Slow-Synchro
Slow-synchro is a cool technique for capturing motion blur with your flash. Picture this: you’re taking a photo of someone walking across a street at night. Using slow-synchro, you can have your subject sharp and in focus while still getting the movement of the background. The flash illuminates your subject while the slower shutter speed captures the ambient light, making the background look blurry.
It’s perfect for those nighttime action shots, adding a sense of dynamism and mood to your images. You’ll often see this used in night photography or capturing action with a background that’s in motion.
Advanced Flash Techniques – Benefits and Drawbacks
| Technique | Description | Example Image Description | Use Cases |
|---|---|---|---|
| Fill Flash | Softly illuminates shadowed areas to balance lighting. | A portrait of a person outdoors under a shady tree, with the fill flash adding a subtle glow to the face, bringing out detail in the shadowed areas. | Outdoor portraits, indoor shots with limited light, balancing harsh light. |
| Red-Eye Reduction | Reduces the red-eye effect by pre-flashing to adjust pupil size. | A close-up portrait of a person with their eyes looking natural and not red, as opposed to an example with red-eye. | Close-up portraits, group photos, any situation where red-eye is a concern. |
| Slow-Synchro | Combines flash with a slow shutter speed to capture both sharp subjects and blurred background motion. | A photo of a person walking down a city street at night, with the person sharp and the street lights blurred, conveying a sense of motion. | Nighttime action shots, capturing motion blur in a background. |
Troubleshooting Flash Issues
Yo, flashin’ issues with your Minolta Maxxum 5000? Don’t sweat it, fam! This ain’t rocket science. We’ll break down common problems and how to fix ’em, so you can get those perfect shots without any fuss.Understanding the potential culprits behind flash malfunctions is key. Sometimes it’s the camera, sometimes the flash itself, and sometimes it’s just a simple battery problem.
Let’s get into the nitty-gritty!
Identifying Common Flash Attachment Problems
Common flash attachment issues often stem from straightforward causes. Pay close attention to these common problems and their likely sources.
- Flash won’t fire at all. This could be a problem with the flash itself, the camera’s settings, or the batteries. It might also be a loose connection somewhere. Check all the connections to make sure everything’s snug.
- Flash fires inconsistently. Inconsistent firing could indicate a weak battery, a faulty flash unit, or a problem with the camera’s flash synchronization settings. Try fresh batteries, and ensure your camera’s settings match the flash’s capabilities.
- Flash fires but the light is weak. This could be a weak battery in the flash, a faulty bulb, or a problem with the flash’s internal circuitry. Replacing the batteries or the flash unit itself might be necessary. It could even be a problem with the camera’s flash metering system.
Diagnosing the Problem
Pinpointing the exact source of the issue is crucial. Here’s a systematic approach:
- Check the Batteries: Weak or dead batteries are a frequent culprit. Replace the batteries in both the camera and the flash with fresh, fully charged ones. A multimeter can help determine the actual voltage, if you have one. This is important to confirm the battery’s capacity.
- Inspect Connections: A loose connection between the camera and the flash can lead to problems. Carefully check all connections and ensure they are secure and properly seated. Try reconnecting the flash unit several times. Clean the connection points with a soft cloth if they appear dirty.
- Verify Camera Settings: Make sure the camera’s flash mode is set correctly. It might be set to “flash off,” or you might need to adjust the flash compensation or other relevant settings. Consult your camera’s manual for specific details.
- Test with Different Settings: Experiment with different flash modes (e.g., fill-in, red-eye reduction). If the problem persists across different settings, the issue might lie with the flash unit itself. Consider if the problem is dependent on the scene or subject matter.
- Examine the Flash Unit: If all else fails, the flash unit itself might be faulty. Try another flash on your camera to rule out any issues with your camera. If a different flash works correctly, the issue is likely with the flash unit you’re using.
Determining the Culprit
Is it the camera, the flash, or the batteries? This systematic approach can help:
| Issue | Likely Culprit | Action |
|---|---|---|
| Flash won’t fire at all | Flash, Camera, or Battery | Check batteries, connections, camera settings, test with a different flash. |
| Flash fires inconsistently | Batteries, Flash, Camera settings | Replace batteries, inspect connections, review camera settings, try another flash. |
| Flash fires but light is weak | Batteries, Flash | Replace batteries, check flash bulb, check camera settings. |
Frequently Asked Questions (FAQ)
- Q: My flash won’t work even after replacing the batteries. What should I do?
- A: Check the connections between the camera and the flash, verify camera settings, and try using a different flash. If the problem persists, the flash unit might be faulty.
- Q: I’ve tried everything, but the flash still won’t work. What else can I do?
- A: Contact a qualified technician for professional diagnostics and repair. If it’s out of warranty, you might consider a replacement.
Using Flash in Different Scenarios
Yo, flash photography fam! Now that you’ve got the basics down, let’s dive into how to use that Minolta Maxxum 5000 flash in various situations, from cozy indoor portraits to epic outdoor action shots. We’ll cover how to adjust your camera settings for different environments and lighting conditions, making sure your shots pop!Understanding how to use your flash in different settings is crucial for capturing stunning photos.
Different shooting situations require different flash settings to get the best results. Choosing the right flash mode and adjusting camera settings accordingly will greatly impact the final outcome of your photos. Let’s get into the nitty-gritty!
Indoor Portraits
Indoor portraiture often requires a little extra help from the flash. Direct flash can lead to harsh shadows, making your subjects look unflattering. To achieve softer, more natural-looking portraits, try bouncing the flash off the ceiling or a wall. This diffuses the light, creating a more even and appealing illumination. Experiment with different angles and distances to find the perfect balance between light and shadow.
Remember to adjust the ISO and aperture to control the ambient light, ensuring a balanced exposure between the flash and the room’s lighting.
Outdoor Landscapes
Outdoor landscapes often benefit from flash in specific situations, like shooting during the golden hour or when you want to highlight certain elements. Using flash outdoors in broad daylight might seem counterintuitive, but it can be surprisingly effective. It can help you freeze action, fill in shadows, or create a dramatic effect. Consider using fill-flash to brighten up your subject or highlight details lost in the bright sunlight.
Experiment with different flash settings and distances to achieve the desired result.
Action Shots
Action shots, like capturing kids playing or pets running, often require fast shutter speeds to freeze motion. Using flash in these situations can be tricky, but it’s definitely possible. Using a high-speed sync mode (if your flash supports it) will allow you to use a faster shutter speed while still utilizing the flash. This will help you capture sharp, detailed action shots without blurring.
Practice and experiment with different shutter speeds and flash settings to find the right balance for your specific action shots.
Choosing the Right Flash Mode
Selecting the right flash mode is crucial for achieving the desired results. Different modes cater to different scenarios. Understanding these modes is essential for getting the most out of your flash.
- Auto Mode: This mode is great for beginners or when you’re not sure what settings to use. The camera automatically adjusts the flash power based on the lighting conditions. It’s convenient, but you might lose some control over the final image.
- Manual Mode: This mode provides complete control over your flash settings, allowing you to fine-tune the flash power, duration, and other parameters. It’s ideal for advanced users who want to experiment with different lighting effects.
- Red-eye Reduction: This mode helps minimize the red-eye effect, which can occur when flash photography is used indoors with dark backgrounds. It uses a pre-flash to adjust your subjects’ pupils to the flash.
Using the right flash mode and adjusting camera settings for the specific environment is key to getting the best results. This will give you more creative control over your images and help you to achieve the best outcome in various scenarios.
Understanding Flash Settings: Minolta Maxxum 5000 How To Use Flash Attachment
Yo, fam! So, you’ve got your Minolta Maxxum 5000 flash game on point. Now, let’s dive into the flash settings. Knowing how to tweak these settings is key to nailing those killer shots, whether it’s a candid pic or a product photoshoot. Different settings give you different vibes, and understanding them unlocks a whole new level of photographic control.Flash settings on your Maxxum 5000 are like having a secret weapon in your arsenal.
They let you fine-tune the flash’s power, timing, and behavior, making your shots pop in ways you never thought possible. This mastery is crucial for getting the perfect exposure and image quality in various situations.
TTL (Through-the-Lens) Mode, Minolta maxxum 5000 how to use flash attachment
TTL mode is like the auto-pilot of flash photography. The camera automatically measures the light and adjusts the flash power accordingly. This is super convenient for quick shots, especially in everyday situations. The camera “sees” the scene and decides the optimal flash output, making it easy to get a properly exposed shot without manual fiddling. This mode is great for capturing spontaneous moments.
Manual Mode
Manual mode is where you’re in total control. You directly set the flash power, sync speed, and other settings. This mode is perfect when you want precise control over the flash’s output. It lets you adjust the flash intensity to suit specific lighting conditions or creative effects. You’re the director of the light show! Great for controlled studio setups or situations where you want a specific look.
Red-eye Reduction
Red-eye reduction is a lifesaver for portraits. It’s a feature that prevents those pesky red eyes in your subjects. The flash emits a pre-flash to adjust the subject’s pupils, resulting in natural-looking eyes. This is a must-have feature to avoid those awkward red-eye disasters, keeping your portraits looking sharp and professional.
Flash Settings Table
| Setting | Description | Example Image Description | Explanation |
|---|---|---|---|
| TTL | Automatic flash power adjustment by the camera. | A candid shot of a friend laughing, well-lit and natural-looking. | The camera automatically calculated the flash power to capture the subject’s expression clearly and naturally. |
| Manual | Allows for precise control of flash power and settings. | A product shot with a soft, focused highlight on a specific area of the product, creating depth and dimension. | The photographer adjusted the flash power and angle to highlight the product’s texture and features. |
| Red-eye Reduction | Pre-flash to adjust subject’s pupils, preventing red-eye. | A close-up portrait of a person with natural-looking, black eyes, looking directly at the camera. | The pre-flash adjusted the pupils, eliminating red-eye and maintaining the subject’s natural expression. |
Closing Notes
In conclusion, mastering the Minolta Maxxum 5000 flash attachment opens up a world of photographic possibilities. This guide has provided a foundation for understanding different flash modes, settings, and techniques, allowing you to confidently use flash in diverse shooting situations. Remember to practice these techniques to fully grasp their impact on your images.
Helpful Answers
Q: What are the different flash modes available for the Minolta Maxxum 5000?
A: The Maxxum 5000 likely offers various flash modes, including automatic, manual, fill-in, and red-eye reduction. Consult your camera’s manual for specific details.
Q: How do I prevent red-eye in my photos?
A: Red-eye reduction is a feature often available on the camera and/or flash. Use this feature when taking portraits indoors or in low-light conditions.
Q: My flash isn’t working. What should I check first?
A: Ensure the flash attachment is properly connected, the batteries are charged, and the flash mode is set correctly on both the camera and the flash unit.
Q: What are the benefits of using fill flash outdoors?
A: Fill flash outdoors can help balance harsh sunlight, soften shadows, and brighten underexposed areas of your scene.
